Before we start
Build something you care about.
A complete app, not just an MVP. AI makes the rest doable.
- Useful.
- Complete.
- Yours.
McHacks · Interactive session
Don’t worry if you don’t know how to code at all. Come with a vision for your app: this talk will show you how to build it and get it into real people’s hands.
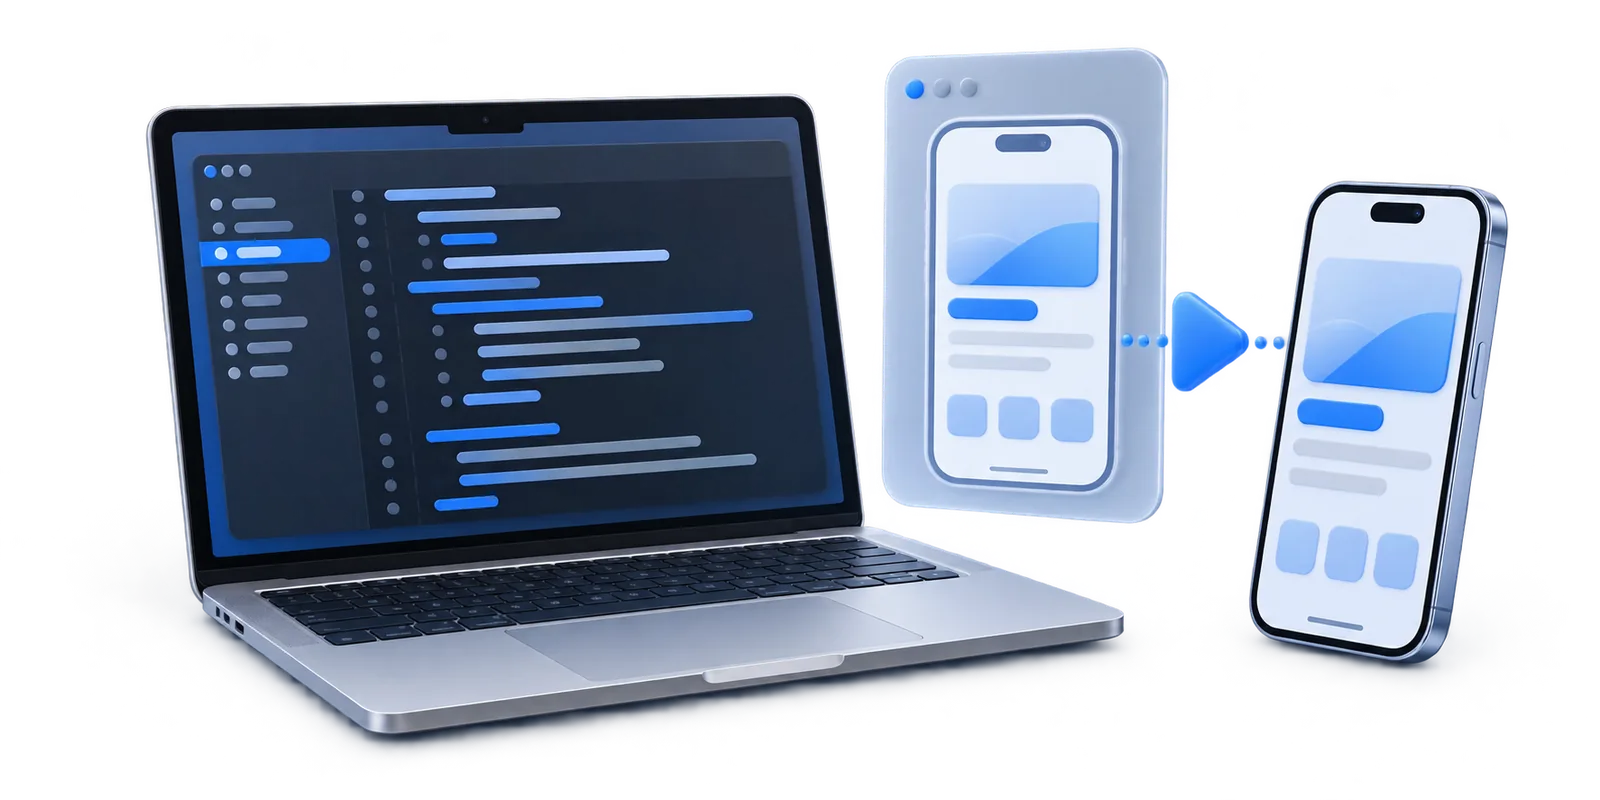
Before we start
A complete app, not just an MVP. AI makes the rest doable.
What we’ll do together
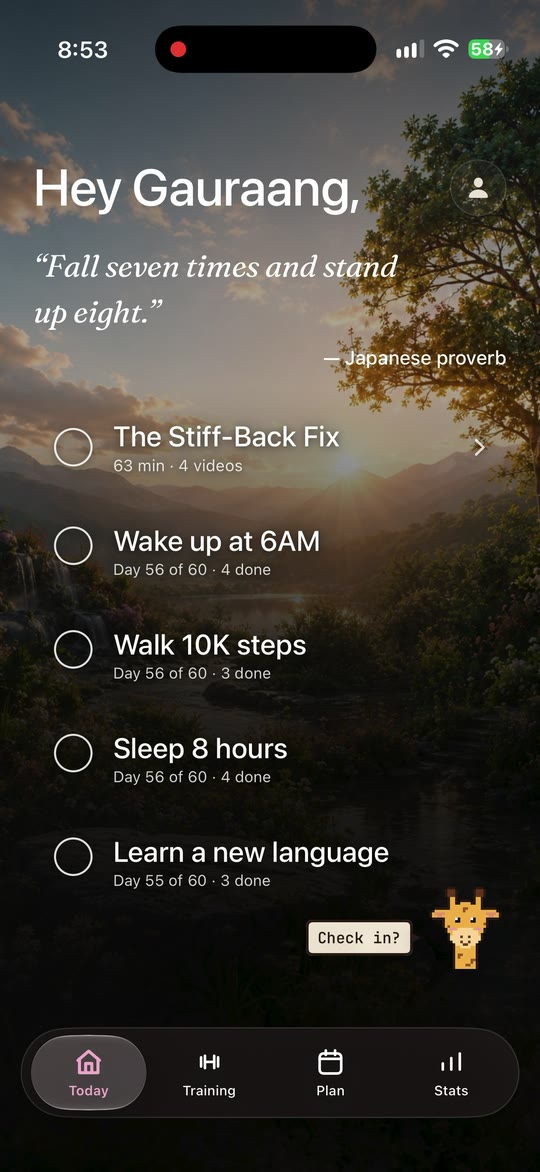 Part 1
With Commit, a wellness app already on TestFlight.
Why build an app?What an app can doDatabasesOpen Part 1 in the slides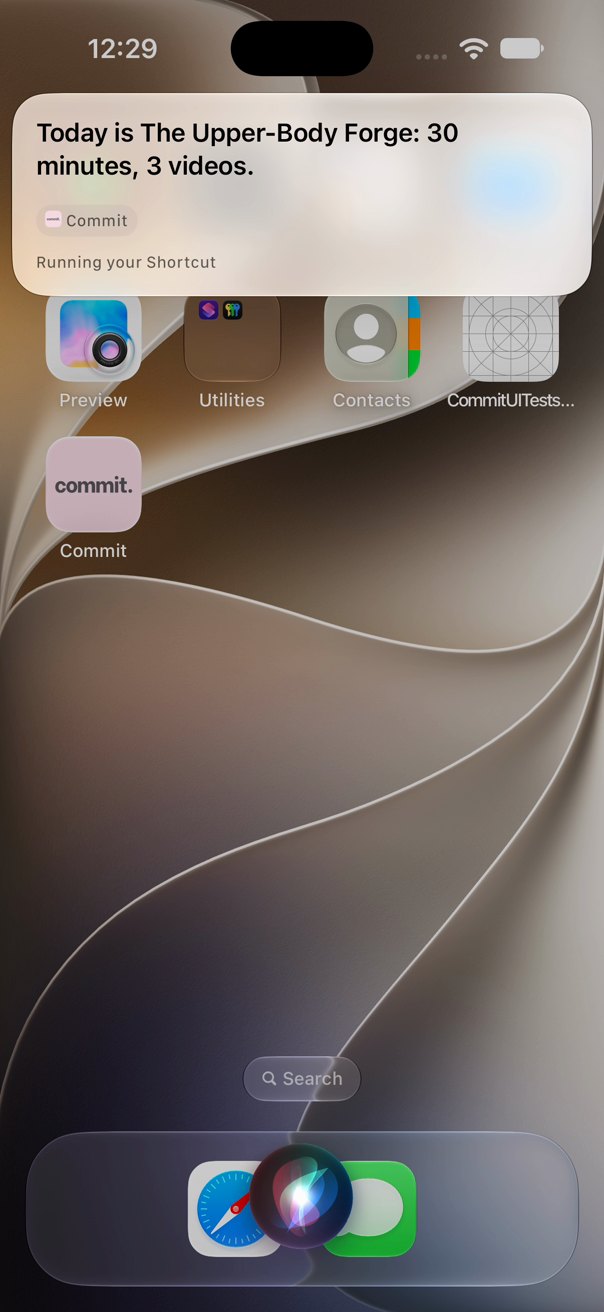 Part 2
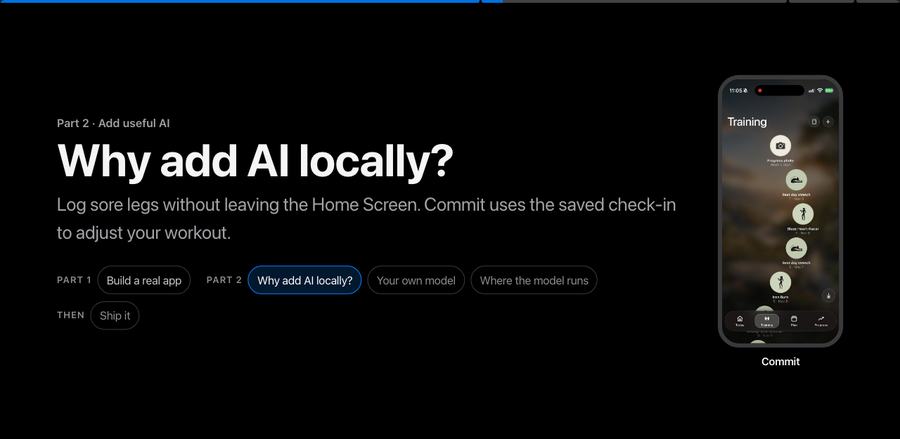
Siri and on-device personalization, inside Commit.
Why add AI locally?Train or bring your own modelWhere the model runsOpen Part 2 in the slidesThen: ship it to real phones, and look after it.
The example app
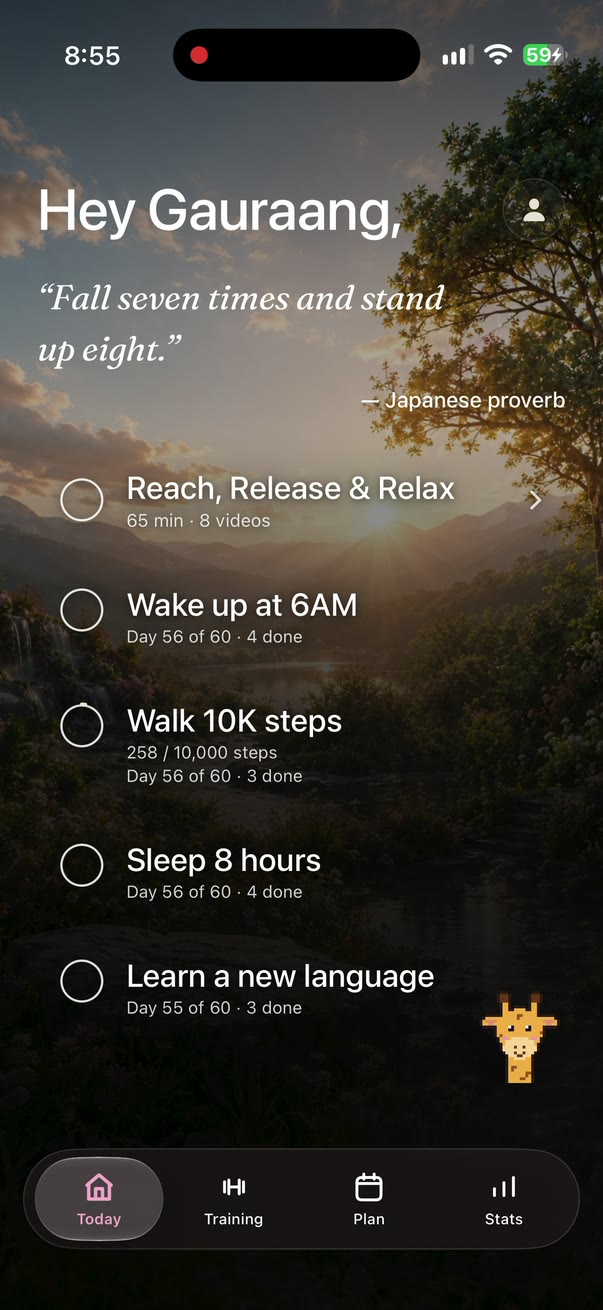
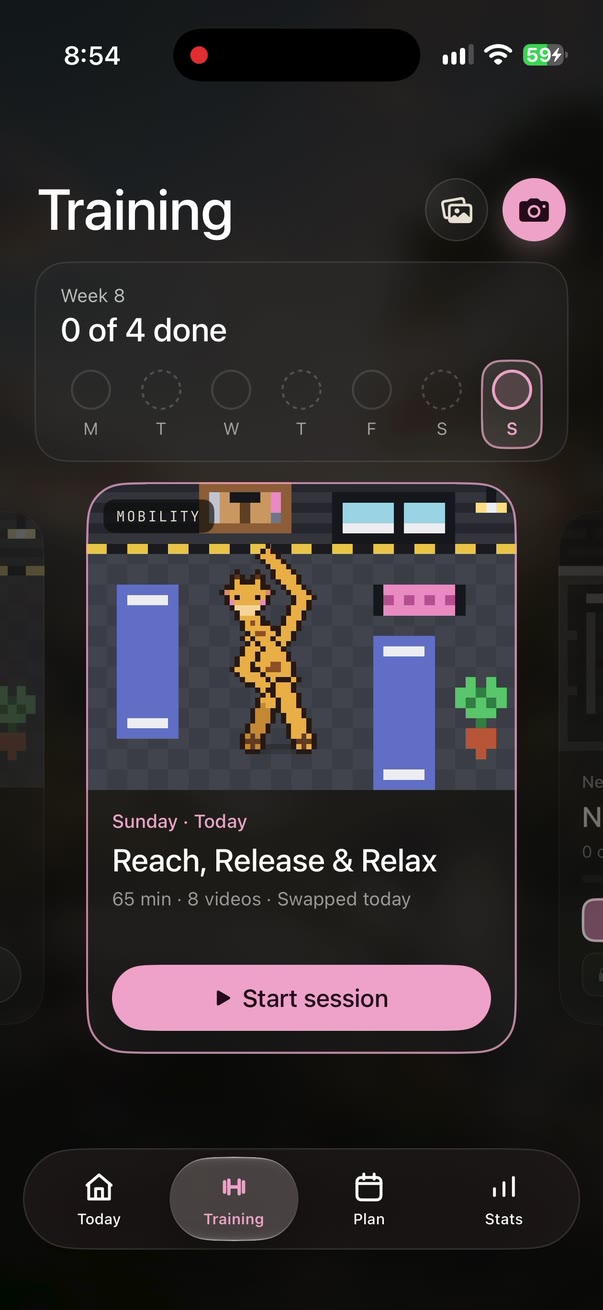
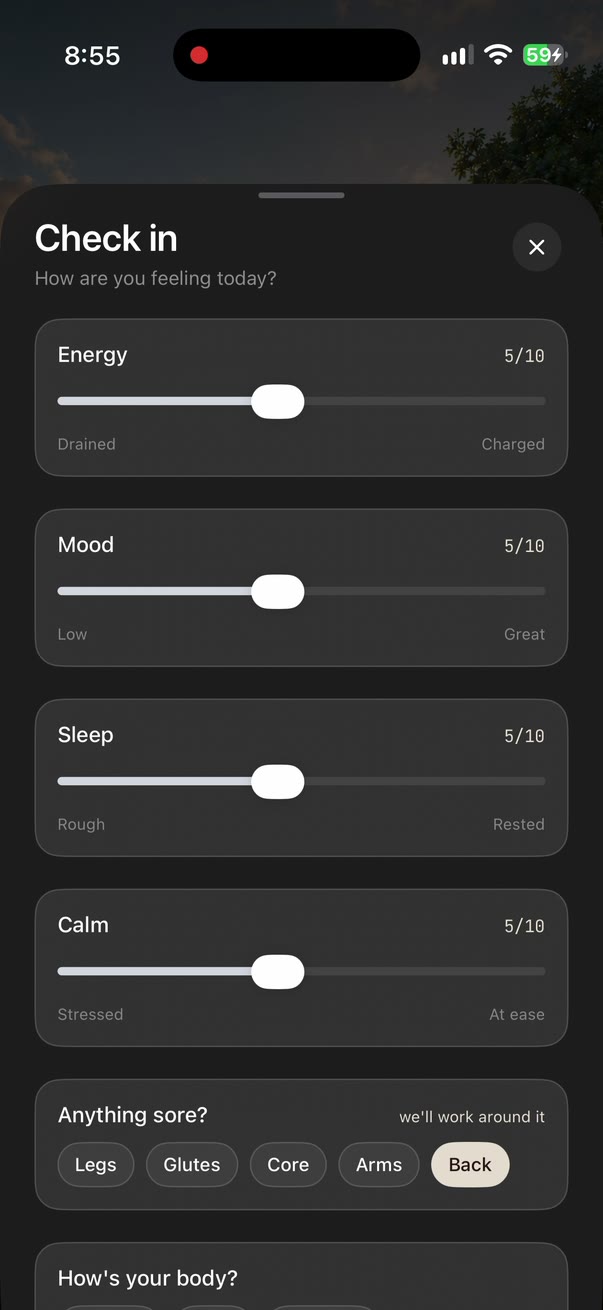
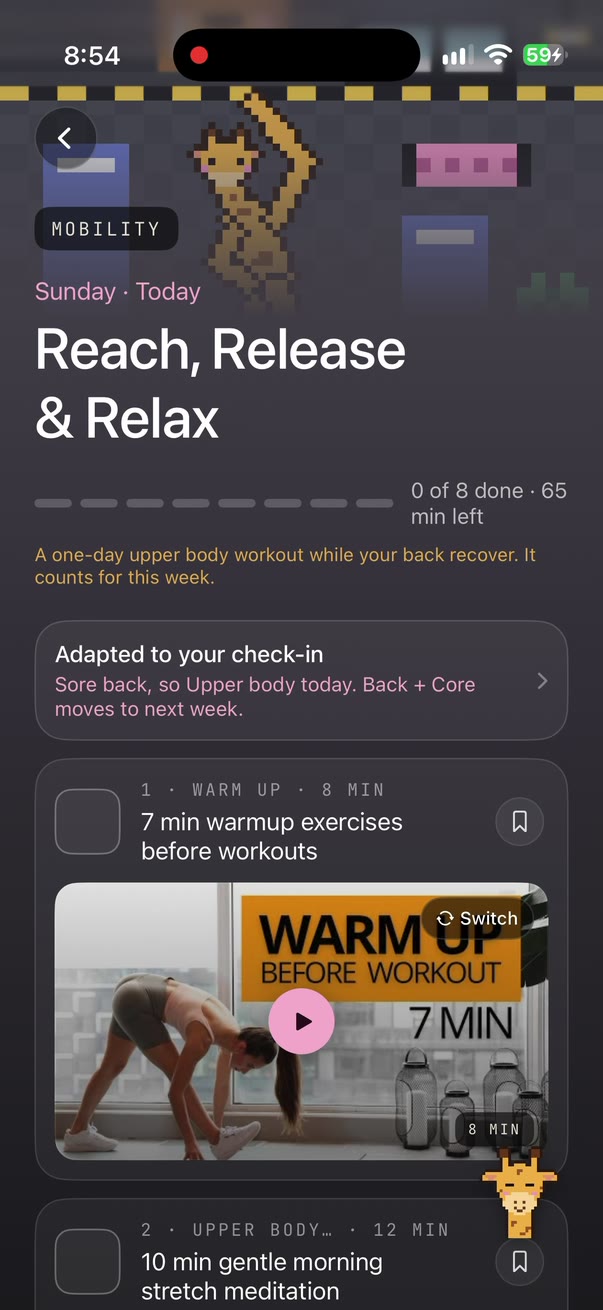
Built with Daniela Suarez, founder of Elovlo Inc.
The words we’ll use
In the order the talk explains them.
On the website too
Private Cloud ComputeCore AI and Core MLCreate MLMLXVisionSpotlight and app memoryWriting ToolsGenmojiApple’s model in Terminal
Part 1 · 17 minutes
Two real apps: Commit, a wellness app on TestFlight, and Passage, a Montréal métro app we built.
Overview
Start with app development, or explore how to add AI features to your app.
Part 2 · Add useful AI
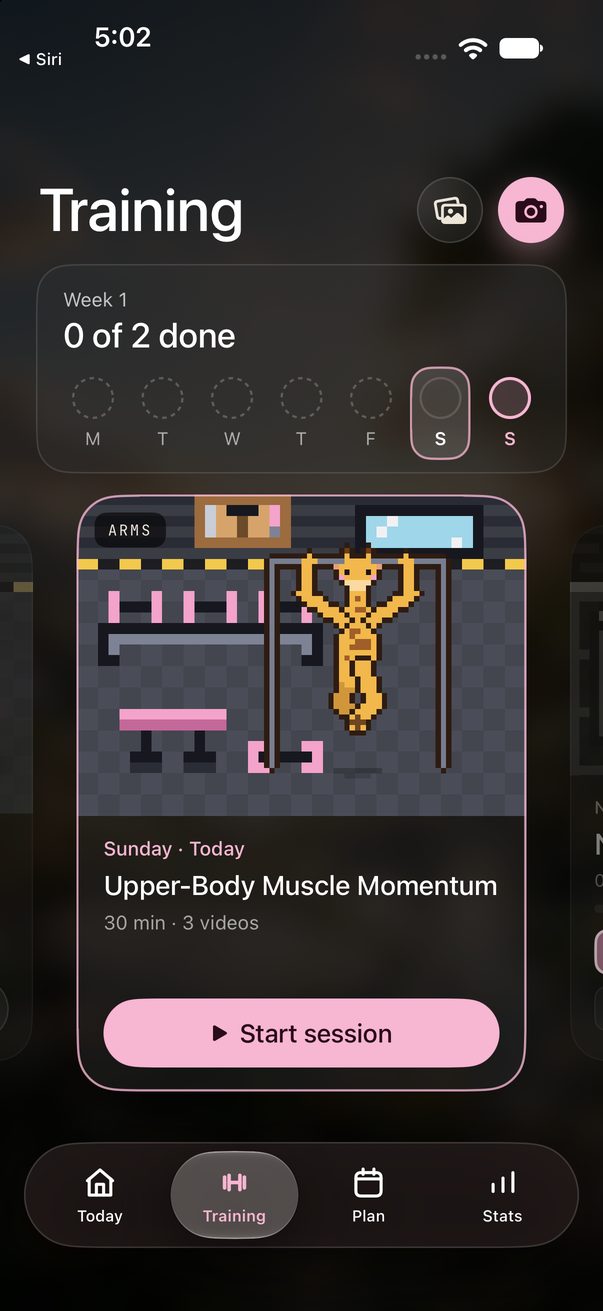
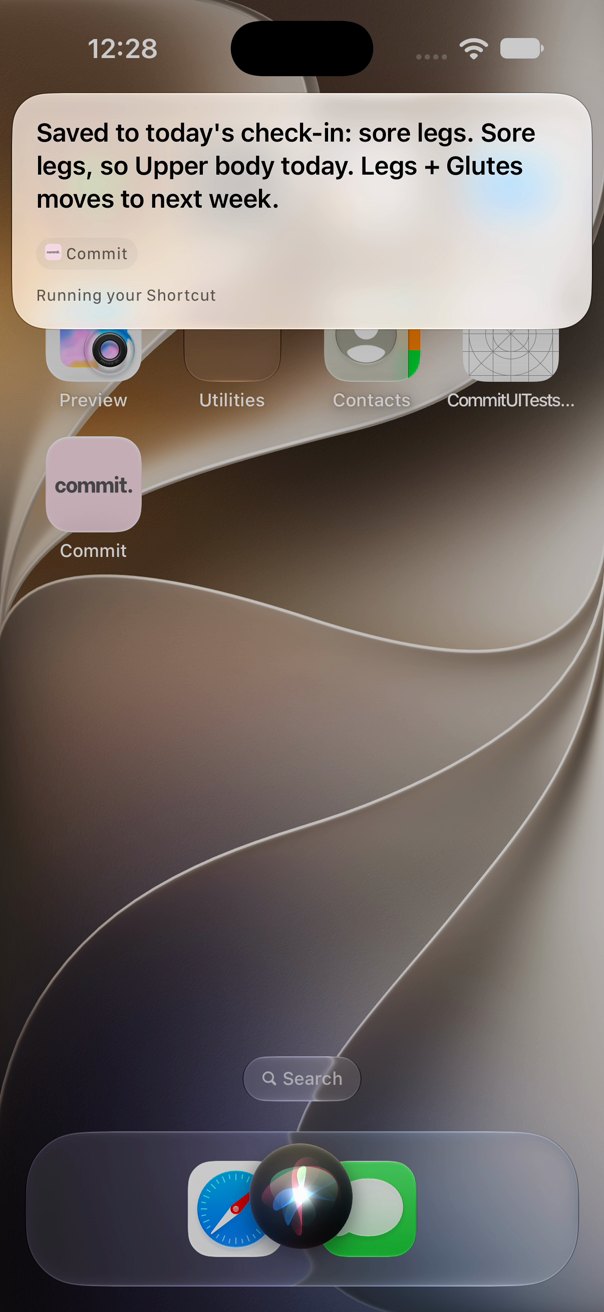
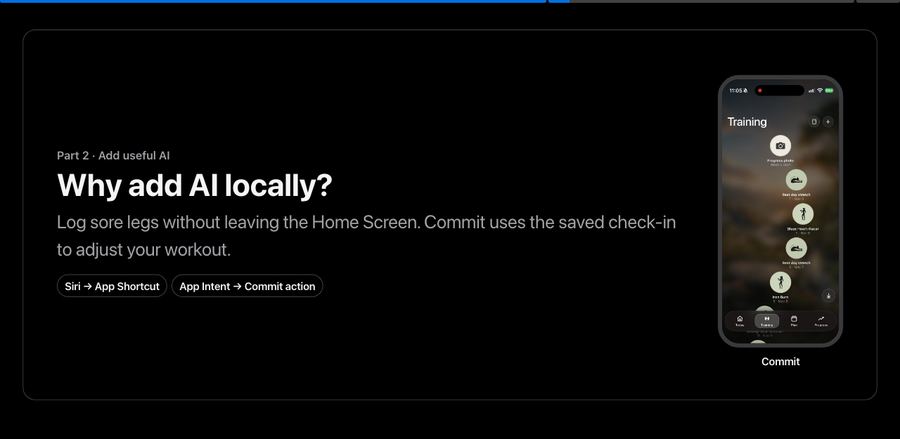
Log sore legs without leaving the Home Screen. Commit uses the saved check-in to adjust your workout.
Overview
Choose a framework for your feature. Open a technology to see how it works.

New in iOS 27: convert a PyTorch model once, then run it on the phone’s CPU, GPU and Neural Engine. Your data stays private and the cloud bill is zero. Open the slide

Use Apple’s language model from Swift. It runs on the iPhone, so it’s private, free and offline, and it can return typed Swift values instead of loose text. For longer reasoning, one line switches to Private Cloud Compute*, Apple’s bigger cloud model. Open the slide

Name what’s in a photo, read its text, and find faces, body poses and barcodes. Vision’s ready-made requests need no training and run on the device. Open the slide

Turn speech into text with SpeechAnalyzer and SpeechTranscriber. It runs on the device, so you can caption a lecture without sending audio to a server. The model downloads the first time you use it. Open the slide

Natural Language, Translation and Sound Analysis take a few lines each. Tag names, places and mood, translate text, or name one of 300+ sounds. Open the slide

Train a model on your Mac with Create ML, or convert one from PyTorch, TensorFlow or scikit-learn with coremltools. Drop the file into Xcode and it runs on the CPU, GPU and Neural Engine. Open the slide

Core ML and MLX already use the GPU through Metal. Write your own kernels, or use Metal 4’s tensors, when no framework has the operation you need. Measure first. Open the slide

Run open models on your Mac with MLX, Apple’s open-source stack. Chat with a 3B model, fine-tune it, or serve it to Xcode and your app through a local, OpenAI-compatible server. Open the slide
Part 2 · The words we’ll use
Part 2 uses eight terms. Which do you already know?Which of these have you heard before?
In the order we explain them
Also on this website: Private Cloud Compute, Core AI and Core ML, Create ML, MLX, Vision, Spotlight and app memory, Writing Tools, Genmoji and Apple’s model in Terminal.
Follow along
Each Part 2 slide names its word at the top.
Eight words, one app. Passage shows each one.
Start with one useful task. Choose a model, give it app context and tools, then test the result.
 new
Choose where the model runs: on the device, in Apple’s cloud, with another provider or with your own model. Use the same session API.
Read more new
Bring a PyTorch model into your app and run it on the phone with Core AI.
Read more new
Give the model station and route tools, then inspect what ran. Check external service access separately from where the model runs.
Read more new
Try prompts and typed output from the command line or a Python notebook before adding the app interface.
Read more new
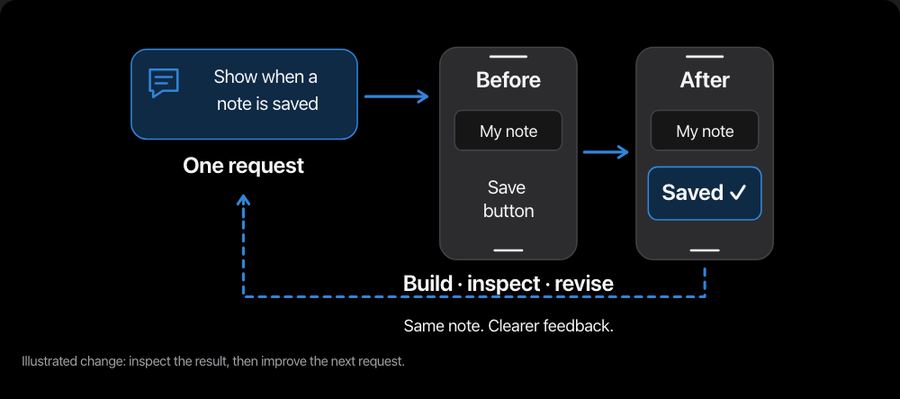
Describe one bounded change, build and preview it, then inspect the result before the next iteration.
Read moreiOS 27, Xcode 27 and macOS 27
Take five to six minutes to learn why we use Swift, what to install, how to improve code with a language model, and how an app reaches your phone and the App Store. Then explore AI through Passage.
Chapter 1 of 4
First, the basics of building and sharing an app. Then Passage shows how models, useful context and actions fit together.
Today
Part 1 · 17 minutes
With Commit, a wellness app already on TestFlight
Part 2 · 14 minutes
Commit · Siri and on-device personalization
Then: ship it, then look after it · 1.5 min
 New to app development?Swift, setup, coding with AI, GitHub, backend choices and your first release.Open →
 1 · Build the app
Learn the setup, code, data and release steps through your own app.
 2 · Add an AI feature
Connect a model, inspect its sources and check the action it proposes.
 3 · Keep improving
Test it with people, fix what breaks and make the work useful.
Your idea. Your app. Your decisions.
We start with a 5½-minute app-development primer. Everything else, including the parts we skip today, is on this page to read later. Sources appear under each topic.
App development in 5½ minutesApp basics
One app for Android and iOS, or a direct route into Apple’s newest AI?Which path fits our app?
A framework using React and JavaScript or TypeScript to build Android and iOS apps.
Swift is the language; SwiftUI builds the interface. We target Apple devices.
Foundation Models provides a native Swift API. Swift gives this workshop direct access to the AI features we will demonstrate.
What the update unlocks
New system APIs and AI capabilities become building blocks for our own apps.
Check the feature’s OS, hardware and model availability. An OS update alone does not enable every AI feature.
React Native can connect to native APIs through modules. Swift keeps our Apple-focused workshop direct.
App basics
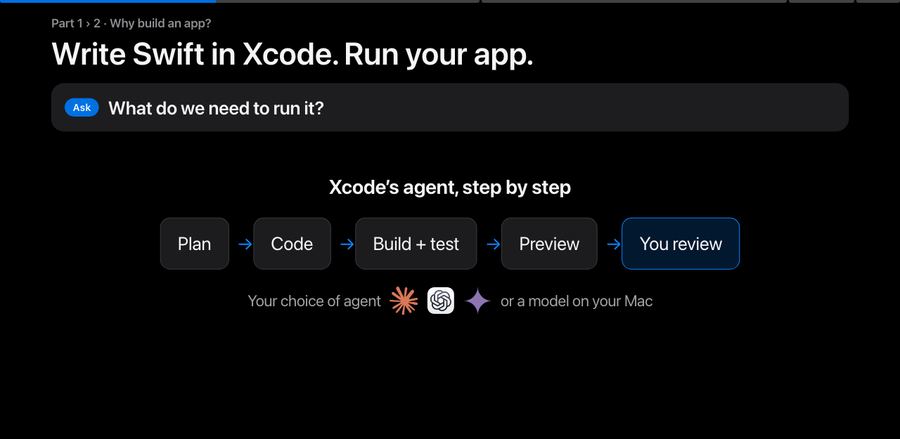
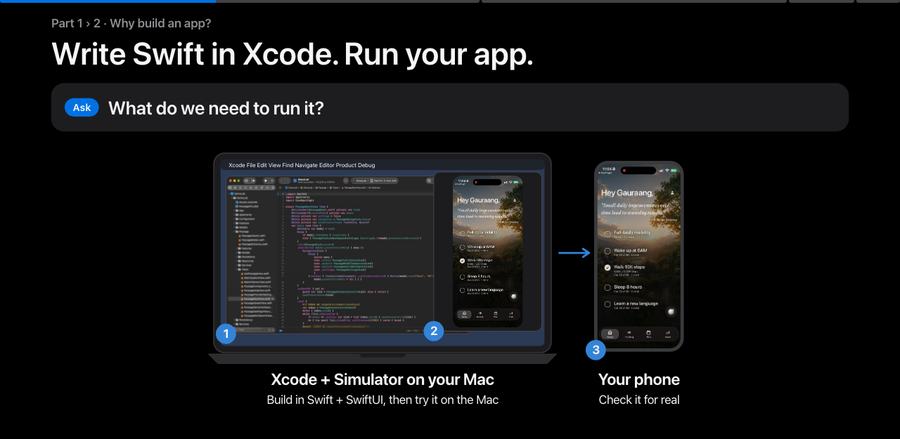
What runs the app before it ever reaches your iPhone?What do we need to run it?
Xcode’s agent, step by step
Your choice of agent

 or a model on your Mac
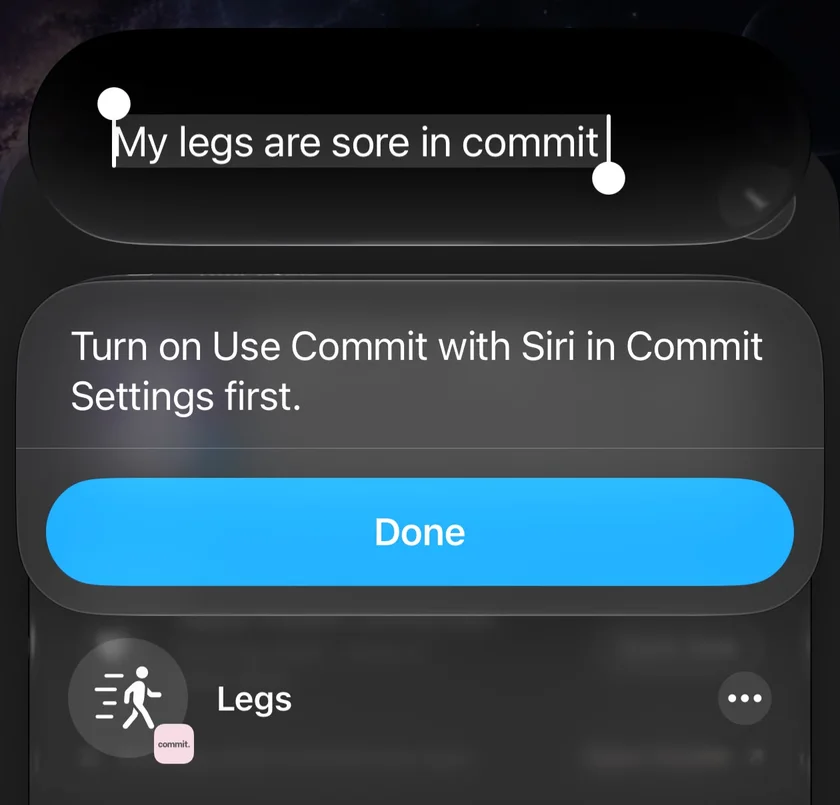
The Simulator can’t catch everything. On my iPhone, Siri said: Turn on Use Commit with Siri in Commit Settings first.
Settings, permissions, Siri and notifications only show their real behaviour on the device.
Install → choose → run
Xcode is the workshop. Simulator is a test phone running on your Mac; it uses the Mac’s resources.
App basics
What can an iPhone app reach that a website cannot?What can trigger an app action?
The phone itself, and the things around it
Safari on iPhone supports neither Web Bluetooth nor Web NFC, and the web has no Ultra Wideband API. None of these features needs AI: the phone itself is the feature.
Pick one that fits your idea
None of these need AI. The phone itself is the feature.
Core Haptics · Core Bluetooth · AccessorySetupKit · Core NFC · Nearby Interaction · WidgetKit · HomeKit · Wi‑Fi Aware · Web NFC support · Web Bluetooth support
App basics · 45 seconds
The coding assistant says “done.” How do you know the change works?What is one useful change?
TestFlight · What to test
“test the workout plans”
One note per build, for the people testing it.
A useful request
“Show a clear confirmation when a note is saved. Keep the existing data and saving logic. Build it and tell me how to check the result.”
Give the next prompt evidence
Share the exact build error, screen or failed action. Review the changes, try the result, then save a working checkpoint in Git.
The coding assistant builds the app. The AI inside the app is a separate component.
Learn the layers as you build: app logic → data → model → actions → evaluation. Today we use an existing model.
Databases
If we change what people see, do we also need to change what we save?Commit asks if you track your cycle. App change, or database change too?
Who needs the answer?
Only this phone → app change.
Another device or the server → database change too.
A release-first convention
main at the publicly released app’s source.main to that source and tag it.Keep the published edition on one shelf and the next draft on another. You can keep writing during review.
This is one Git convention, chosen for a clear shipped-version reference. Apple reviews an uploaded build, not your GitHub branch. Approval can precede a manual release.
App basics
Does saving a favourite, a note or a photo always need a server?What needs to be saved or shared?
SwiftData or local files can store the app’s records. Secrets belong in the Keychain.
Firebase is one option: Authentication handles sign-in, Firestore stores records and Cloud Storage holds files. Compare Supabase, AWS and CloudKit below.
Firebase works with Apple, Android and web apps. It sits outside Apple’s ecosystem; it is an option when the product needs a backend.
Connect a backend deliberately
We explain the option here. A private app can keep notes on the device without a backend or upload.
Start with a notebook in your pocket. Add a shared notebook when people or devices need to share.
Firebase for Apple apps · Firestore access rules
| Option | Stores / connects | Useful benefit | Tradeoff |
|---|---|---|---|
| Firebase | Authentication; Firestore records; Cloud Storage files. | Mobile SDKs, realtime records and offline caching. | Document/query model; database and file rules; separate usage charges. |
| Supabase | Auth; Postgres records; Storage file buckets. | SQL tables and relationships with managed APIs. | Design schemas, row-level access and file policies; plan record and file backups. |
| AWS with Amplify | One route uses Cognito, AppSync, DynamoDB and S3. | Connect an app to AWS services and detailed access controls. | More service/permission choices; the underlying services have separate costs. |
| Apple CloudKit | Records and CKAsset attachments; private, shared and public databases. | An Apple-centered app can use the person’s iCloud account. | iCloud/account and quota constraints; a web API exists, but it is not the same cross-platform setup as the other options. |
Firebase files · Supabase Storage · Amplify services · CloudKit
Yes, with an appropriate storage service and supported limits. Store fields such as owner, item ID, note text and file path in a database. Store large attachments in local files or object storage, with a database record pointing to each file. For example, an item record can reference its attached photo in S3. Storing a file does not mean the selected AI model can interpret its format.
Amplify Swift can connect the app to AWS resources. In one architecture, Cognito handles identity, AppSync exposes the API, DynamoDB holds records and S3 holds photos or documents. Choose only the services needed. Use per-user authorization and temporary access or signed links where appropriate; do not distribute account-wide AWS credentials. Connect existing AWS resources.
Storage is not unlimited and free by default. Stored bytes, downloads, requests, database operations, compute and authentication features can have different meters. AWS offers depend on the account, credits and plan. Firebase file storage requires Blaze and billing even where qualifying usage has a no-cost allowance; Firestore database quotas are separate. Supabase also separates database, file and transfer quotas. CloudKit private data uses the person’s iCloud quota. These conditions were checked on 24 October 2026; consult the live pricing pages before choosing.
S3 pricing · AWS Free Tier · Firebase storage billing · Supabase plans
Local saving, sync and backup are different. Add shared storage when the product needs it, configure both record and file permissions, test allowed and denied access, and plan recovery. A budget alert is not a universal spending cap. Passage’s demonstration still saves its favourites and notes locally; no backend account or upload is needed. An AWS backend can be used with an on-device model: storage does not choose or train the model.
App basics
Which familiar phone feature could make your app more useful?What should the app be allowed to do?
Recorded in Commit
Built-in connections, explicit choices
Apple provides native APIs and familiar system screens. Add the required capabilities, request permission where needed, and test on a real device.
Websites can use Apple Pay too, with web and merchant setup. Native integration can reduce custom work; it still needs configuration.
Use the phone’s existing building blocks. The user decides what to share and which actions to take.
Apple Pay in apps and on the web · Mail and Messages · HealthKit permissions
App basics

What helps someone without making them reopen the app?What helps people between visits?
Recorded in Commit
Connect useful system experiences before integrating your own model: local reminders or remote push, widgets and Live Activities, and accessible feedback. Add them when they serve a concrete need.
Choose one experience
Ask for permissions at the relevant moment. Test supported devices, delivery, empty states and accessibility.
Be useful at the right moment, with the person in control.
These features can improve an app before it integrates its own model. Choose a concrete benefit, use the matching system API and request access only when the feature needs it.
The study-app example: a student has a Statistics exam tomorrow and chooses to revise today at 6 PM. A local notification invites them to review five saved practice questions. Tapping it opens that practice set directly at question one. The app requests notification access when the student enables the reminder, schedules the alert and handles its tap with ordinary app navigation. This example does not require an AI model. An exam-countdown widget, adaptable text, VoiceOver labels and visible confirmation can improve the same app further.
| Feature | Useful benefit | Setup or limit |
|---|---|---|
| App Intents | Selected actions in Siri and Shortcuts. | Expose entities, queries and actions deliberately. |
| Local notification | An app-created reminder. | Authorization plus a scheduled trigger; no push server required. |
| Remote push | An alert caused by a server event. | Provider server → APNs → device; registration and setup. |
| Widgets | Useful information outside the app. | WidgetKit timelines; system-controlled update budgets. |
| Live Activities | Progress on the Lock Screen or Dynamic Island. | ActivityKit state, updated by the app or its server. |
| Haptics | Tactile confirmation of an interaction. | Supported devices and settings; retain a visible cue. |
| Accessibility | Adaptable text and navigation. | Dynamic Type, VoiceOver, clear labels and adaptable layouts. |
| Apple Reminders | An entry in the person's Reminders database. | EventKit and Reminders access; distinct from an app notification. |
| Share sheet | Share content through familiar system choices. | Supply content; the person selects a destination. |
| Universal links | Open the relevant app content from a link. | Associated domains and a matching website association. |
Options for your own app, not claims that every feature is implemented in Passage. Sources checked 25 October 2026.
App basics
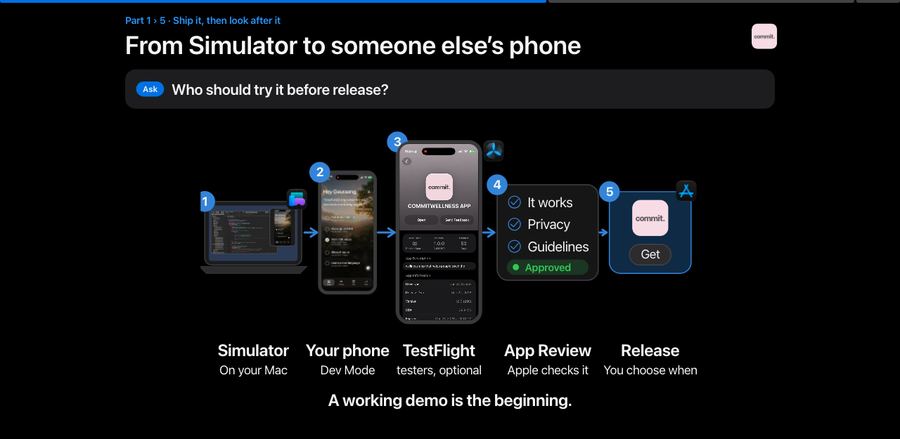
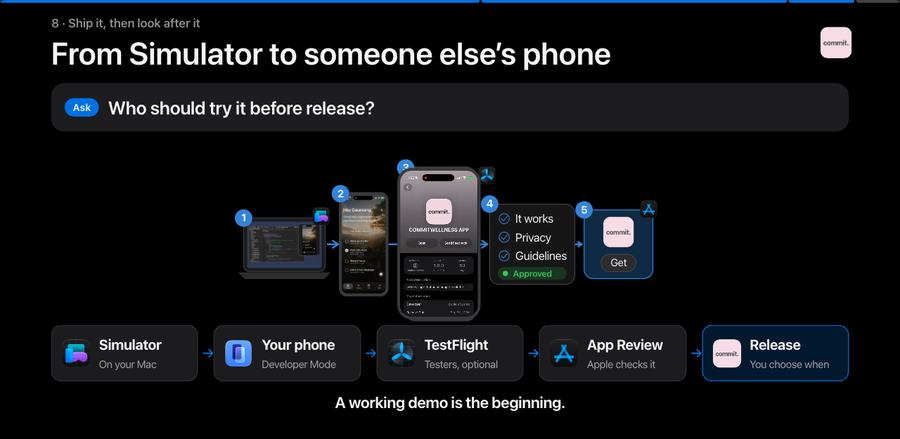
It works on the Mac. What do we check before sharing it?Who should try it before release?
 SimulatorOn your Mac
 Your phoneDeveloper Mode
 TestFlightTesters, optional
 App ReviewApple checks itReleaseYou choose when
A working demo is the beginning.
Own phone: pair, sign, enable Developer Mode and Run.
Sharing: upload a build, collect beta feedback, then submit for review.
Get it onto your own phone
Pair the iPhone with your Mac. Add your Apple Account and signing team in Xcode, enable Developer Mode on the phone, select it as the run destination and press Run.
Share a build, then submit
Archive in Xcode and upload to App Store Connect. Testers install TestFlight and accept your invitation. Collect feedback, fix issues, then submit a build with its listing, privacy details and review information.
Your test bench → your phone → beta testers → public release. Return to iteration whenever something fails.
A free Apple Account supports personal device testing with limits. TestFlight and App Store distribution need Developer Program membership. TestFlight is optional; external beta review is separate from App Store review.
In the timed talkIf time allows
Foundation Models
With Swift and the Foundation Models framework, the model is already on the phone. What does your app add?What does the model need from you?
The model ships with the phone
The app still checks what the model proposes before it acts on it.
Give it context
Same model for every app. Your context makes it yours.
Context
You tell Siri: “My legs are sore in Commit.” What does it need to know?
Your turnMy legs are sore.
“Sorry to hear that. Try to rest today.”
The model doesn’t know your plan or what to fill in.
My legs are sore.
“Sore: Legs. Commit moves legs to next week: upper body today.”
Same model, with the context it needs.
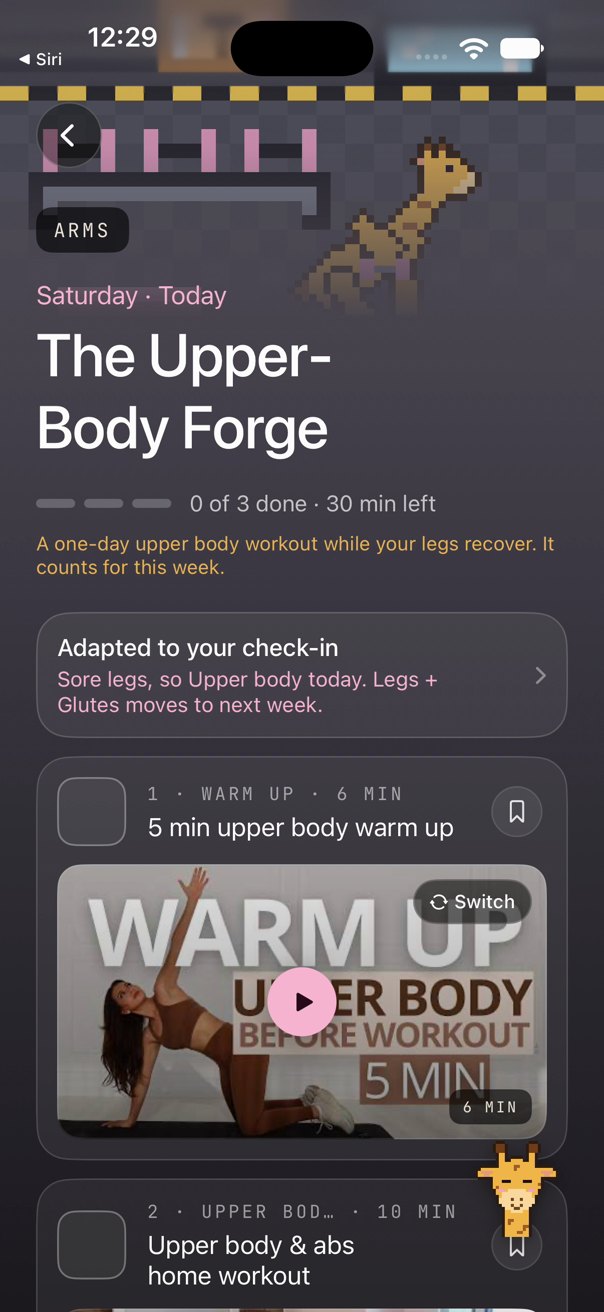
What you said, today’s plan and Commit’s own list of body parts give Siri useful context. Siri fills one field; Commit’s own rules decide the workout. These response bubbles are illustrations; the recorded screen shows the real result.
Words → a checked plan.
How to do it
// Siri may only fill a body part from Commit's list.
enum BodyPart: String, AppEnum {
  case legs, glutes, core, arms, back
}
struct LogSoreness: AppIntent {
  @Parameter var part: BodyPart
  func perform() async throws -> some IntentResult {
    try CheckIns.saveToday(sore: part)   // Commit's data
    Plan.adaptToday(for: part)           // Commit's rules
    return .result()
  }
}
The default model runs on the device. Enabled online tools can send requests to external services.
Like telling a coach how you slept before asking for today’s workout.
A persona is not a knowledge source. Commit’s App Intent tells Siri what it may fill: one body part from Commit’s own list (Legs, Glutes, Core, Arms, Back). What you said (“my legs are sore”) and today’s plan supply the facts. Siri fills the field; Commit’s own rules then check the plan: upper body today, legs move to next week.
For a factual question, retrieve the relevant source before answering instead of letting the model invent it.
RAG, in a larger app: split documents into useful passages, index them, retrieve relevant passages for the question, then supply those passages and source references to the model. Embeddings and a vector database are one implementation, not a requirement for every app. Retrieved content is context, not permanent training or a guarantee of truth.
Apple: instructions and tools · Retrieval and semantic search
Tools
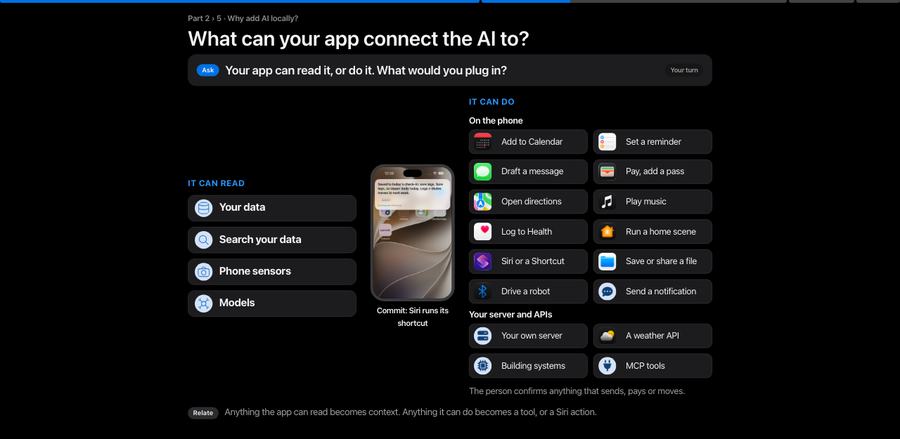
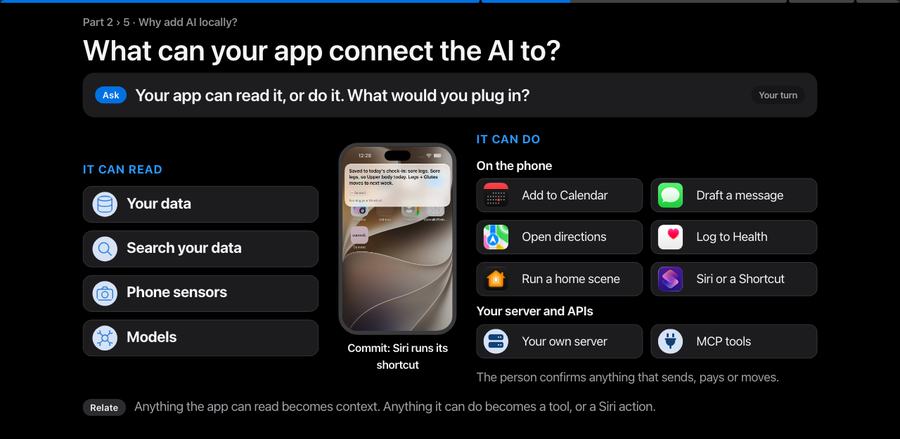
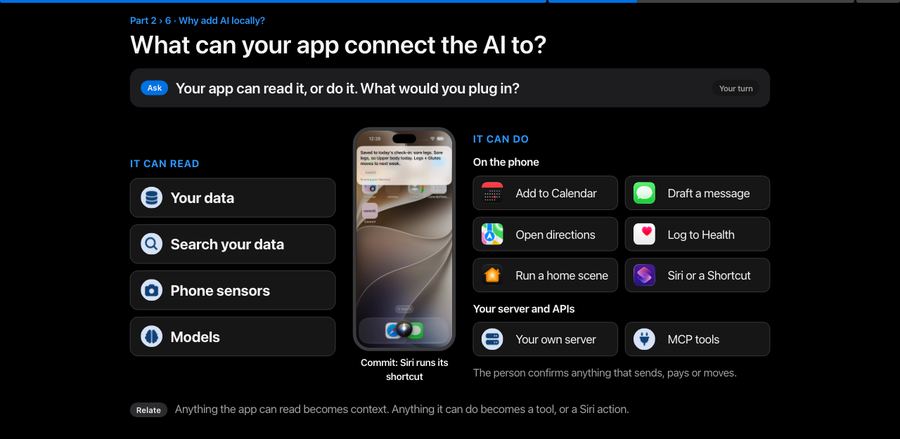
Your app can read it, or do it. What would you plug in?
Your turnIt can read
It can do
On the phone
 Add to Calendar
 Set a reminder
 Draft a message
 Pay, add a pass
 Open directions
 Play music
 Log to Health
 Run a home scene
 Siri or a Shortcut
 Save or share a file
 Drive a robot
 Send a notification
Your server and APIs · the request leaves the phone
 Your own server
 A weather APIBuilding systemsMCP tools
The person confirms anything that sends, pays or moves.
The limits: its own sandbox · the user’s permission · short background time · a small on-device context.
Anything the app can read becomes context. Anything it can do becomes a tool, or a Siri action.
Foundation Models · App Intents · Core Spotlight · HomeKit · Core Bluetooth · EventKit · PassKit · MusicKit
Why build an app?Start here · Why an app
Who has built a website? What did you need besides the code?Who has built a website? What would an app add?
Both can use a backend, and both need deliberate data choices. This workshop chooses a native app for direct access to the Apple AI and system features being demonstrated.
Start this weekend
Android Studio and Google Play testing offer a comparable build, device-test and distribution path.
An app is personal: it lives in your pocket, right next to your data.
Start here · Xcode 27
Who has used AI to write code? What went wrong?
How to do it
WWDC26 · 382 Special presentation · 227 UI prototypes with agents
Like a pair programmer who can also run the build and the tests.
Start here · Coding agents
Which AI would you trust to write your app’s code? Why?
Your turnClaude Agent, Anthropic’s coding agent in Xcode. The one I used to build the app you’ll meet next.
OpenAI’s coding agent, also in Xcode.
Google’s agent, in Xcode 27.
Any agent through ACP, even an MLX model. Code stays on the Mac, but small models are weaker.
Compare them on Swift quality, cost, privacy (cloud agents send your code to the provider) and working offline. These agents write the app. The models your users run come later in the talk.
How to do it
WWDC26 · 382 Special presentation · 232 Local agents with MLX
Like choosing a pair-programming partner: give two the same task and compare.
Overview
Commit’s data choices and Passage’s working AI features.
Two real apps, two data choices
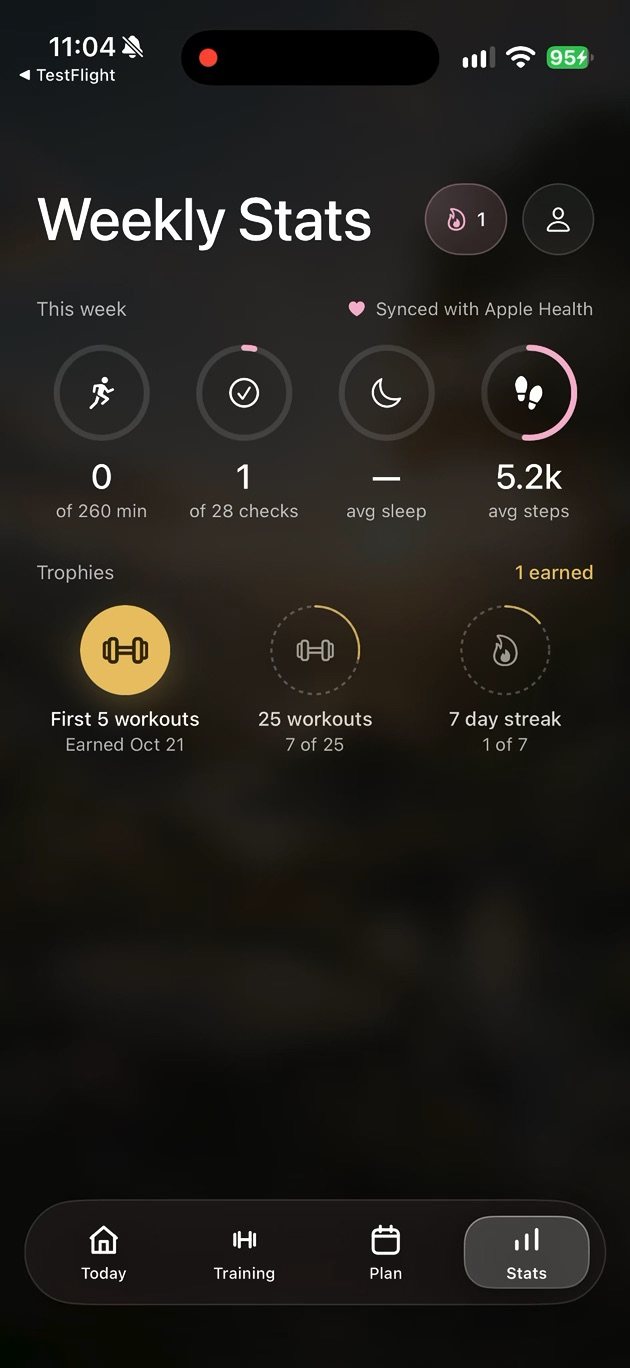
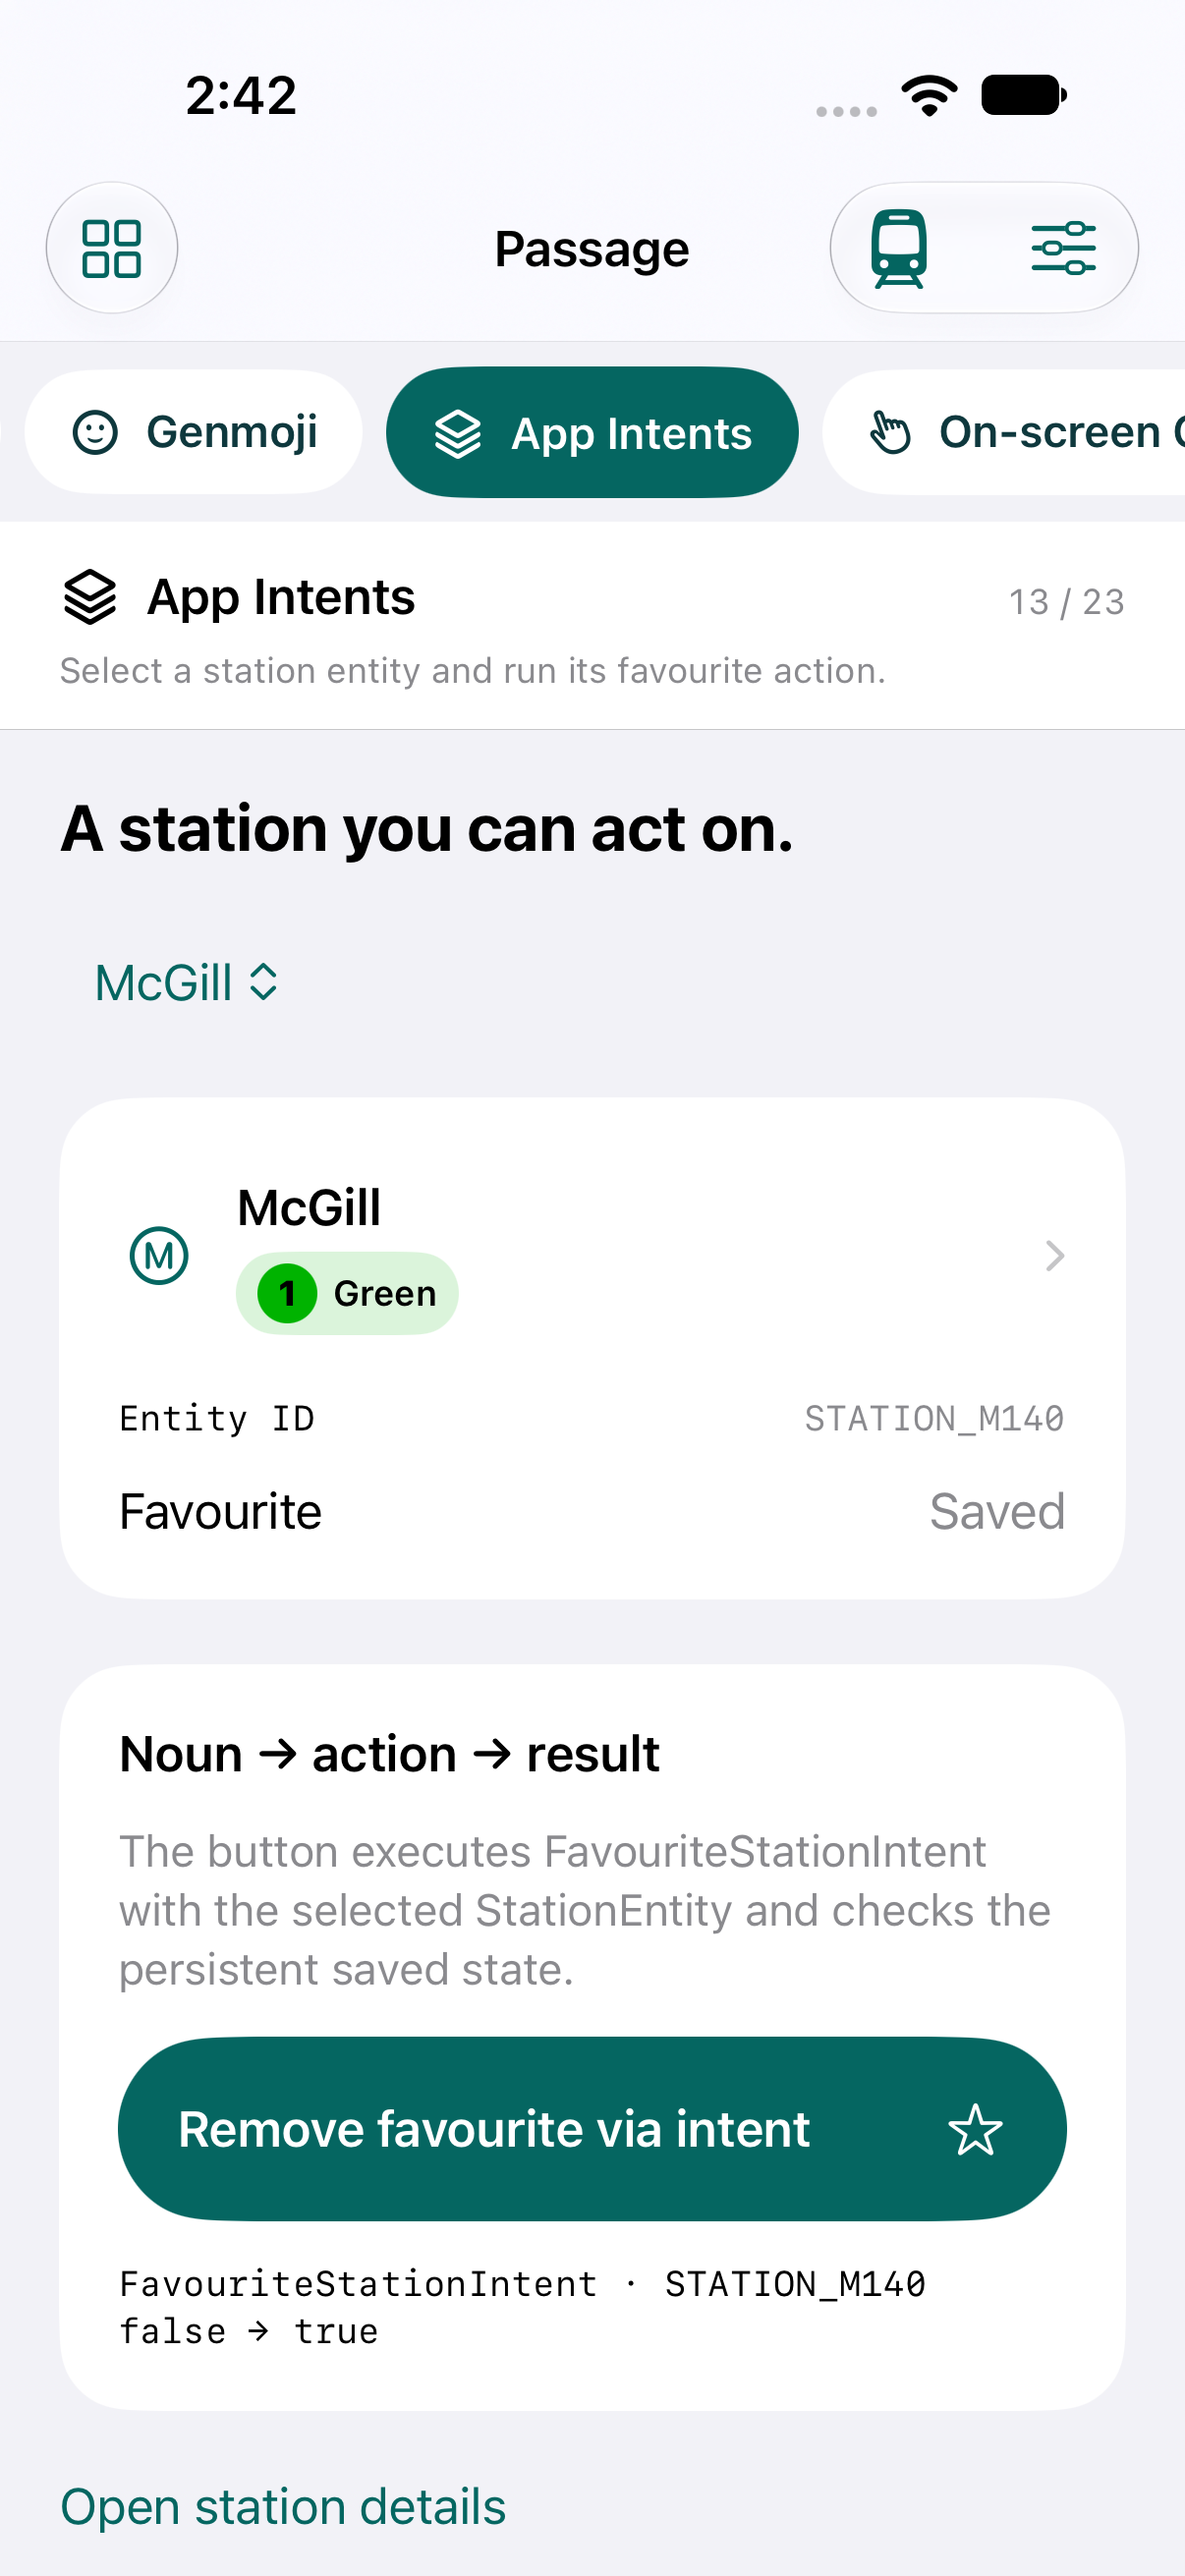
Commit: TestFlight · Passage: recorded Simulator capture
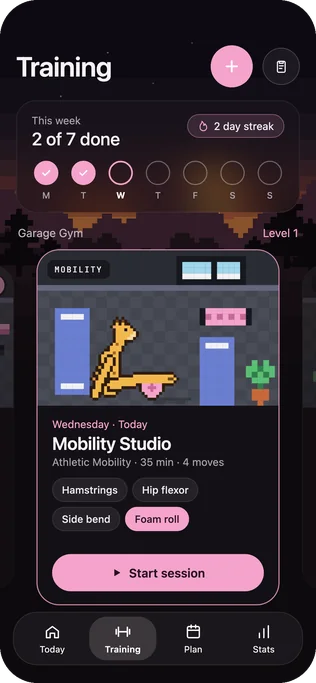
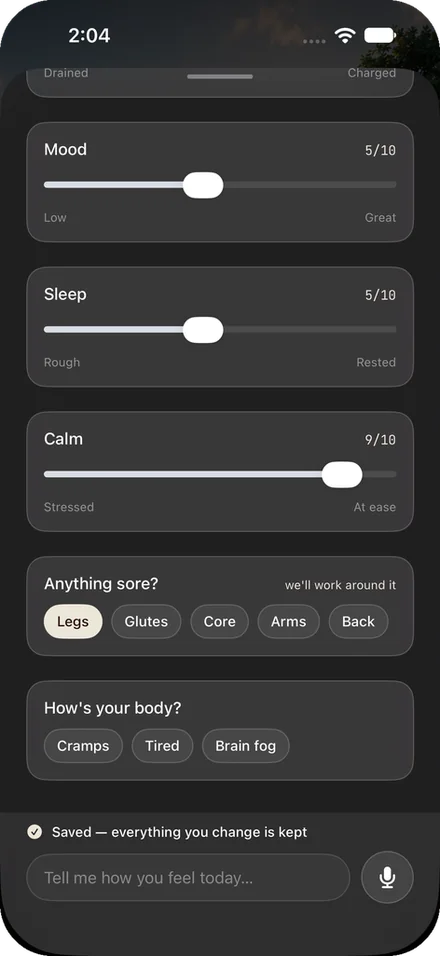
A wellness app for women reads Apple Health on the device and never uploads it.
Read moreOnly sign-in, the plan and check-ins reach Commit’s cloud, and each person is locked to their own data.
Read moreA Montréal métro app with model answers, validated journeys and saved actions.
Read more
Scan once and your phone follows the talk. Suggest a small improvement to Passage, choose one to try, and answer live questions as we go.
Answer live questions
Try three things this week, from the fm command to a Siri action, then read the sessions and open-source projects behind the talk.
See all resources*Private Cloud Compute has no cloud API cost if your app is in the App Store Small Business Program and has fewer than 2 million first-time downloads (developer.apple.com/machine-learning).
Choose the framework for your feature: language, images, speech, your own model or app actions. Start with a built-in capability, then evaluate the result.
Chapter 2 of 4
Choose the framework for your feature, then add the app context and actions it needs. Open a technology to explore its topics below.
App actions, system features and evaluation
Technologies · The toolbox
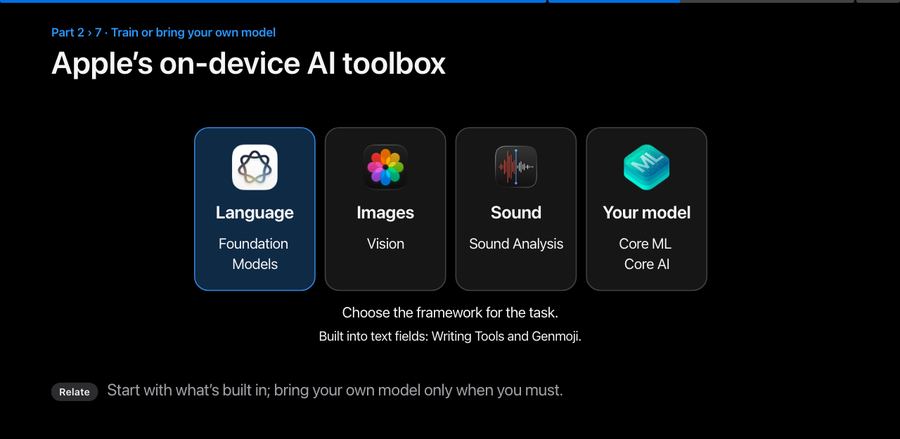
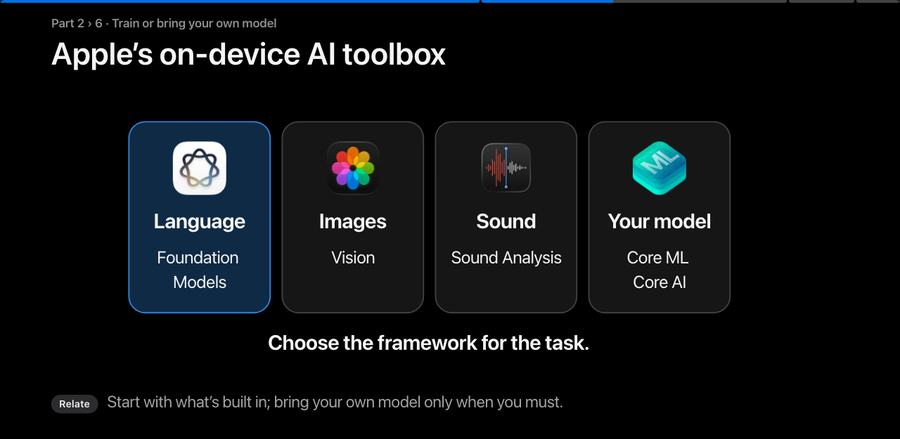
Choose a framework for the job: language, images, sound, or your own trained model.
Natural Language · Translation · Sound Analysis: a few lines eachMLX: train and fine-tune on a Mac Metal: models on the GPU
Apple: “Create intelligent features … by leveraging powerful on-device machine learning.” Private Cloud Compute has no cloud API cost for apps in the App Store Small Business Program with fewer than 2 million first-time downloads.
Apps built this way (Apple’s developer stories)
developer.apple.com/machine-learning · /core-ai · /foundation-models-framework
Start with what’s built in; bring your own model only when you must.
 Foundation Models
On-device model
Can we try an AI feature without signing up for another paid service?What can it reach without leaving the phone?
Start local; compare when needed
Try the task on supported hardware, check the result, then decide whether a hosted model’s benefits justify its setup and cost.
Keep a shared provider API key on a backend, outside the distributed app and GitHub. A local model still uses device memory, storage and power.
Fewer accounts and moving parts make the first useful experiment easier to start.
On-device Foundation Models · Provider keys and secure access
| Task | Apple on-device model | What a hosted model can add |
|---|---|---|
| Text and typed answers | Summarize, rewrite, classify and extract fields from supplied material. | A larger model may suit harder tasks; compare the actual result. |
| App data and actions | Use the context and tools the app exposes, including local records. | Use app tools too; supplied context and tool results reach the remote model. |
| Current information | An app-provided tool can fetch a service API or web search while inference stays local. | Managed search with citations, when explicitly configured; an API key alone does not enable it. |
| Images | OS 27 supports image input on supported devices. Vision OCR is a separate operation. | Model-dependent image and other input capabilities; the app must implement those inputs. |
| Long inputs and reasoning | A limited context window; inspect the device’s available context size. | Selected models offer larger context windows and additional reasoning options. |
| Video | Use suitable app processing or another model; do not assume direct video input. | Selected models, such as Gemini, offer direct video understanding. |
Apple model capabilities · App-provided tools · Hosted context · Video input
Guide and station search read bundled app content; Spotlight searches indexed app content. Maps and weather are specific external services when enabled. No general web-search tool or live STM disruption feed is connected. The Apple photo explanation uses an on-device image attachment; the current Claude/Gemini adapters support text, typed answers and app tools, and reject image attachments.
A new search tool could retrieve current information and return sources for the local model to explain. Its query would leave the device; the search service may require its own authentication and payment. Provider search also needs explicit configuration: Claude search · Gemini Search grounding.
PCC runs inference in Apple’s cloud, without app-managed provider API keys. Access requires an eligible developer account, the assigned entitlement and supported availability, with user usage limits. It does not automatically add web search. Check Apple’s access requirements.
The shared-key backend diagram shows a production architecture for an app-owned credential. Passage’s optional provider setup instead accepts the user’s own key, stores it in Keychain and contacts that provider directly. Storage choice, model choice and tool access are separate decisions. This comparison is not a benchmark showing that a hosted model performs better on the demo.
Choose model location separately from tool access. An on-device model can call a network tool for current facts. Passage connects Maps and weather; general web search is not connected. A provider API key alone does not enable search.
A selected hosted model can offer different input limits, modalities or reasoning capabilities. Compare the actual task, privacy, latency and cost. Passage’s user chooses the engine explicitly; changing engines resets the conversation. There is no automatic easy/hard model router in this demo.
Later optimizations: avoid unnecessary requests, reuse valid results where appropriate, and consider routing only after evaluation supports it. Semantic answer caching must respect freshness, user access and personal context. Provider prompt caching reuses repeated input prefixes; it is different from serving a previously generated answer. Neither a semantic response cache nor a cost saving is demonstrated here.
A shared provider key belongs on a backend. Passage’s optional provider mode uses the user’s own key directly; a company backend is not part of this app.
Apple: network tools · Prompt caching
Foundation Models · Apple’s model
Build a private assistant into the app with Apple’s on-device language model.
 PrivateRuns on the phone
 FreeNo cloud-model bill for local inference
 OfflineLocal inference; tools may use the network
 Typed answersSwift types, not just text
Summaries, tags, pulling out fields, short writing, calling your tools.
Fetch current facts with an appropriate tool. Evaluate a larger model separately for harder reasoning.
OS 27 adds image input and improves logic and tool calling. Inspect the device’s available context size instead of assuming a fixed limit. Check Apple Intelligence/model availability and keep a fallback.
A real answer, with a source to inspect.
How to do it
import FoundationModels

let session = LanguageModelSession(
  instructions: "You are a study coach.")
let reply = try await session.respond(
  to: "Make 3 flashcards from my notes")
print(reply.content)
WWDC26 · 241 What’s new in Foundation Models
Local inference can work offline once the model is ready. Connected tools may still send requests online.
Typed answers
Why not let the model just write the answer?
Try the on-device OPUS answer, then turn a sentence into journey fields that the app can validate.
Commit · Read
“What’s today’s workout in Commit?”
Siri answers from Commit’s data; the app shows the same workout.
Foundation Models · What’s new
Your app needs a language model. Phone, Apple’s cloud, or Anthropic?
Your app calls one API, LanguageModelSession, and you choose what sits behind it.
These are not the coding agents. These models power features in your users’ app; hosted requests run on the provider’s servers.
How to do it
// the on-device model (the default)
let session = LanguageModelSession()

// Apple cloud model
// Check eligibility and availability.
let cloud = LanguageModelSession(
  model: PrivateCloudComputeLanguageModel())
let reply = try await cloud.respond(
  to: "Plan my study week")
WWDC26 · 241 · 319 Private Cloud Compute · 339 Model providers
Like USB-C: one plug, and you choose what’s on the other end.
One session interface does not make model capabilities identical. In Passage, Claude/Gemini currently accept text, typed answers and app tool calls; image attachments and managed web-search/citation responses are not wired into that adapter. Photo explanation uses the Apple on-device path. PCC additionally requires eligible access. Compare the task, input format, data flow, availability and cost before selecting a provider.
Image input
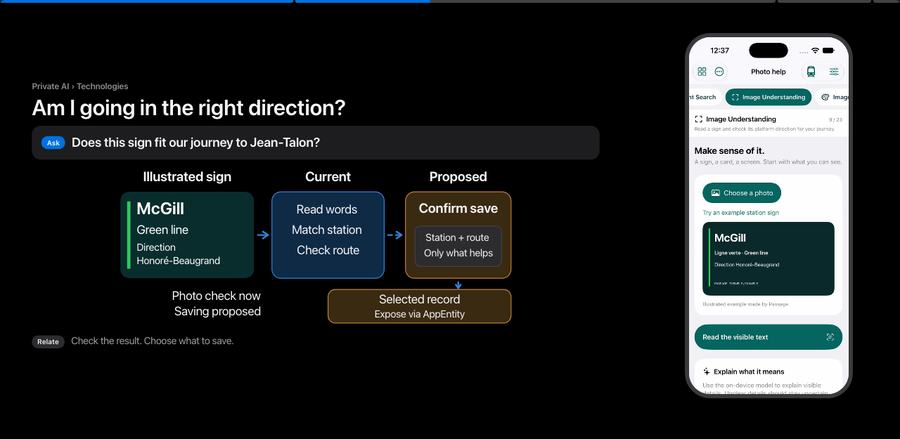
This sign says McGill, Green line, Honoré-Beaugrand. Does that direction fit our journey to Jean-Talon?Does this sign fit our journey to Jean-Talon?
New tools the model can call, on the device:
OCRToolBarcodeReaderTool+ your own toolsLimiting what the model can return is how you make it safe to put in an app.
Read the sign; check the direction.
How to do it
@Generable struct Receipt {
  var store: String
  @Guide(.range(0...500))
  var total: Double
}
let r = try await session.respond(
    generating: Receipt.self) {
  "Read this receipt"
  Attachment(photo)
}
WWDC26 · 241 · 237 What’s new in image understanding
Check the result. Choose what to save.
Save → Expose → Ask → Act → Verify. Persist a validated record, represent selected fields as an AppEntity, and implement EntityQuery so Siri or Shortcuts can retrieve the current record. Publish relevant actions through App Intents/App Shortcuts. Saving alone does not make every app record visible to Siri.
For references such as “this,” associate the relevant on-screen view with its app entity where supported. Your own app model needs selected facts supplied to its session or retrieved through tools; saved storage is not automatic model memory.
A proposed “Remind me about this journey” action could retrieve the saved journey, resolve the time, obtain relevant permission and schedule a local notification. A real entry in Apple Reminders needs EventKit access. Server-driven alerts use a separate APNs integration. These do not grant access to other apps' notification histories or unlimited background execution.
Passage now: local favourites/journeys, entities, queries and selected app actions. Proposed extensions: notifications and Apple Reminders. The sign check can update the selected route; its OCR observations are not automatically saved or exposed to Siri. Confirm which facts to retain before saving and exposing them. Spoken Siri remains a separate device check.
Entity queries · On-screen context · Local reminders · Apple Reminders access
Commit · Personalization
Commit learns which kinds of videos someone tends to finish.
That preference adjusts the ranking after the app filters for suitability.
Tools and profiles
Can a model on your phone still contact an external weather service?
The SDK example below illustrates profile-based model choice. Passage’s profile demo keeps the on-device model; its separate engine selector resets the conversation when changed.
In Passage: internal station, guide and route tools; external Apple Maps and weather tools. Model location is a separate choice. Switch tool access and inspect actual results in the app. The code illustrates model switching; Passage’s profile demo keeps the on-device model.
See which tool ran and what it returned.
How to do it
switch mode {
case .quick:
  Profile { QuickCheck() }
    .model(onDevice)
case .plan:
  Profile { PlanWriter() }
    .model(pcc)
    .reasoningLevel(.deep)
}
let session = LanguageModelSession(
  profile: Coach())
WWDC26 · 242 Build agentic app experiences
A receptionist who passes you to a specialist, without you repeating yourself.
A model running on-device can call an app tool that uses the network. Passage currently connects Apple Maps and Open-Meteo, not general web search. The STM helper supplies an official link, not a live disruption feed. Inspect the tool event and returned source; selecting a cloud model or adding an API key does not itself add search.
From an answer to a checkable action: ask for weather at McGill, let the model propose the weather tool, validate the station and allowed tool in app code, call Open-Meteo, then inspect what was returned. Passage records the actual tool, arguments, result or error and duration for the request.
Passage uses Apple’s Swift Tool protocol and provider function-calling adapters. It does not run the HR/Jira/Slack MCP servers in the reference screenshots. MCP is another way an application can connect tools; it does not automatically grant permission to use every record or action.
For a company app: validate the authenticated user and enforce resource permissions in the service that reads or changes data. A role written into a prompt is not authorization. OAuth tokens and scopes do not by themselves define the company’s resource-access policy. Passage does not demonstrate enterprise OAuth/RBAC.
Retrieved documents and tool results can contain hostile instructions. Keep them separate from trusted instructions, validate arguments and outputs, and restrict tool access. Classifiers and redaction can add layers, but they do not guarantee protection or replace access checks. Passage’s implemented boundary is its tool allowlist and input/result validation; a general redaction layer is not demonstrated.
Apple tool calling · MCP authorization · Agent safety
Foundation Models · fm and Python
How would you test 50 prompts without building an app?
fmrespond · chat · schema--model pcc: the bigger model--image: show it a picturepip install apple_fm_sdkHow to do it
fm respond "Give me 3 study tips for finals"
fm respond "What app is this?" \
  --image shot.png --model pcc

pip install apple_fm_sdk
# Python, in a notebook
import apple_fm_sdk as fm
s = fm.LanguageModelSession()
print(await s.respond("Hello, McGill!"))
WWDC26 · 334 fm CLI and Python SDK
A notebook for Apple’s model: test ideas in Python, ship them in Swift.
Core AICore AI · New this year
You trained a PyTorch model in class. How does it end up inside an iPhone app?
Apple: “Load and run AI models entirely on device, keeping your data private, your apps responsive, and your costs zero.”
Also in the kit: PyTorch extensions, an optimization toolkit, a debugger app, and a repository of ready models.
How to do it
# Python: convert once
prog = coreai_torch.TorchConverter() \
  .add_exported_program(exported) \
  .to_coreai()
prog.save_asset("Energy.aimodel")

// Swift: run it in the app
let m = try await AIModel(contentsOf: url)
let fn = try m.loadFunction(named: "main")!
let y = try await fn.run(inputs: ["x": x])
developer.apple.com/core-ai · WWDC26 · 324 Meet Core AI
What apps can do with it:
A research idea: an energy model on the phone that keeps a building comfortable for less.
 Vision, Speech and machine-learning APIs
ML APIs · What kinds of AI
Pick an app on your phone. Which of its features is secretly AI?
Your turnThree kinds of AI. Your data decides which one you reach for.
| Your data | Usual kind of AI | Apple tool | App example |
|---|---|---|---|
 Photos and video | Deep learning, generative | Vision · Create ML · Image Playground | Name a plant from a photo |
 Text | Deep learning, generative | Natural Language · Foundation Models | Tag and summarize my notes |
 Sound and speech | Deep learning | Sound Analysis · Speech · Create ML | Caption a lecture |
 Motion and sensors | Deep learning or classic ML | Create ML activity classifier | Spot a wave from watch motion |
 Tables of numbers | Classic ML | Create ML tabular · Core ML | Recommend hiking trails |
Most of these need no training at all. That’s the next page.
How to choose
developer.apple.com/machine-learning · WWDC24 · 10223 · WWDC25 · 360
Like a file picker: your data’s type decides which AI tools show up.
ML APIs · Ready-made models
Your app must read the text in a photo. Do you have to train a model?
 Name what’s in a photoVision
ClassifyImageRequestRead the text in a photoVisionRecognizeTextRequestSpot names, places and moodNatural LanguageNLTaggerName one of 300+ soundsSound AnalysisSNClassifySoundRequest Turn speech into textSpeech
SpeechAnalyzer · SpeechTranscriberTranslate textTranslationTranslationSessionHow to do it
import Vision
import NaturalLanguage
// 1. Read the text in a photo
let lines = try await RecognizeTextRequest()
  .perform(on: photoURL)
print(lines.map(\.transcript))
// 2. Which language is it?
let lang = NLLanguageRecognizer
  .dominantLanguage(for: "Where is the exam room?")
print(lang?.rawValue ?? "?")   // en
developer.apple.com/documentation/vision · WWDC24 · 10163 · WWDC25 · 272 · 277
Also ready-made:
DetectFaceRectanglesRequestDetectHumanBodyPoseRequestDetectHumanHandPoseRequestDetectBarcodesRequestGenerateForegroundInstanceMaskRequestNLLanguageRecognizerNLEmbeddingThey run on the device. Speech and Translation download a model the first time.
Like importing a library: call the function instead of writing it.
Live demo · Step 5
Use the labelled example sign to inspect real recognized text. Keep OCR separate from the optional model explanation.
ML APIs · The map
You need a model in your app. Do you train one, download one, or use Apple’s?
How to choose
developer.apple.com/apple-intelligence · developer.apple.com/core-ai
Start with the least work: use Apple’s model before you train your own.
 Core ML
 · Create ML
You have your own labelled data. What would you teach a model to do?
Your turn| Your data | Template | You provide | How much |
|---|---|---|---|
| Images | Image classifier · Object detector | Photos in a folder per label; boxes to detect | 10+ per label |
| Video and hands | Action · Hand pose · Hand action | Short clips, plus a “background” class | 50+ clips per action |
| Sound | Sound classifier | Audio files per sound, plus background noise | 10+ per sound |
| Text | Text classifier · Word tagger | A table: text and label, or words and tags | Apple lists no minimum |
| Motion | Activity classifier | Labelled accelerometer and gyroscope data | Apple lists no minimum |
| Numbers | Tabular classifier · Regressor · Recommender | A CSV or JSON table; one column is the answer | Apple lists no minimum |
You get a Core ML model file, trained on your Mac. Image and text models start from Apple’s own, so they train fast and stay small.
How to do it
developer.apple.com/documentation/createml · WWDC21 · 10039 · WWDC22 · 10019
Like flashcards: study labelled examples, then get tested on new ones.
Core ML · Create ML and Core ML
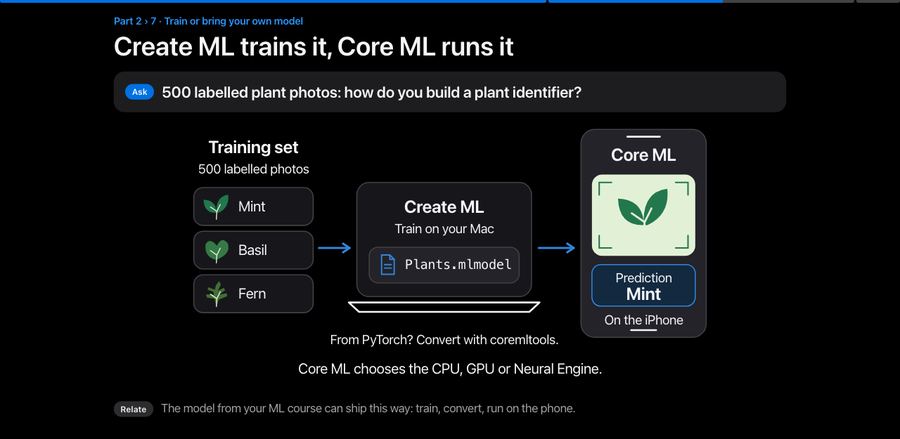
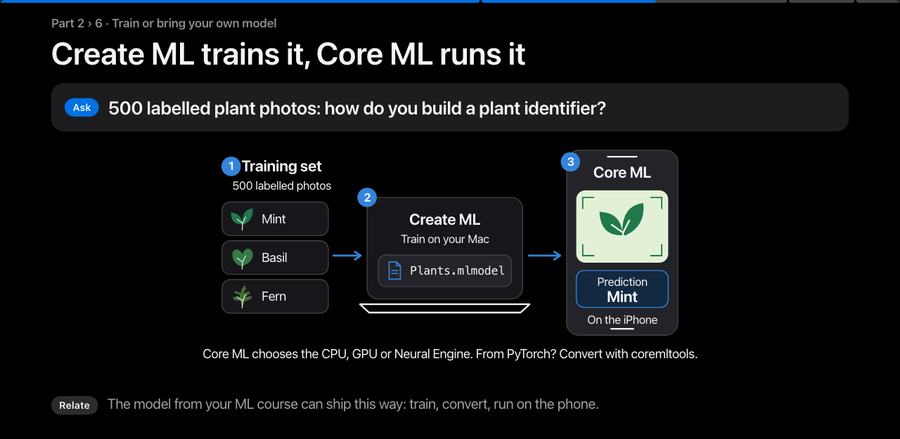
500 labelled plant photos: how do you build a plant identifier?
Trained in PyTorch or TensorFlow instead? Convert it with coremltools. The Vision framework prepares camera images for the model.
How to do it
// Xcode turns PlantClassifier.mlmodel
// into a Swift class you can call
let model = try PlantClassifier(
  configuration: MLModelConfiguration())
let out = try model.prediction(
  image: pixelBuffer)
print(out.target)   // "Monstera"
developer.apple.com/machine-learning · Create ML · Core ML
The model from your ML course can ship this way: train, convert, run on the phone.
Core ML · What it runs
Your model is a decision tree from scikit-learn. Can an iPhone app run it?
Convert with coremltools, then shrink with palettization, quantization or pruning. It runs on the CPU, GPU or Neural Engine.
How to do it
import coremltools as ct
# classic ML: a scikit-learn model
ml = ct.converters.sklearn.convert(
  model, ["bedroom", "bath", "size"], "price")
ml.save("HousePricer.mlmodel")

# a neural network from PyTorch
ml = ct.convert(exported_program,
  inputs=[image_input])
ml.save("Plants.mlpackage")
developer.apple.com/documentation/coreml · WWDC24 · 10159 · 10161
Like exporting a document as a PDF: same content, a format every iPhone reads.
MetalMetal · The GPU
When would an app talk to the GPU itself, instead of through a framework?
Start with a framework. Reach for Metal only after you have measured that the GPU work is the bottleneck. Sources: developer.apple.com/metal · developer.apple.com/machine-learning
Like hand-tuning one inner loop: worth it only when the profiler points there.
MLXMLX · Open models
Who has run an AI model on their own laptop? What did you use?
On your Mac
Into Xcode and your app
Point Xcode or any agent at the server. In an app, MLXLanguageModel plugs into Foundation Models.
It is also the second way to build in “Who holds the data?”: a company can run mlx_lm.server on its own machine and keep users’ data in-house.
What apps can do with it:
How to do it
pip install mlx-lm
# chat with a 3B model (about 2 GB)
mlx_lm.chat --model \
  mlx-community/Llama-3.2-3B-Instruct-4bit
# serve it to Xcode or any agent
mlx_lm.server --model \
  mlx-community/Llama-3.2-3B-Instruct-4bit
# then Xcode › Settings › Intelligence
WWDC26 · 232 Local agents with MLX · 233 Many Macs
Like Ollama, but Apple’s own open-source stack, from Python to Swift.
Optional demonstration · on the Mac
Inspect the recorded Mac output, or run the existing companion after rehearsing it on this Mac. The iOS page does not run a shell.
Siri and App IntentsSiri and App Intents · The question
“Hey Siri, tell my study app I finished chapter 3.”
What has to happen before the app marks chapter 3 as done? Guess the steps.
Your turnKeep your guesses. We check them on “Siri can now use your app”. One more to think about: does all of this happen on the phone, or on someone’s server?
Siri and App Intents · App Entities
Siri should answer “When’s my next workout?” What must it know?
In Commit, workouts use the calendar-event schema, hold no health data, and only the next 14 go into a private, encrypted index.
How to do it
@AppEntity(schema: .calendar.event)
struct EventEntity: IndexedEntity {
  @Property(indexingKey: \.title)
  var title: String
  @Property(indexingKey: \.startDate)
  var startDate: Date
}
// index only what Siri needs, encrypted
try await index.indexAppEntities(upcoming)
WWDC26 · 240 Siri with App Schemas
Like a library catalogue: good records make things findable.
Siri and App Intents · Who does what
You’ll tell Siri “My legs are sore in Commit.” Which part of that is AI?
Your turnSiri changes one piece of information. Everything after that is the app’s own code, so it behaves the same whether you speak or tap.
Like a receptionist: they hear what you need and fill in the form. The office does the work.
Siri and App Intents · Shortcuts
What could start an action in your app, besides a tap?
Your turnIn Shortcuts, people chain actions: the output of one becomes the input of the next.
Like a light: a wall switch, a timer or your voice can turn it on. The light doesn’t care which.
Siri and App Intents · Core Spotlight
You ask a hiking app: “Which hikes did I enjoy most?” Where’s the answer?
Meaning in text: “hikes I loved”.
Dates, people and places.
All on the device. It searches the App Entities from the last topic, so good titles, dates and descriptions change the results.
How to do it
// 1. donate your content (IndexedEntity)
// 2. let the model search it
let search = SpotlightSearchTool()
let session = LanguageModelSession(
  tools: [search])
let r = try await session.respond(
  to: "Which hikes did I enjoy most?")
WWDC26 · 246 LLM search using Core Spotlight
Retrieval-augmented generation (RAG), without running your own vector database.
App Intents
Name an app you wish you could just talk to. What would you say?
Your turn“Hey Siri, tell my study app I finished chapter 3.”
Your guesses from the Siri question:
Save the station, then read the state back.
How to do it
struct FinishChapterIntent: AppIntent {
  @Parameter var chapter: Int
  func perform() async throws
      -> some IntentResult { … }
}
// this row on screen = this entity
MessageRow(message: m)
  .appEntityIdentifier(EntityIdentifier(
    for: MessageEntity.self,
    identifier: m.id))
WWDC26 · 240 Siri with App Schemas · 344 Code-along
Give Siri your app’s nouns and verbs; Siri builds the sentences.
App Intents
McGill Green line
One identifiable station
Save McGill
App IntentNot saved → saved
McGill. Favourite: Saved.
“Hey Siri, my legs are sore in Commit.”
Commit updates today’s check-in in the background.
Spoken Siri needs its own check on the presenting iPhone.
Save → Expose → Ask → Act → Verify. Persist a validated record, represent selected fields as an AppEntity, and implement EntityQuery so Siri or Shortcuts can retrieve the current record. Publish relevant actions through App Intents/App Shortcuts. Saving alone does not make every app record visible to Siri.
For references such as “this,” associate the relevant on-screen view with its app entity where supported. Your own app model needs selected facts supplied to its session or retrieved through tools; saved storage is not automatic model memory.
A proposed “Remind me about this journey” action could retrieve the saved journey, resolve the time, obtain relevant permission and schedule a local notification. A real entry in Apple Reminders needs EventKit access. Server-driven alerts use a separate APNs integration. These do not grant access to other apps' notification histories or unlimited background execution.
Passage now: local favourites/journeys, entities, queries and selected app actions. Proposed extensions: notifications and Apple Reminders. The sign check can update the selected route; its OCR observations are not automatically saved or exposed to Siri. Confirm which facts to retain before saving and exposing them. Spoken Siri remains a separate device check.
Entity queries · On-screen context · Local reminders · Apple Reminders access
Use one stable record across the flow. The station catalogue exposes McGill through an app entity and query. The favourite intent saves that station’s stable ID, and the app reads the saved state back. The station entity exists before it becomes a favourite. Saving data alone does not make it automatic model memory or expose every field to Siri.
For a future ‘remind me about this journey’ action, retrieve only the relevant journey and time, obtain the required permission, then schedule the intended alert. A local notification and an Apple Reminders entry use different APIs. Both are proposed extensions in Passage; the recorded favourite action does not prove spoken Siri dispatch.
Entity queries · Local notifications · Apple Reminders access
Commit · Write
“My legs are sore in Commit.”
The shortcut saves Legs. Commit’s workout rules use that check-in to switch today from legs to upper body.
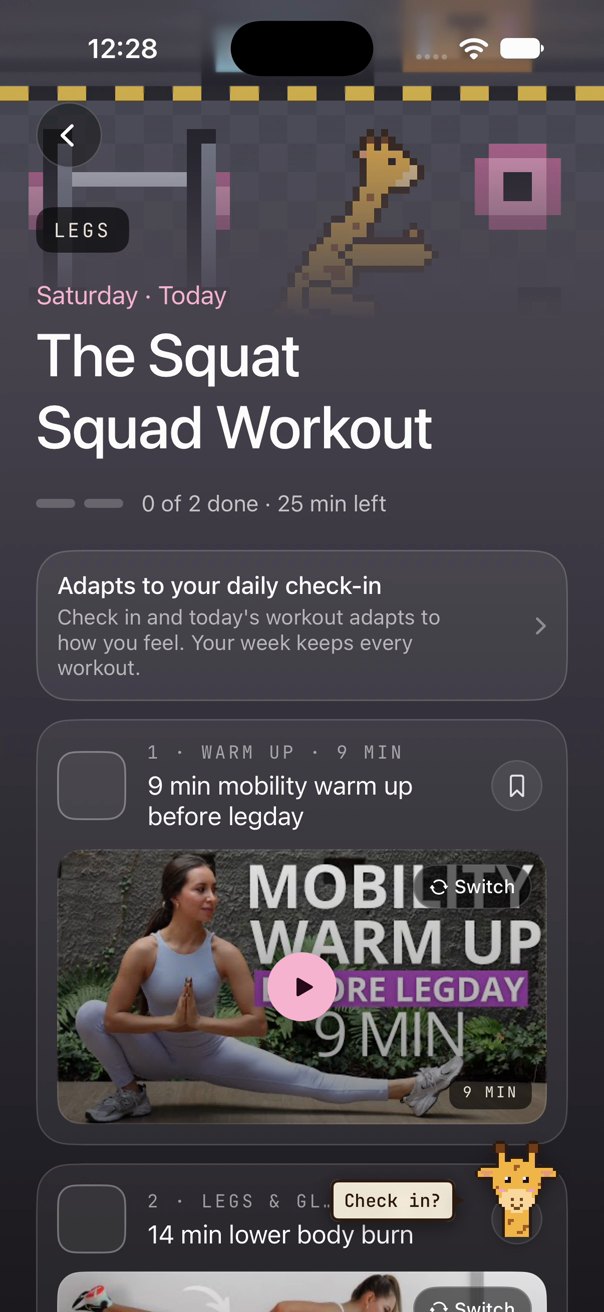
Watch the Commit Siri recordings
 System features
 · Writing Tools and Genmoji
Your app has a notes field. How much code does it take to add AI rewriting?
NSAdaptiveImageGlyphHow to do it
// SwiftUI: full Writing Tools
TextEditor(text: $notes)
  .writingToolsBehavior(.complete)
// UIKit: let people insert Genmoji
textView.supportsAdaptiveImageGlyph = true
WWDC24 · 10168 Writing Tools · 10220 Genmoji
Use the system controls and you inherit the features, like spell-check.
System features · Image Playground and Visual Intelligence
For a campus app, which is more useful: making images or understanding them?
ImageCreator makes images in codeWWDC26 · 375
WWDC26 · 297
One draws, one looks, and both hand the result back to your app.
 Check it works: Evaluations
AI evals · Testing the model
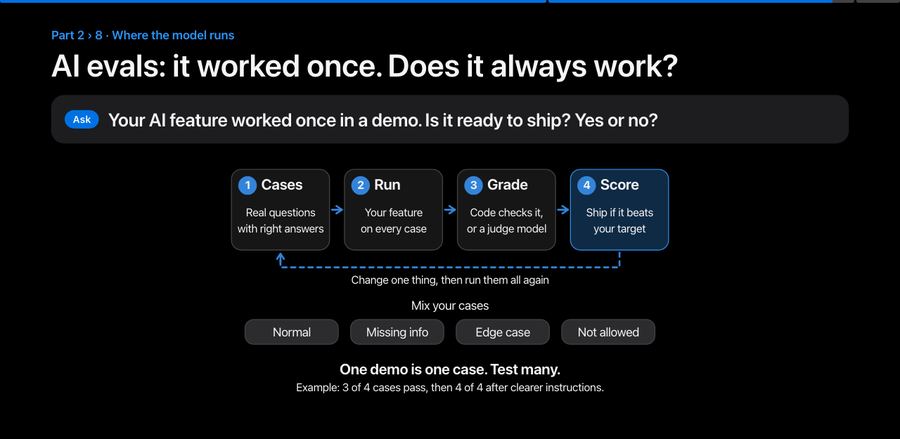
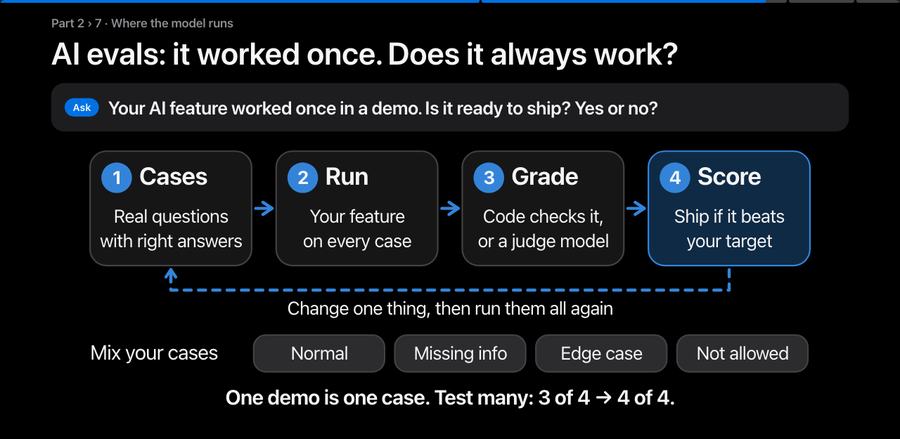
Your AI feature worked once in a demo. Is it ready to ship? Yes or no?
The judge can be a bigger model (Private Cloud Compute) grading the small one. Instruments shows prompts, tool calls and tokens.
Recorded example: A 3/4 → B 4/4. Inspect what changed.
How to do it
let tagCount = Metric("TagCount")
Evaluator { _, out in
  let n = out.value.tags.count
  return (3...8).contains(n)
    ? tagCount.passing(rationale: "\(n)")
    : tagCount.failing(rationale: "\(n)")
}
// Swift Testing: 80% of samples must pass
#expect(result.aggregateValue(
  .mean(of: tagCount)) >= 0.8)
WWDC26 · 298 Evaluations · 243 Instruments
One demo. More cases. Inspect failures.
What the recorded result establishes: on four authored advice cases, A chose the expected option in 3/4 and B in 4/4. Both instructions and tool access changed. This does not isolate a prompt effect, establish general accuracy or grade the quality of the explanation.
Use evidence to improve: inspect the failed case and its tool record, change one factor where possible, rerun the same checks, then test fresh cases before deciding whether to release. Include normal, missing-information, edge and disallowed-action cases. Repeat these checks after changes to instructions, tools or model versions; identity and behaviour can regress.
Passage’s local tool activity records tool names, arguments, results or errors and timing. These are app events, not private chain-of-thought or a complete production monitoring system. Log only what you need and decide how to protect, redact and retain it. A mandatory release gate is a recommendation, not an implemented Passage feature.
Commit shows how an app handles data. Passage lets us inspect an AI feature and improve one small part.
Chapter 3 of 4
Follow Commit’s data choices, then inspect the models, context and actions in Passage.

 Story 1 · Commit keeps health data on the phone
Story 1 · Meet Commit
What should a fitness app know about you, and never share?
Your turnBuilt with Daniela Suarez, founder of Elovlo Inc.
Everything on this page shows up in Commit: the code, the data and the AI.
Story 1 · Built with Claude
If an AI writes most of the code, what’s left for you to do?
Commit’s overnight loop: rules for Claude
Mission: find and fix real bugs overnight, one verified fix per commit, never breaking the build.
Commit · docs/overnight_loop.md (shortened)
You become the editor, not the typist: set the rules, then check the work.
Story 1 · AI on the phone
Which jobs run locally, and which records sync?
Your turnA Siri action can save to the regular check-in, which can sync through Commit’s backend.
Passage · a Montréal métro appThe app for this session
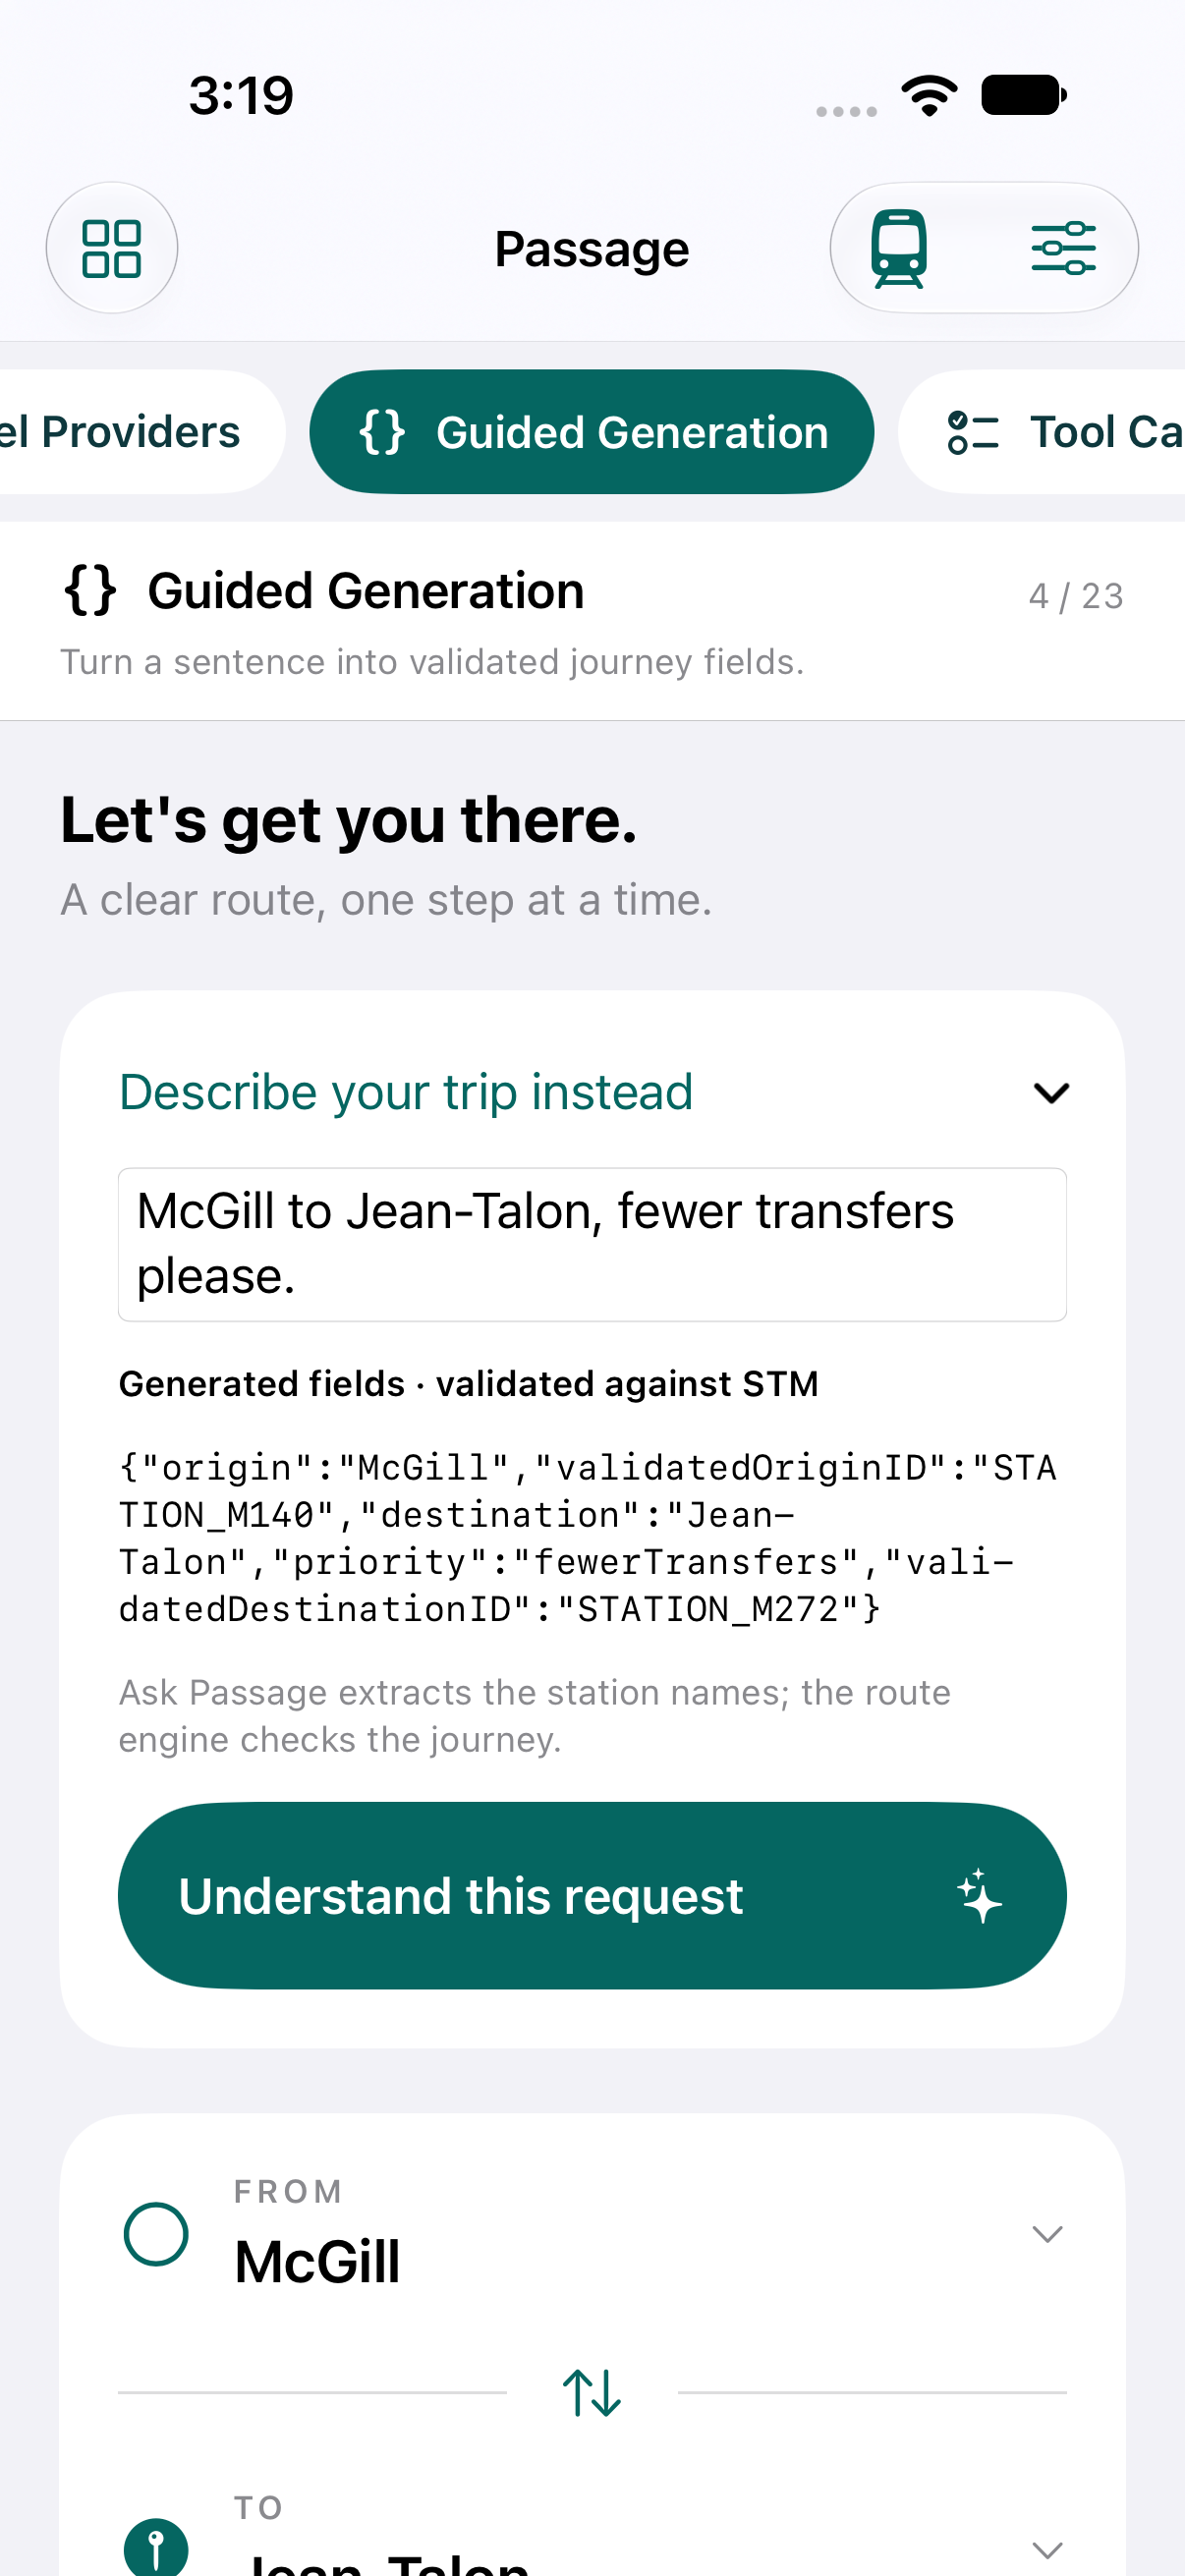
One app. A question, a journey and an action you can inspect.
Recorded simulator capture · 22 Oct 2026. Use the native app for a live run.
Live demo · Step 1
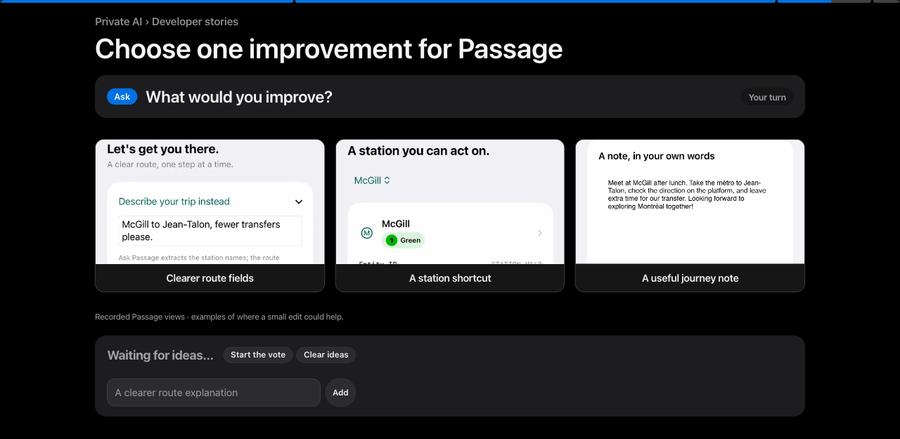
What would make Passage more useful? Suggest a clearer route explanation, a station shortcut or a small change to a journey note. Choose one change we can try in the prepared app.What would you improve?
Your turn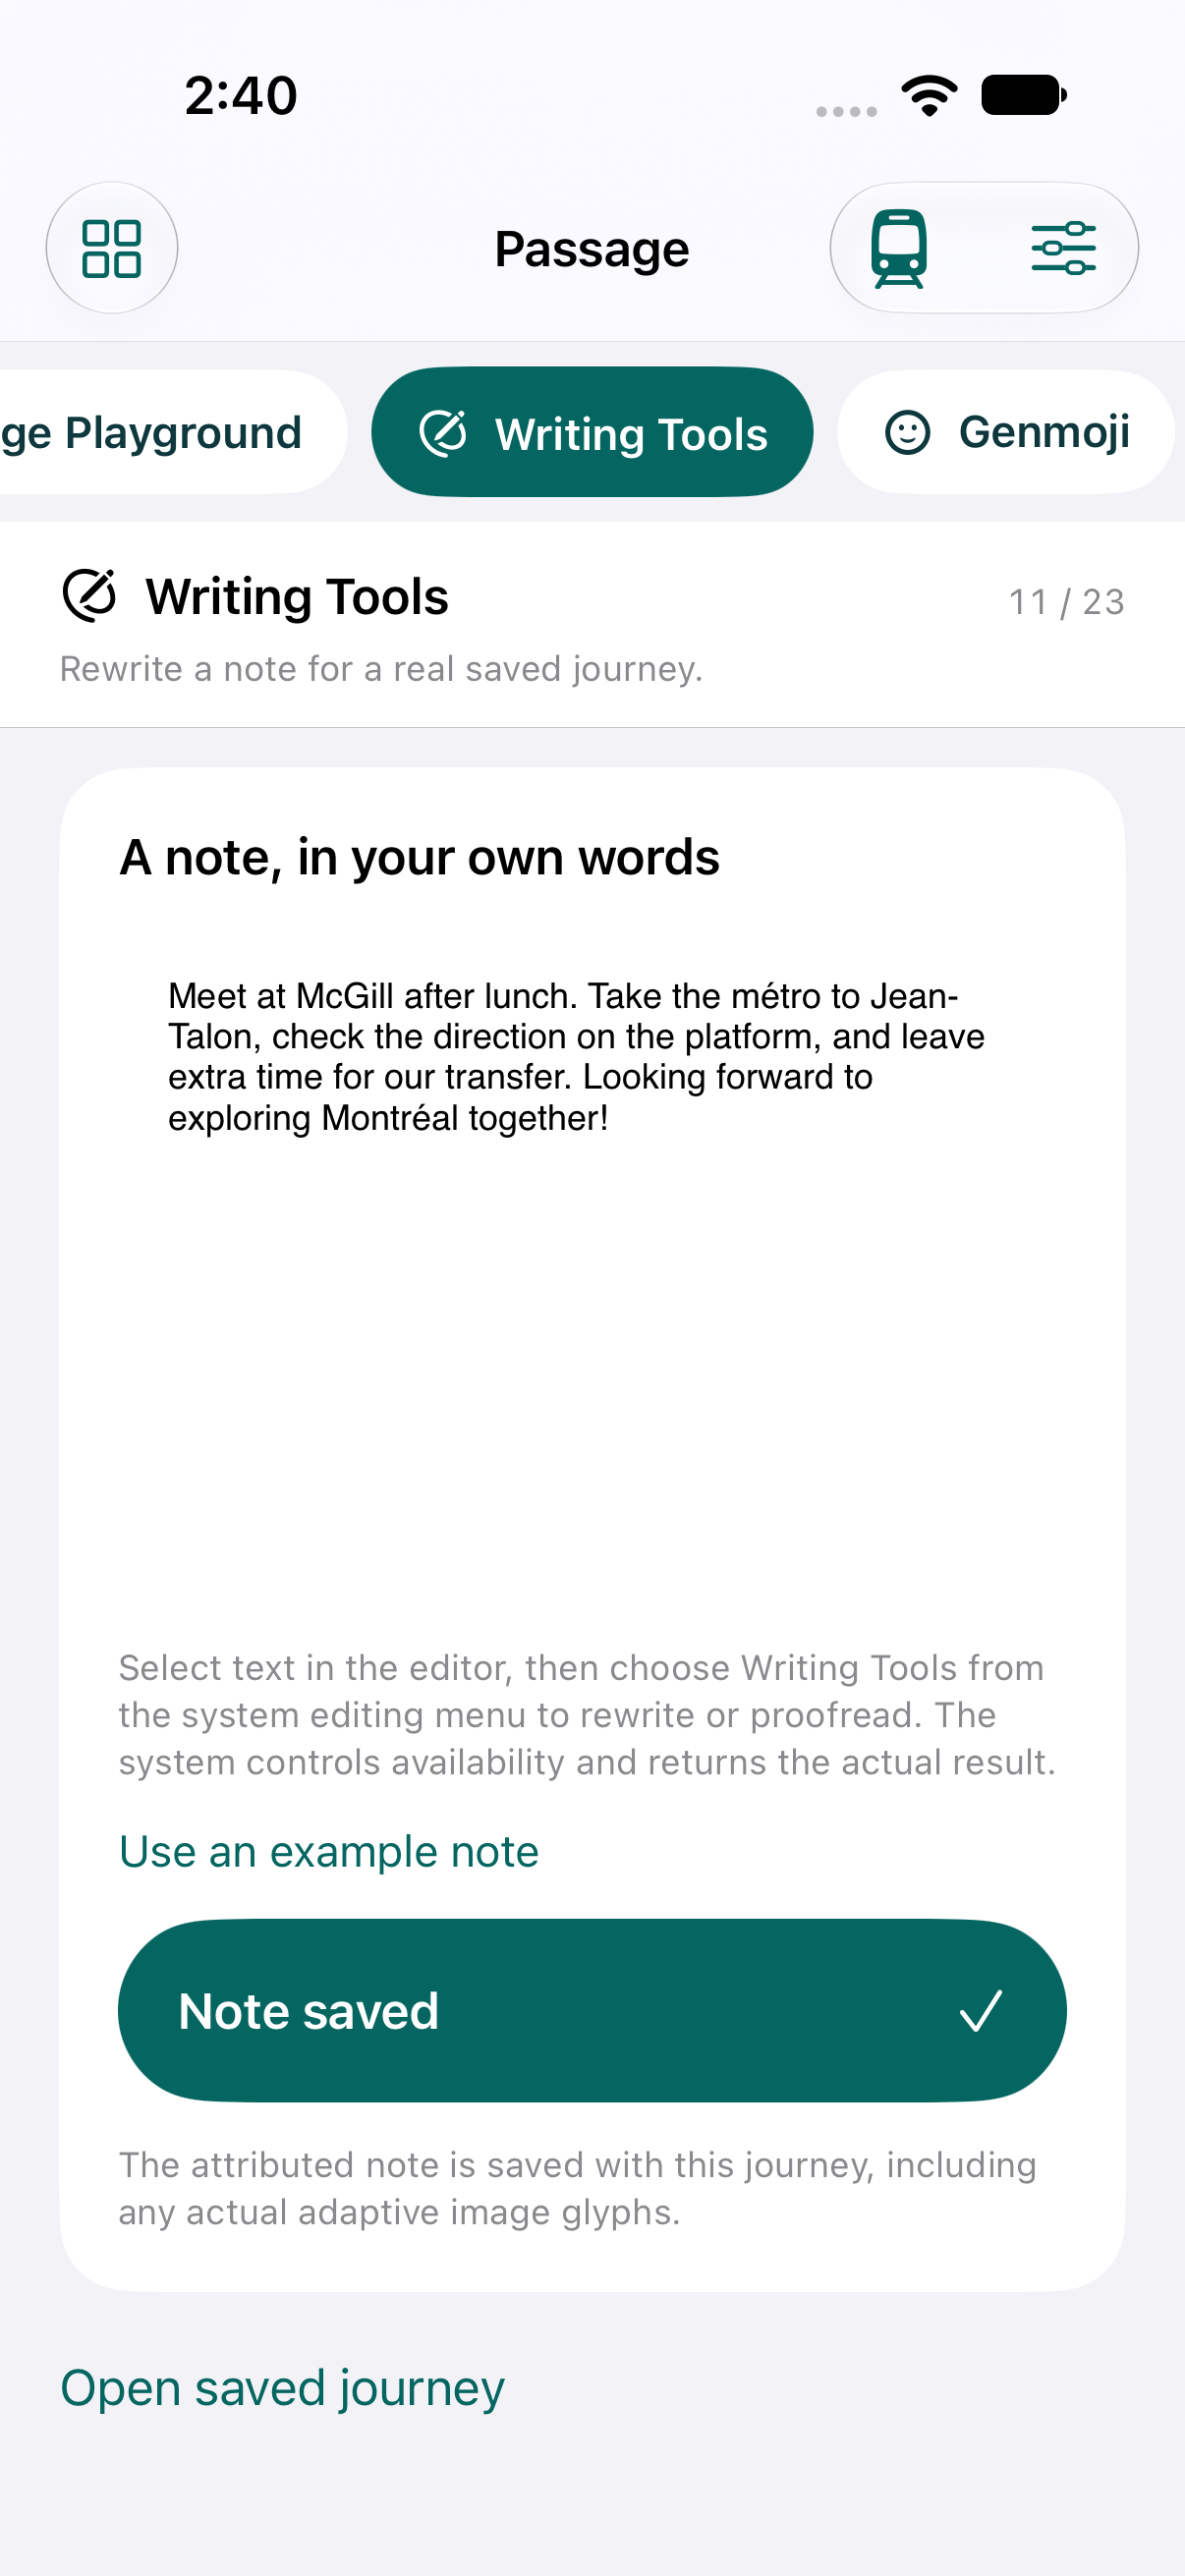
Recorded Passage views · examples of where a small edit could help.
Ideas appear here as teams send them.
Live edit · the existing app
Work in the prepared Passage project. Keep its working routes, storage and feature navigation intact.
One change. Build. Inspect.
 Story 2 · Inside Commit’s database
Privacy · Who holds the data
 Security check
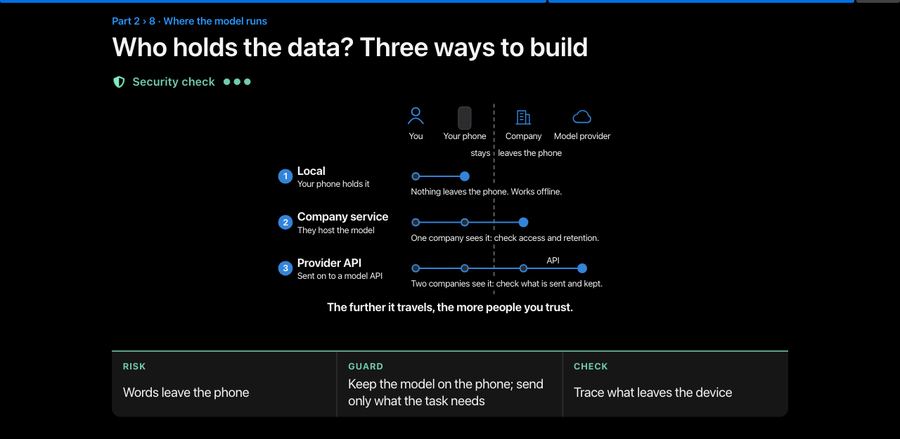
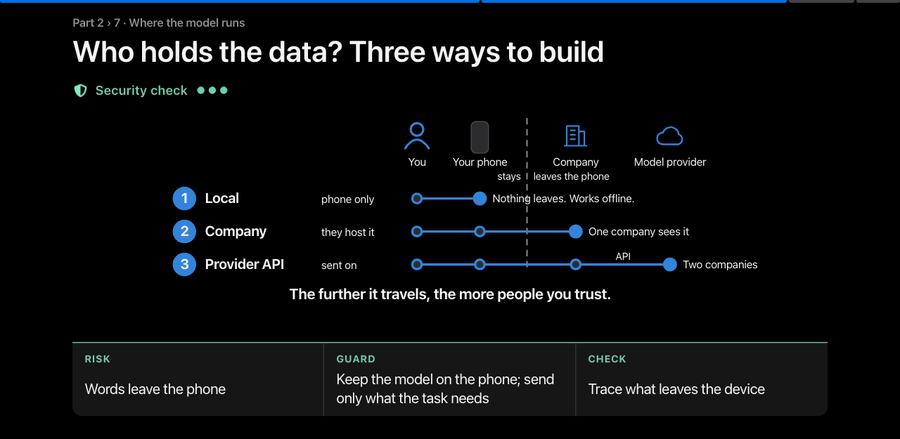
Which of these would you trust with your health data?
Your turnIn this local-only configuration, app records and model processing stay on the phone. Online tools and sync are separate choices.
 You
A company can host a model alongside its app service. This does not mean it trained the model. Check access, logs and retention.
YouIn this illustrative company service, the app sends selected context to an external model provider through an API. Check what is sent and how it is handled.
YouPassage starts with local records and an on-device model. A selected provider can receive supplied context and tool results. Coding assistants also receive whatever context you supply; use public examples for this demonstration.
Trace what leaves the device.
A branded assistant is not necessarily a model the company trained. A company can build the interface, retrieval, data access and actions while choosing an external model provider. Those app features can be useful; the company still needs to explain which context crosses which boundary.
The diagram’s company service is an illustrative hosted architecture. Passage itself has no company backend: its optional provider mode sends selected context and tool results from the app to the chosen provider. Check the provider’s applicable handling and retention settings; do not infer them from branding or the presence of an API key.
Enforce the user’s access before supplying records to the model or executing an action. Do not rely on a model to conceal records it should never have received. Treat retrieved text as untrusted data and keep observability proportionate to the information involved.
Privacy · Data on the phone
You swipe an app away. Where does its data wait until you come back?
SwiftDataYour app’s own records: plans, notesNever: passwords and tokensCore Data or SQLiteExisting apps, or SQL you write yourselfNever: secrets in plain columnsFiles in the sandboxPhotos, audio, exports, documentsNever: re-downloadable files in Documents UserDefaultsSmall settings: theme, last tabNever: personal data: it sits unencrypted
 KeychainPasswords, tokens, small keysNever: big data: it’s for small secretsHealthKit’s storeHealth data, read with permissionNever: anything that isn’t health or fitness
 iCloud · CloudKitSync, if you choose: next page
Records in SwiftData, secrets in the Keychain, settings in UserDefaults. Health data stays in Health: you borrow it.
How to do it
@Model class Note {
  var text: String
  init(text: String) { self.text = text }
}
// App: .modelContainer(for: Note.self)
struct NotesView: View {
  @Environment(\.modelContext) var ctx
  @Query var notes: [Note]   // live
  var body: some View {
    Button("Add") { ctx.insert(Note(text: "Hi")) }
  }
}
developer.apple.com/documentation/swiftdata · /foundation/userdefaults · /security/keychain-services · /healthkit
Your app. Your choices. Your responsibility.
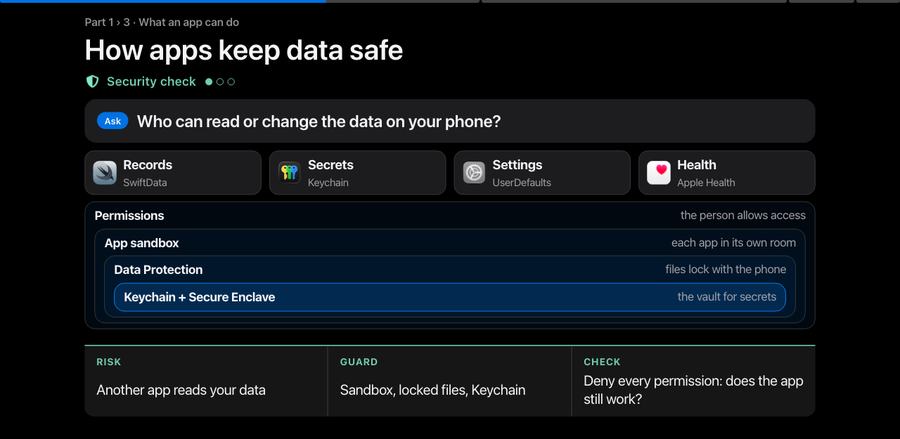
Privacy
Security check
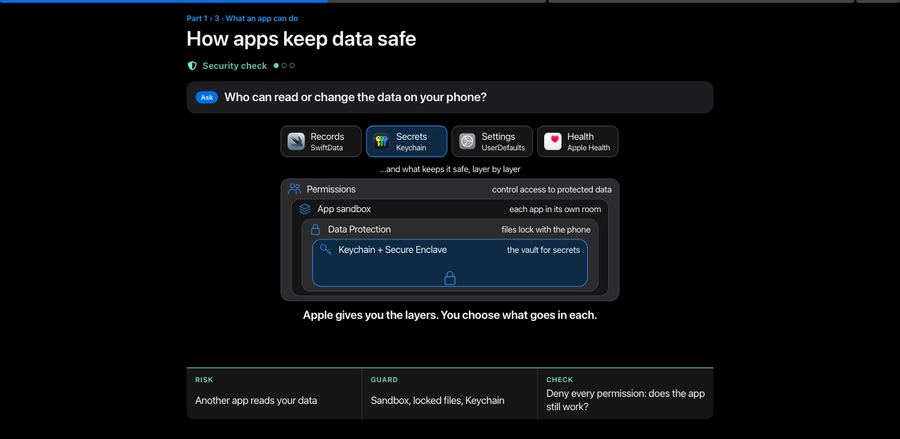
Who can read or change the data on your phone?
 RecordsSwiftData
 SecretsKeychain
 SettingsUserDefaultsHealthApple Health
Permissionsthe person allows access
App sandboxeach app in its own room
Data Protectionfiles lock with the phone
Keychain + Secure Enclavethe vault for secrets
Apple gives you the layers. You choose what goes in each.
SecItemAddSecureEnclave.completeFileProtectionrequestAuthorizationencryptedValuesPrivacyInfo.xcprivacyApps that do it
Apple gives you the layers. You choose what goes in each one.
How to do it
// 1. Lock a file while the phone is locked
try data.write(to: url,
  options: .completeFileProtection)

// 2. Encrypt a CloudKit field on the phone
let record = CKRecord(recordType: "Note")
record.encryptedValues["text"] = "Slept badly"
let db = CKContainer.default()
  .privateCloudDatabase
try await db.save(record)
developer.apple.com/documentation/uikit · /cloudkit · /healthkit · /security · Apple Platform Security guide
Like a castle: vault, locked doors, thick walls and a guard who asks first.
Story 2 · Where data lives
In a fitness app, which of these should never leave the phone?
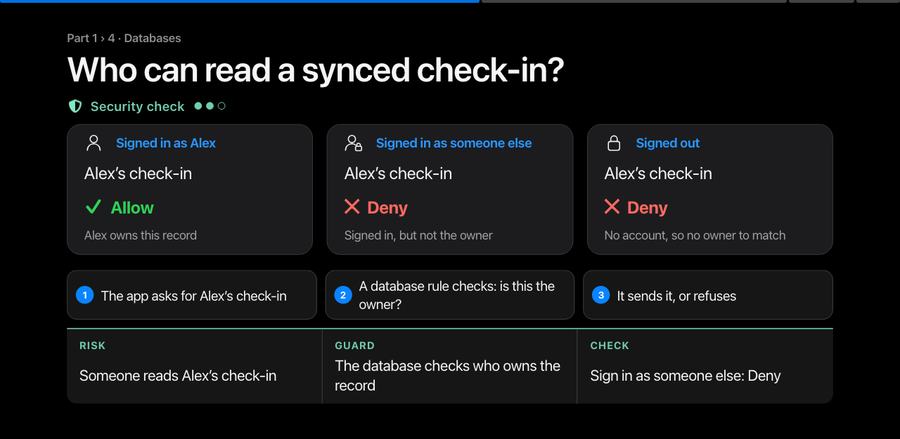
Your turnThis is how Commit is split: Firebase for sign-in, plans and check-ins, and everything personal on the phone.
Decide where the data lives before you choose the model.
Story 2 · Commit’s database
Sort it with us: for each piece of data, phone only or Commit’s small cloud?
Your turnDiscuss: check-in answers (mood, sleep) do sync, so a new phone gets them back. Right call? Commit started on a Vapor server with PostgreSQL and moved to Firebase on 22 July 2026.
How it’s locked: each person sees only their own data
// Firestore security rules (simplified)
match /users/{uid}/{doc=**} {
  allow read, write: if request.auth != null
                     && request.auth.uid == uid;
}
// Health data never gets here: it stays
// in Apple Health, read on the phone.
Commit · Firebase Auth, Firestore, Cloud Functions · HealthKit
Sort first, then build: every piece of data gets its home before any code.
Story 2 · Cloud costs
What does a brand-new app actually need in the cloud on day one?
Every cloud feature is a monthly bill, and one more place data can leak.
How to keep it small
Start lean, then grow with your users.
Rent a bigger kitchen once people line up for the food.
Take the ideas home. Try three things this week, see what the same ideas are called on Android and the web, and find the docs, sessions and open-source projects behind the talk.
Apple’s language model, one API for any model, and the fm command.
WWDC26 · 241 What’s new in Foundation Models · 242 Build agentic app experiences
Bring your own model to the device.
Ready-made models that need no training.
Train on your Mac, convert from other tools, run on the device.
Run, fine-tune and serve open models on your Mac.
Let Siri find your data and act in your app.
WWDC26 · 240 Siri with App Schemas · 246 LLM search using Core Spotlight
Build the app with an agent that knows Swift.
Test your AI feature on many real examples before you ship.
WWDC26 · 298 Evaluations · 243 Instruments

The pages this talk draws on.
Your turn
Pairs, two minutes: fill in the sentence. Then we share three ideas and map each one to a technology.
Your turnYour sentence appears here as you type.
“Which of my loans are due?”
App Intents and Spotlight
“Turn this whiteboard into notes.”
Images and @Generable
“What plant is this?”
Create ML and Core ML
Good features start with a person’s problem, not with a model.
Chapter 4 of 4
What the ideas are called on Android and the web, what to try this week, and where to read more.
Resources · Not just Apple
Building for Android or the web: what would change?
Your turnApple is our example because it ships the most complete on-device kit in one place: a free model on the phone, Core ML, Core AI and MLX, App Intents, and Evaluations. The names change on other platforms. The ideas don’t.
Apple is our example, not the rule: the same ideas work in any app.
Take it further · Questions
Where we started
A complete app, not just an MVP. AI makes the rest doable.
We built the app, added useful AI and checked the result. Take that process to an idea you want to see in the world.
Solve a problem, explore a hobby or make something for someone you care about.
Problem. Hobby. Someone you care about.
Use tools such as ChatGPT and Claude to learn and try ideas. Keep the decisions yours.
Learn. Explore. Make the decisions.
Test with people, fix what breaks and improve the work before a wider release.
First version. Feedback. Another try.
Your project can be useful, creative or personal. It does not have to start as a business.
Useful. Creative. Yours.
Questions?
Revisit the Passage examples from the talk.
Three things to try this week:
fm respond "Hello"In the Terminal on macOS 27.
pip install mlx-lmThen try mlx_lm.chat.
AppIntentAdd one, then test it with AppIntentsTesting.
developer.apple.com

Volt-Age is a Concordia-led research program on sustainable electrification, and students drive it. Here’s what we’re working on, and how you can join.
Why join
What we’re working on
In plain words. Pick the problem you care about.
Store clean energy without the environmental cost.
Make the places we live and work cleaner and smarter.
Move people with less carbon, and more fairly.
Put people and nature at the centre of the transition.
Data, AI and security are part of the work too.
Keep clean power flowing as the climate changes.
Living Labs
Ideas leave the lab and run in real buildings and communities.
Thanks to Volt-Age, we get to try to make a difference on climate. Even if it’s a tiny step, it counts.
Gauraang Malik · PhD student, Building Engineering, Concordia
I’m Gauraang Malik, a PhD student in Building Engineering at Concordia University in Montréal. Before that I studied information technology at Amity University and information studies at McGill.
I also build apps people can trust. Commit, the wellness app in this talk, is built with Daniela Suarez, founder of Elovlo Inc.
Why I’m here
Why would a computer science person do a PhD in Building Engineering?Why would a computer science person study buildings?
From computers to buildings
Buildings are older than the internet. The devices inside our homes and offices are online; the building itself mostly isn’t.
Start from the gap
Buildings haven’t had their internet makeover yet.
Look for places that haven’t had their makeover. That’s where a good app helps.
Why I’m here
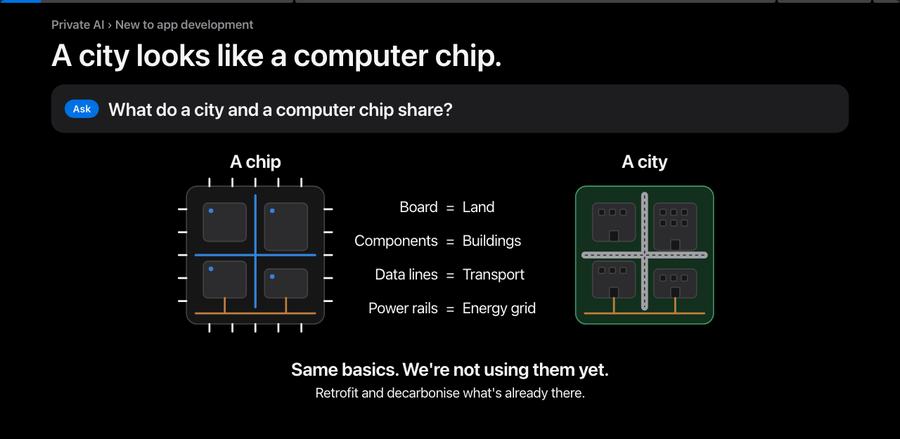
Zoom out from one building to a whole city. What does it look like?What do a city and a computer chip share?
The same basics
The basics are already there, and we’re not using them yet. Retrofitting and decarbonisation start from what exists.
Make what exists smart
Retrofit and decarbonise the buildings we already have.
The infrastructure exists. What’s missing is the smart layer.
Why I’m here
If buildings get smart, who should run the smart part?Where should the smart part live?
Keep control with people
This is a view, not a rule: we don’t need more servers; we need things that are controllable and helpful.
So: build apps
That’s why this talk.
Smart buildings and smart apps: both work best close to the people who use them.
My research
AI’s appetite for electricity is growing fast. What if buildings did more of the work?
Answer requests where people are. Wait at peak. Use the cloud only when needed.
A computing layer across buildings. Data centres still train and back up.
In some cases, maybe not. That’s what my research is testing, without raising total energy use.
Volt-Age · Concordia

Volt-Age is a Concordia-led research program on sustainable electrification, and students drive it.
Come build it with us.See Volt-Age opportunities More about Volt-Age
Thanks to Volt-Age, we get to try to make a difference on climate. Even if it’s a tiny step, it counts.
Everything that is not in the talk right now. Tick what you want, then press Copy my picks and paste the list to Claude. Nothing here changes the presentation.
Left: how it was in version 45 (for slide 10 and the full slide 26: what is hidden now). Right: the slide as it is now. Pick one for each.
Slide 1
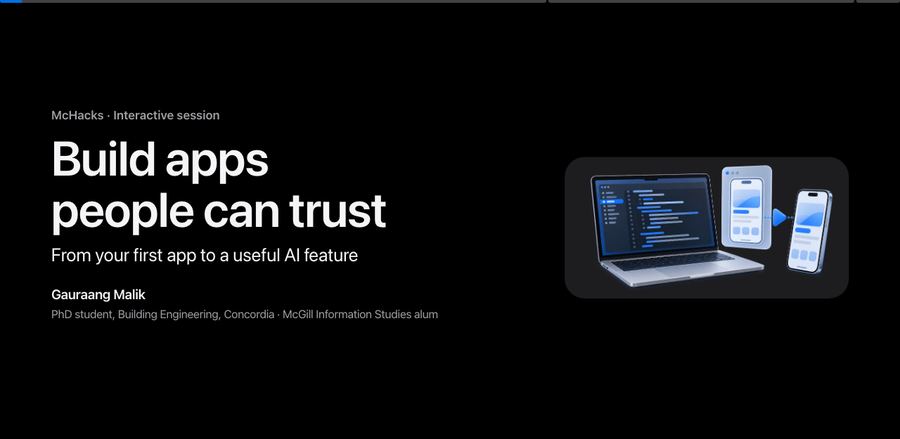
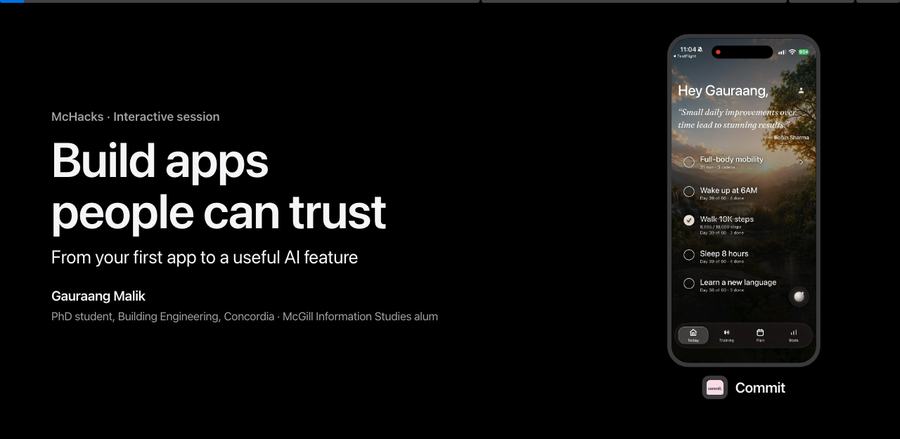
The laptop “workshop” drawing. Now a Commit phone with its logo.
Slide 4
The lock and bolt picture icons on the cards. Now blue line icons.
Slide 11
New, never shown: “Xcode’s agent, step by step” (Plan → Code → Build + test → Preview → You review) with your choice of agent.
Slide 17
The layered drawing, the “…and what keeps it safe, layer by layer” label and the line “Apple gives you the layers. You choose what goes in each.”
Slide 21
The Xcode logo in the Test copy card. Now a person icon.
Slide 23
The three picture icons (person, person with lock, lock). Now line icons.
Slide 24
The two chips “Siri → App Shortcut” and “App Intent → Commit action”. Now the whole-talk row.
Slide 32
The full “It can do” list: 16 options on the website, 8 on the slide. Hidden on the slide: Set a reminder, Pay / add a pass, Play music, Save or share a file, Drive a robot, Send a notification, A weather API, Building systems.
Slide 32
The four picture icons (database, search, camera, brain). Now line icons.
Slide 34
The line “Built into text fields: Writing Tools and Genmoji.”
Slide 36
Two separate footnotes, now merged into one.
Slide 41
“One demo is one case. Test many.” and “Example: 3 of 4 cases pass, then 4 of 4 after clearer instructions.” Now one shorter line.
Slide 42
The longer labels (“Your phone holds it”, “check access and retention”, “check what is sent and kept”). Now shorter ones.
Slide 45
The labels under the drawing. Now the five boxes you chose to keep.
They show on the reading page, not on the slide.
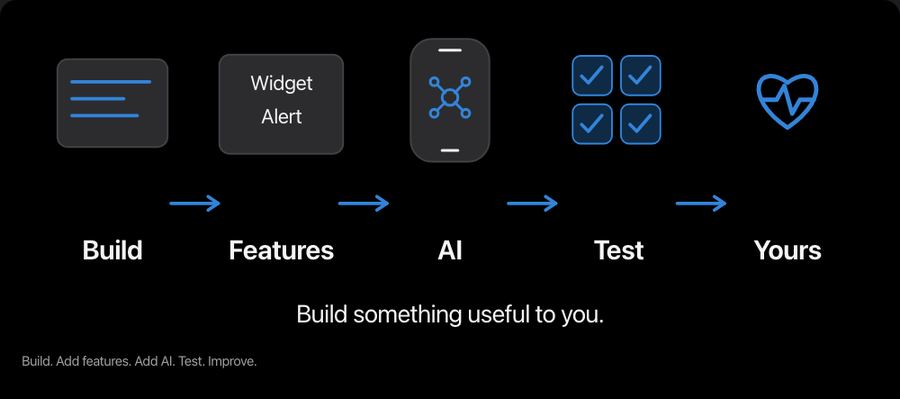
Slide 6 · Build an app. Add AI. Keep improving.
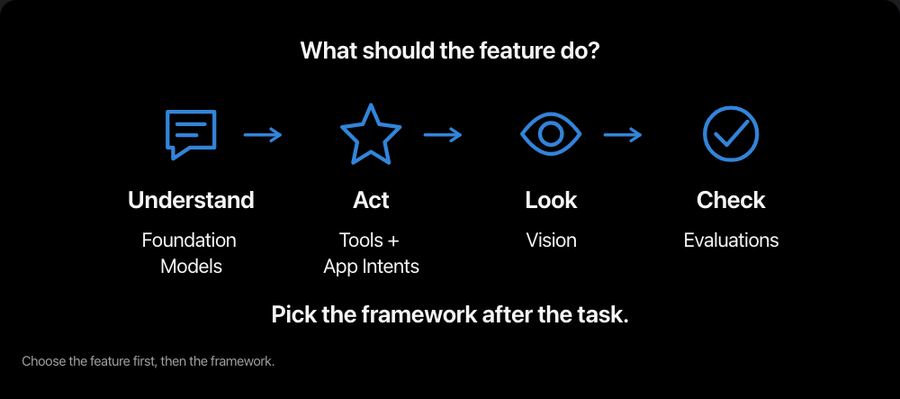
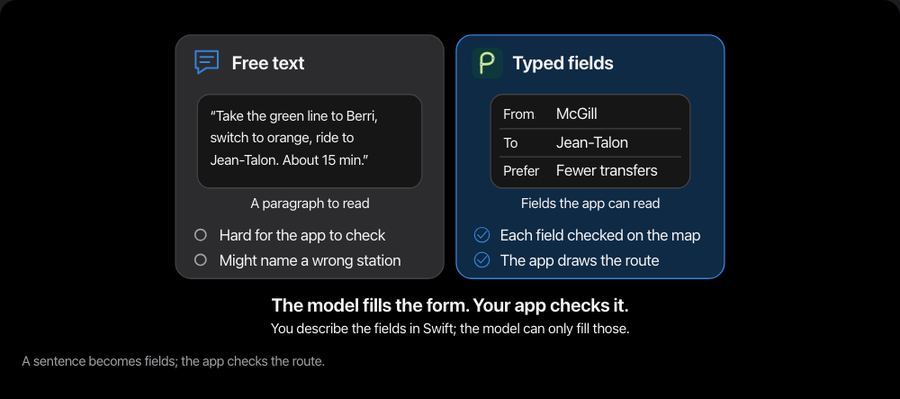
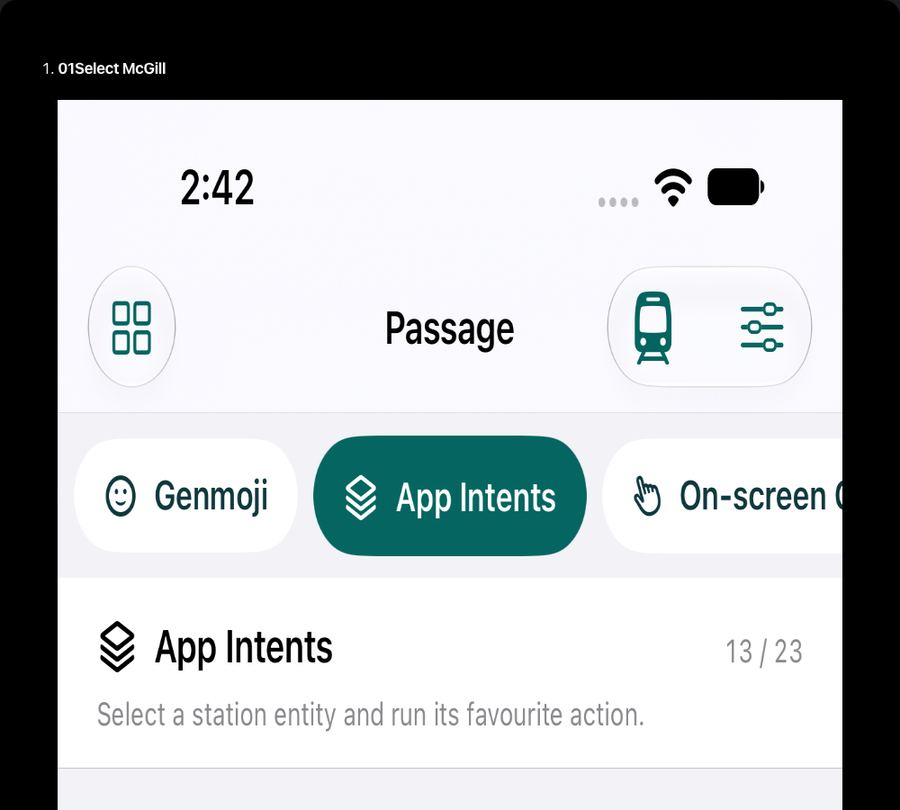
Slide 44 · Build one small change at a time
The picture is how it looks as a slide, or on the website when it has no slide. Adding one means a new slide.
Opening extras
Zoom out from one building to a whole city. What does it look like? What do a city and a computer chip share?
Open on the website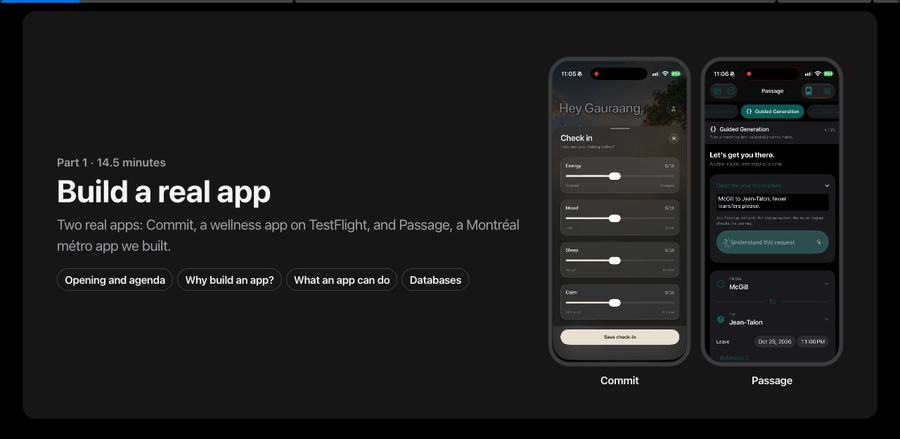
Opening extras
Choose a model, add useful context and actions, then test the result. Explore the technologies behind each step.
Open on the website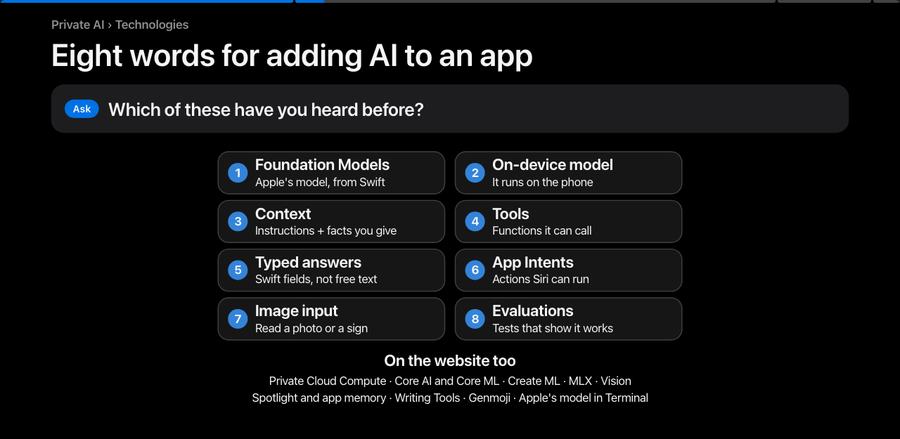
Opening extras
Part 2 uses eight terms. Which do you already know? Which of these have you heard before?
Open on the website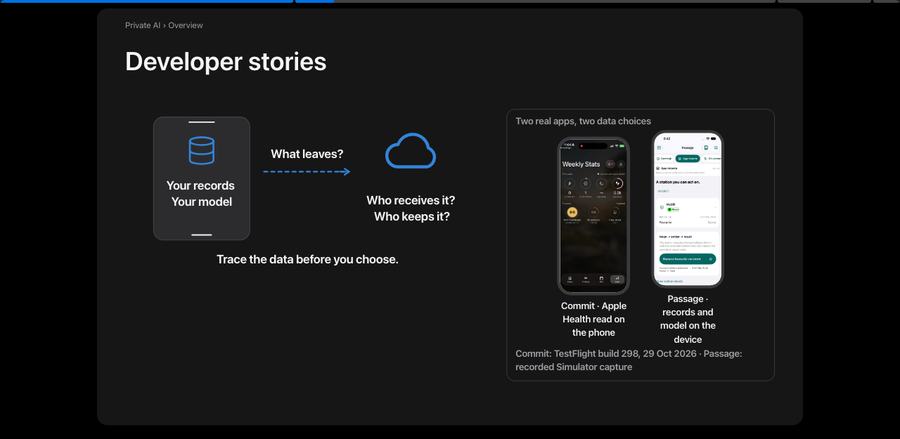
Opening extras
A wellness app for women reads Apple Health on the device and never uploads it.
Open on the website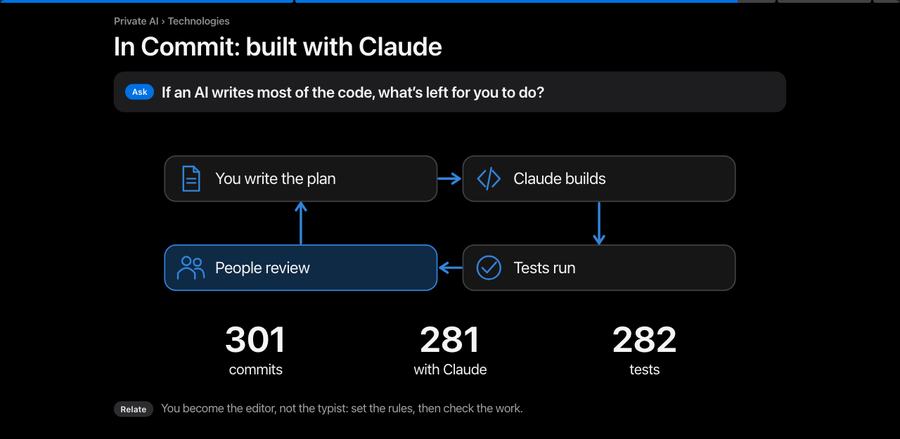
Opening extras
If an AI writes most of the code, what’s left for you to do?
Open on the website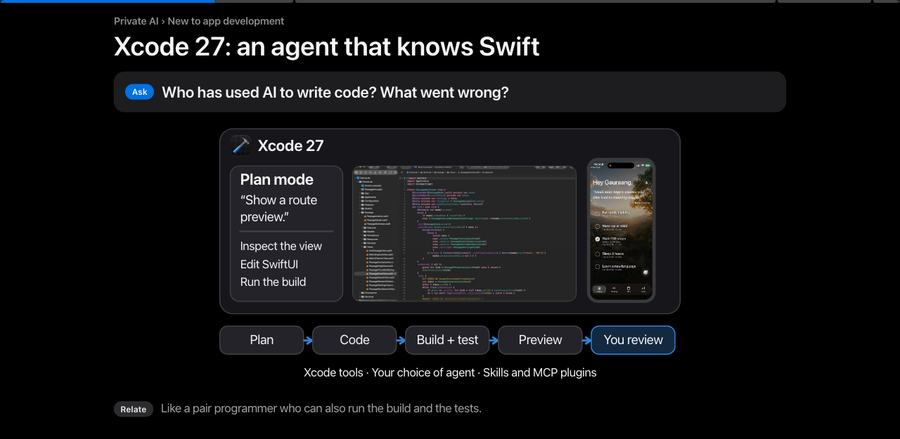
App building
Who has used AI to write code? What went wrong?
Open on the website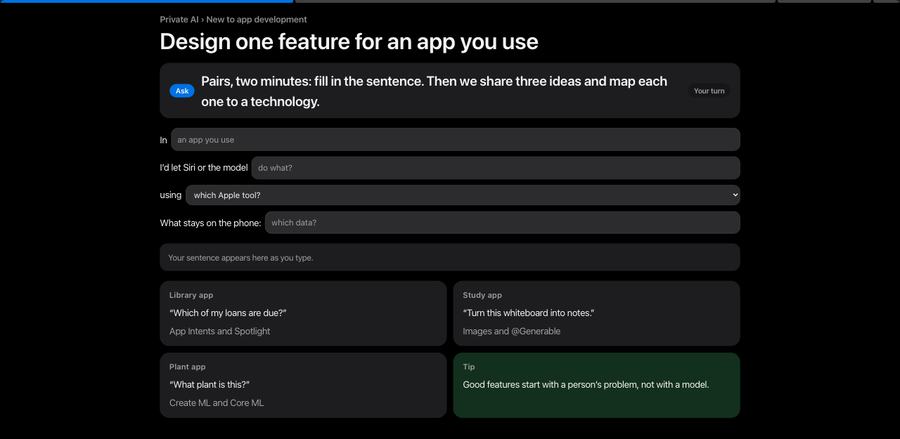
App building
Pairs, two minutes: fill in the sentence. Then we share three ideas and map each one to a technology.
Open on the website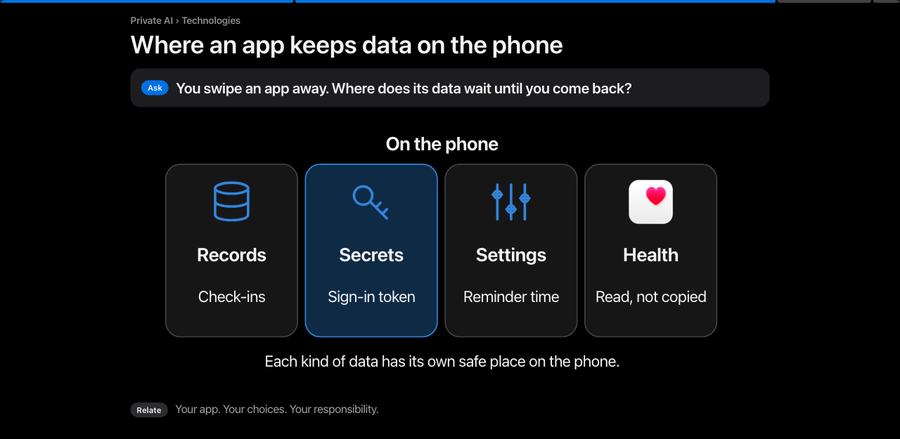
Data
You swipe an app away. Where does its data wait until you come back?
Open on the website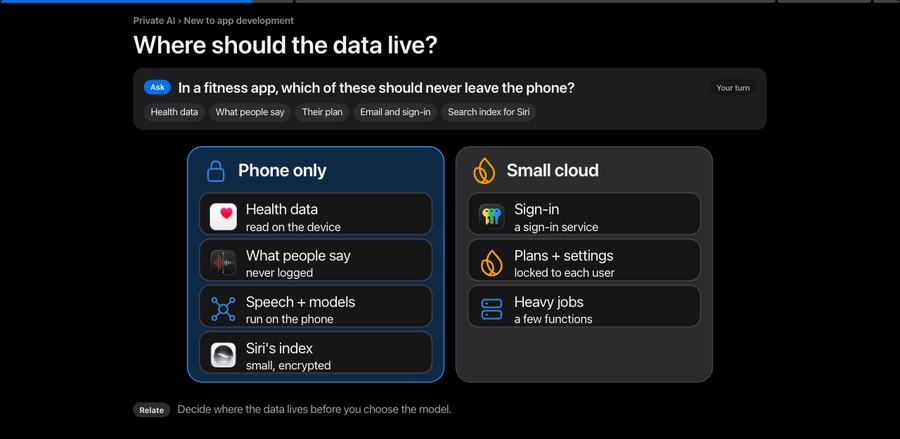
Data
In a fitness app, which of these should never leave the phone?
Open on the website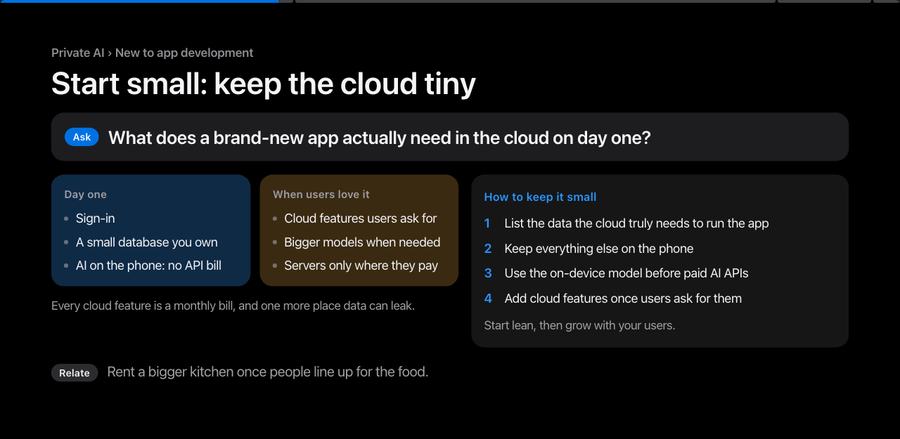
Data
What does a brand-new app actually need in the cloud on day one?
Open on the website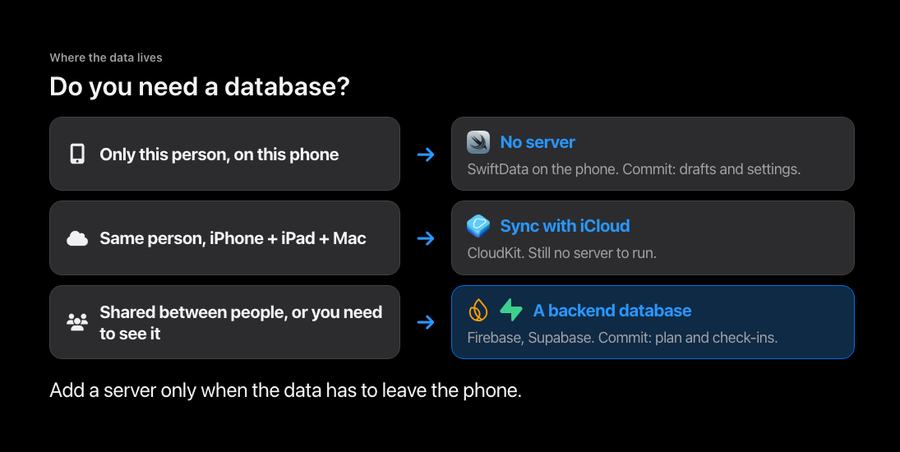
Data
Explain why you need access before you ask.
Open on the website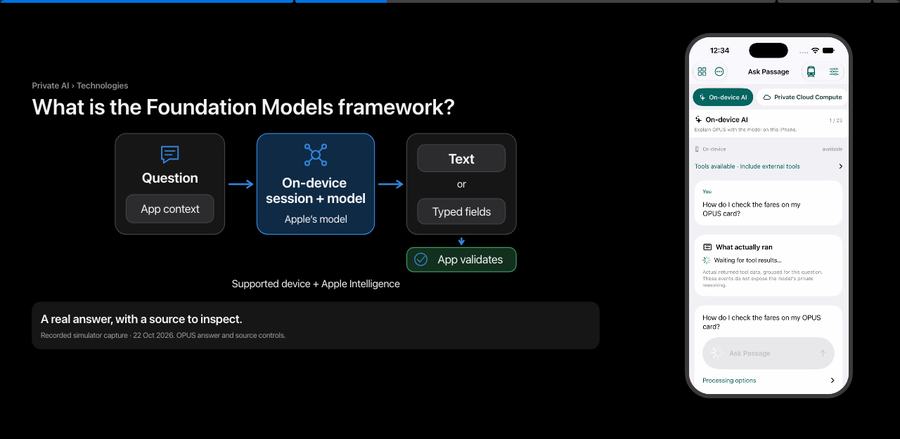
Apple’s AI
Summaries, tags, pulling out fields, short writing, calling your tools.
Open on the website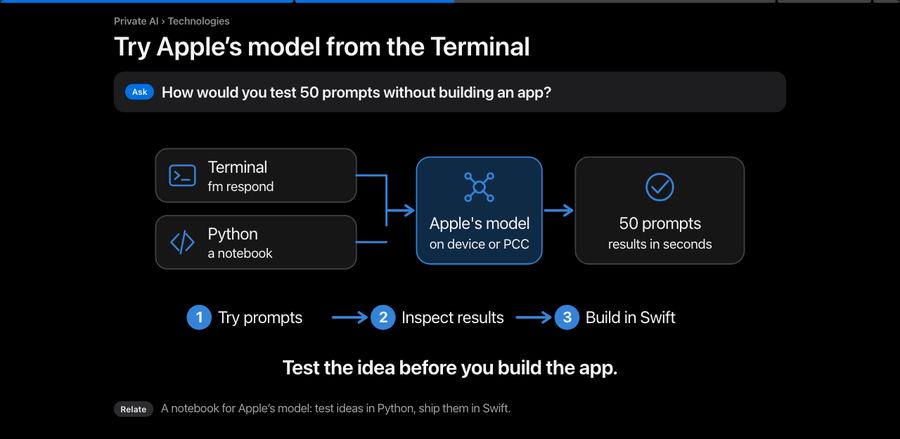
Apple’s AI
How would you test 50 prompts without building an app?
Open on the website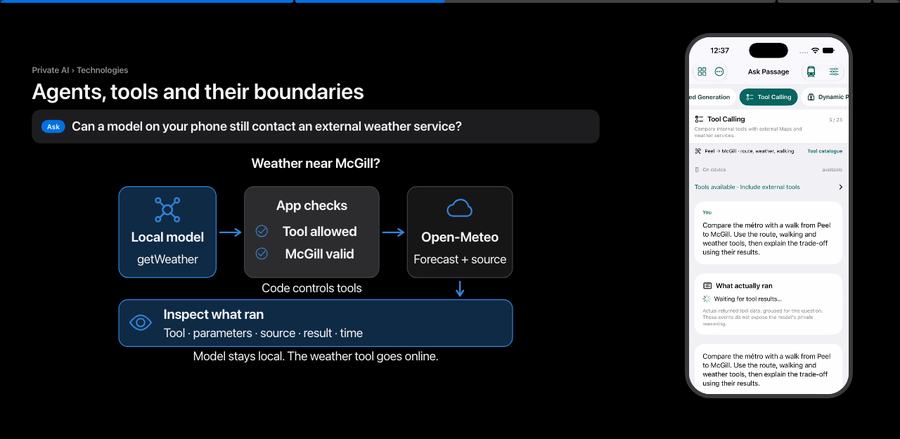
Apple’s AI
Can a model on your phone still contact an external weather service?
Open on the website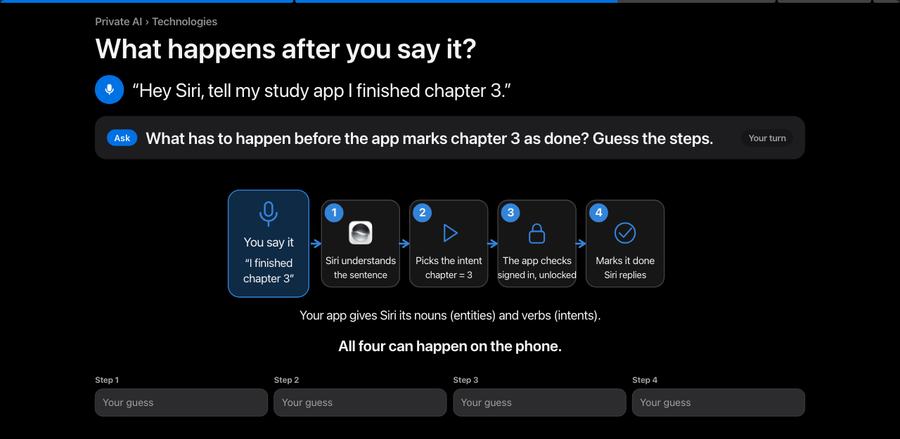
Apple’s AI
What has to happen before the app marks chapter 3 as done? Guess the steps.
Open on the website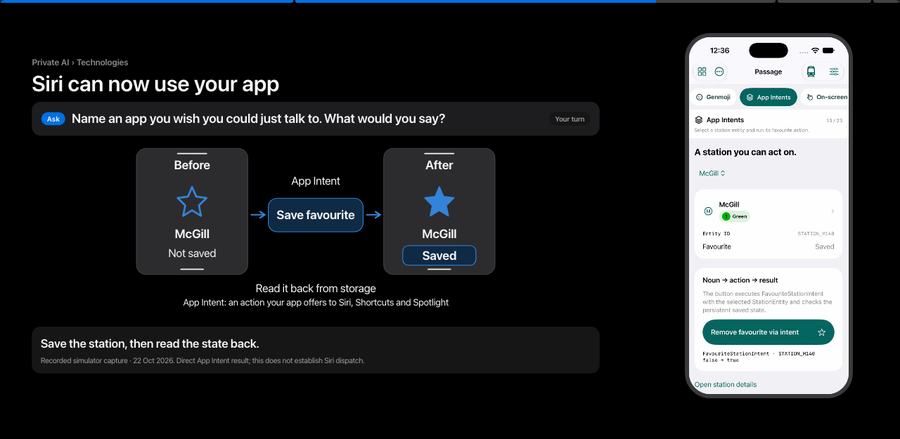
Apple’s AI
Name an app you wish you could just talk to. What would you say?
Open on the website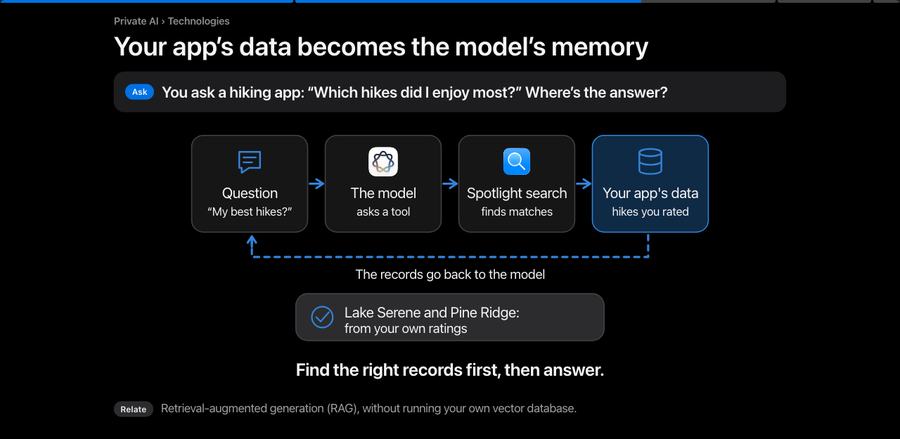
Apple’s AI
You ask a hiking app: “Which hikes did I enjoy most?” Where’s the answer?
Open on the website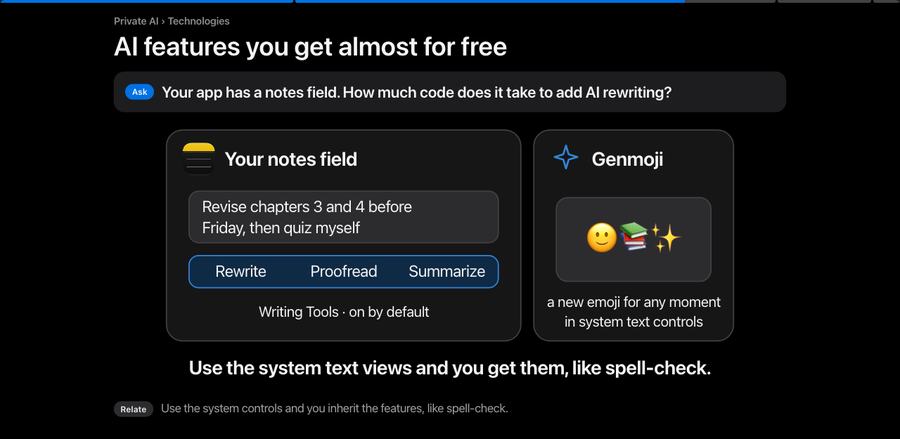
Apple’s AI
Your app has a notes field. How much code does it take to add AI rewriting?
Open on the website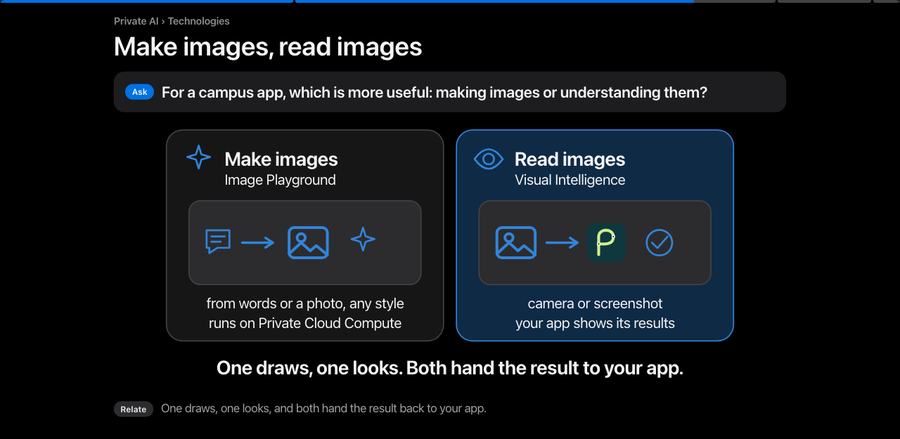
Apple’s AI
For a campus app, which is more useful: making images or understanding them?
Open on the website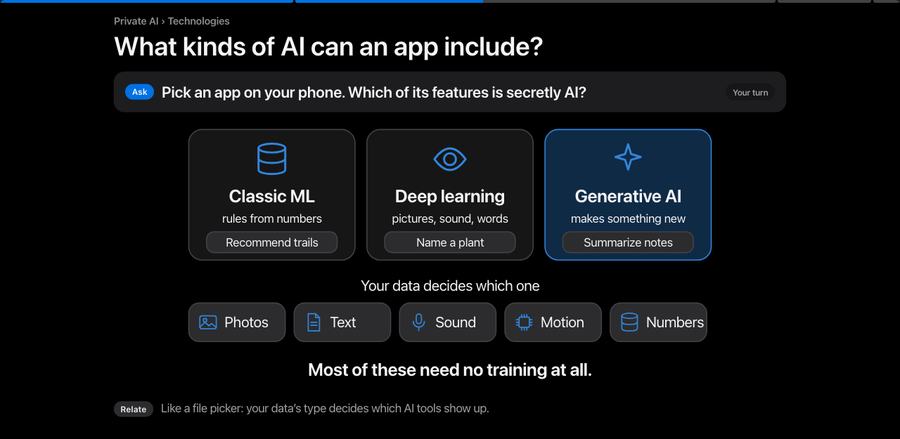
Apple’s AI
Pick an app on your phone. Which of its features is secretly AI?
Open on the website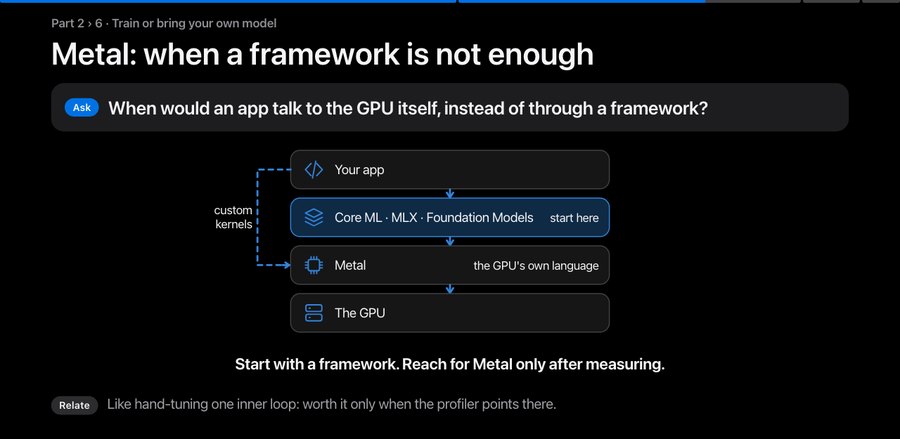
Your own model
When would an app talk to the GPU itself, instead of through a framework?
Open on the website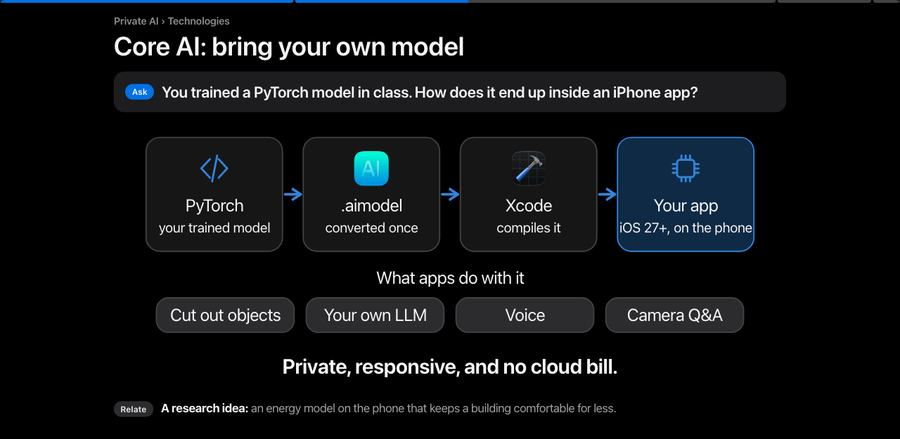
Your own model
You trained a PyTorch model in class. How does it end up inside an iPhone app?
Open on the website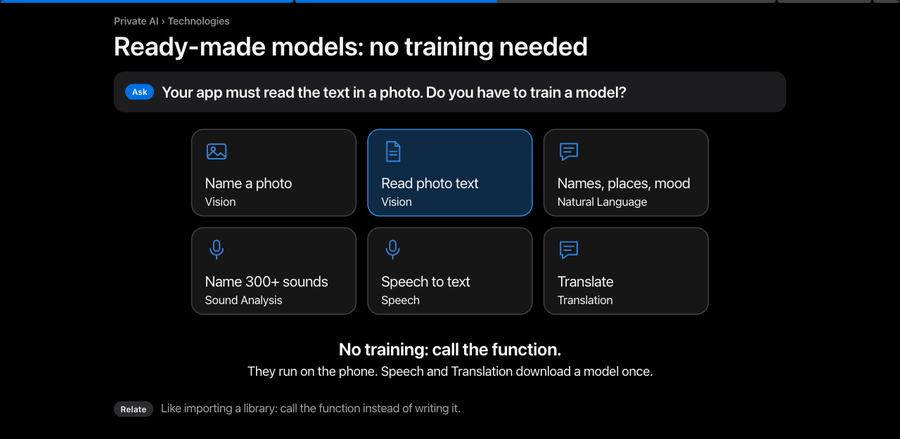
Your own model
Your app must read the text in a photo. Do you have to train a model?
Open on the website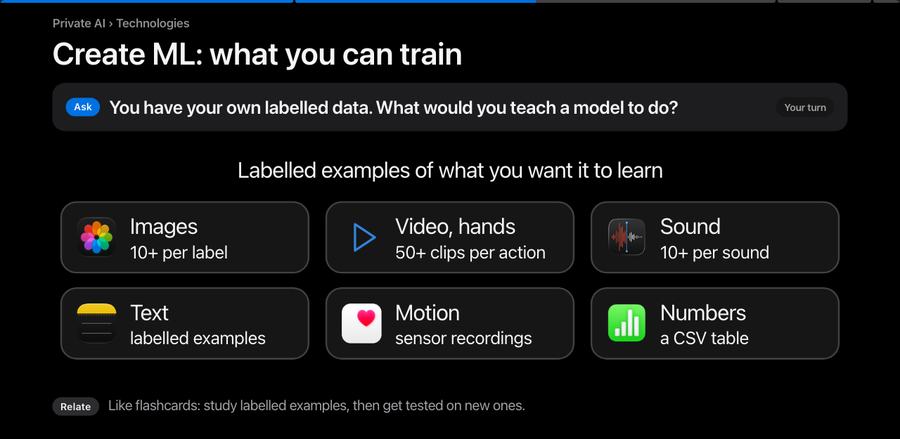
Your own model
You have your own labelled data. What would you teach a model to do?
Open on the website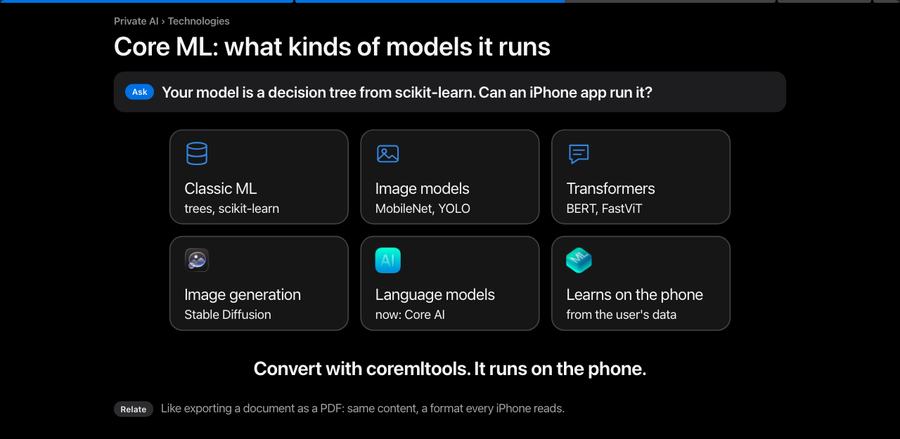
Your own model
Your model is a decision tree from scikit-learn. Can an iPhone app run it?
Open on the website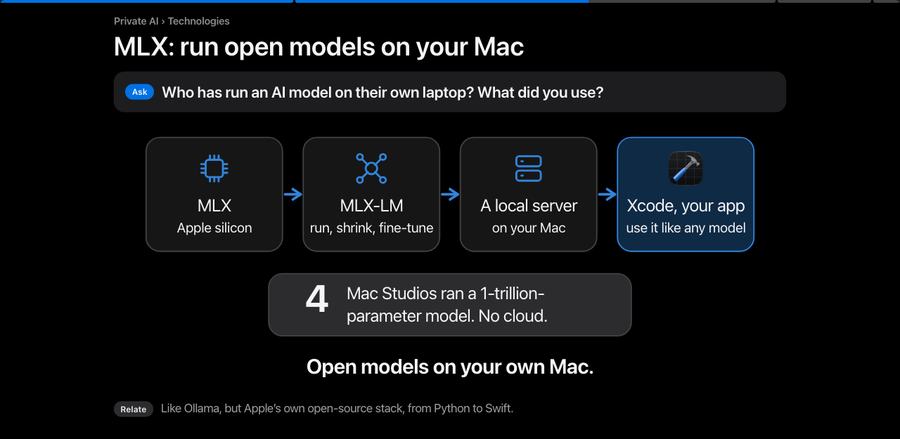
Your own model
Who has run an AI model on their own laptop? What did you use?
Open on the website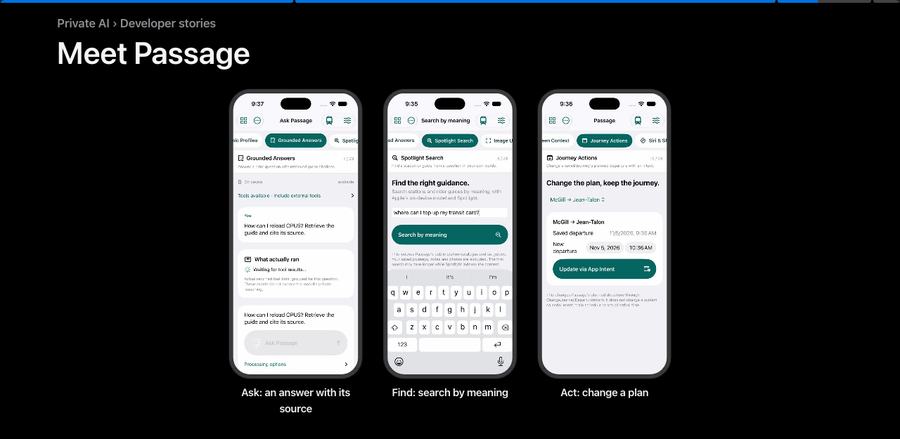
Passage demos
What would make Passage more useful? Suggest a clearer route explanation, a station shortcut or a small change to a journey note. Choose one change we
Open on the website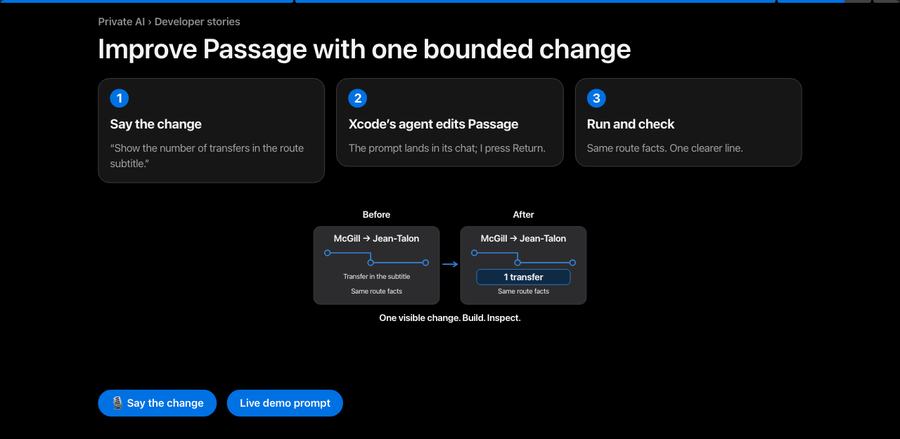
Passage demos
This sign says McGill, Green line, Honoré-Beaugrand. Does that direction fit our journey to Jean-Talon? Does this sign fit our journey to Jean-Talon?
Open on the website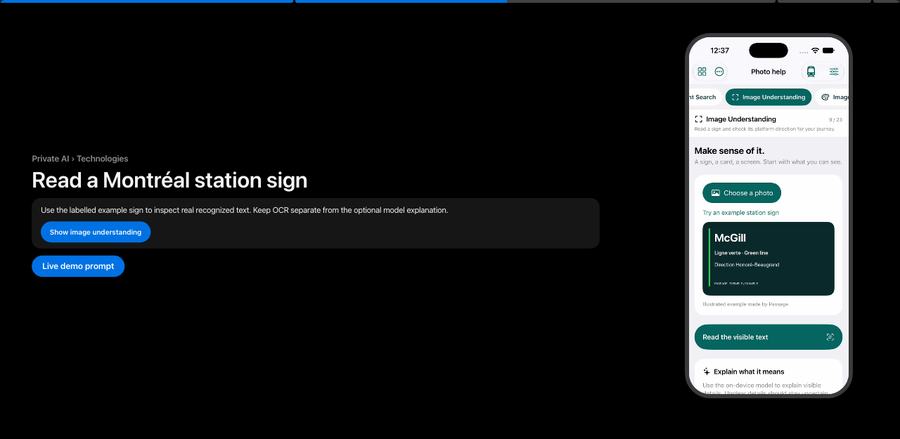
Passage demos
Use the labelled example sign to inspect real recognized text. Keep OCR separate from the optional model explanation.
Open on the website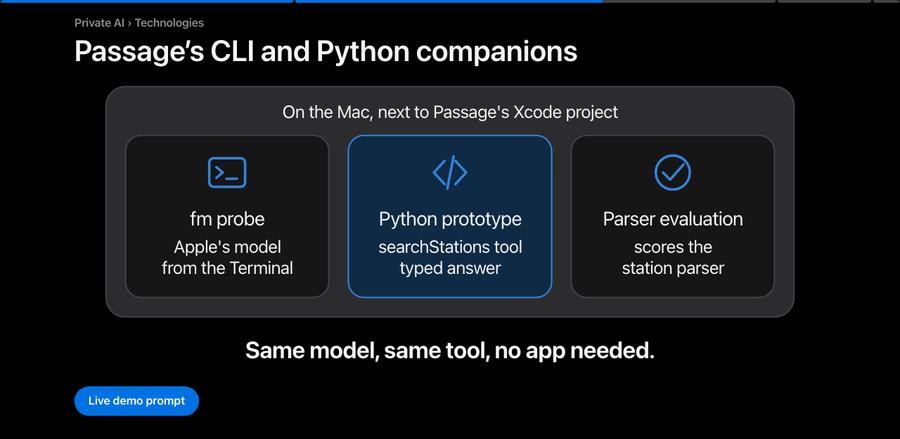
Ship it reviews
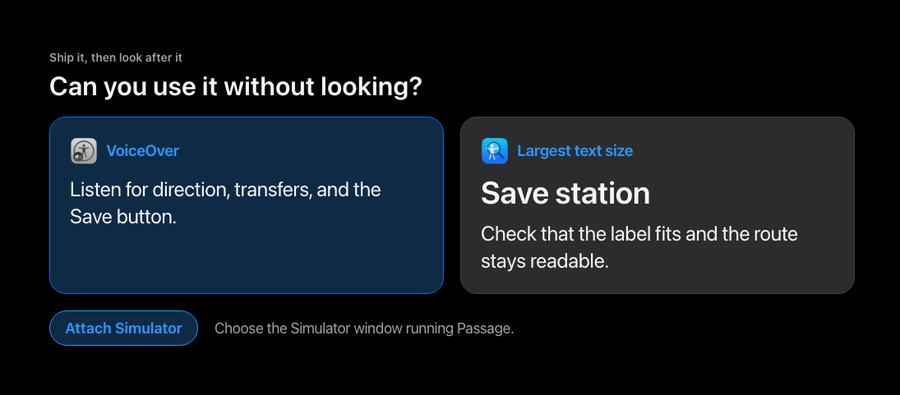
Listen for direction, transfers, and the Save button.
Open on the website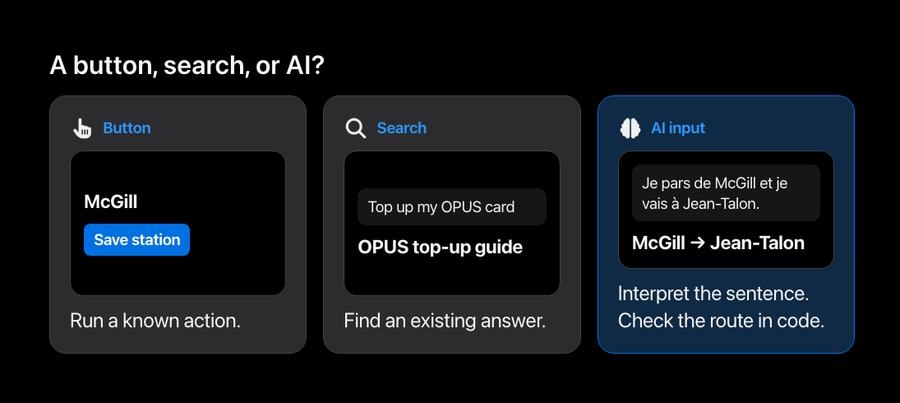
Ship it reviews
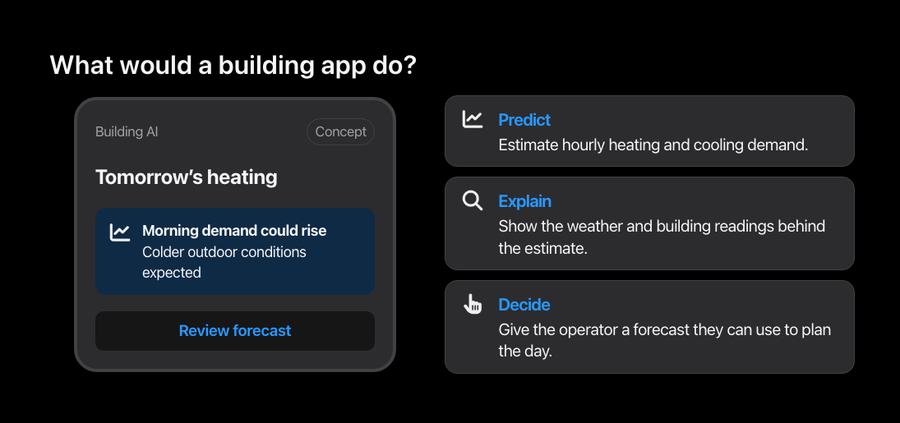
Estimate hourly heating and cooling demand.
Open on the website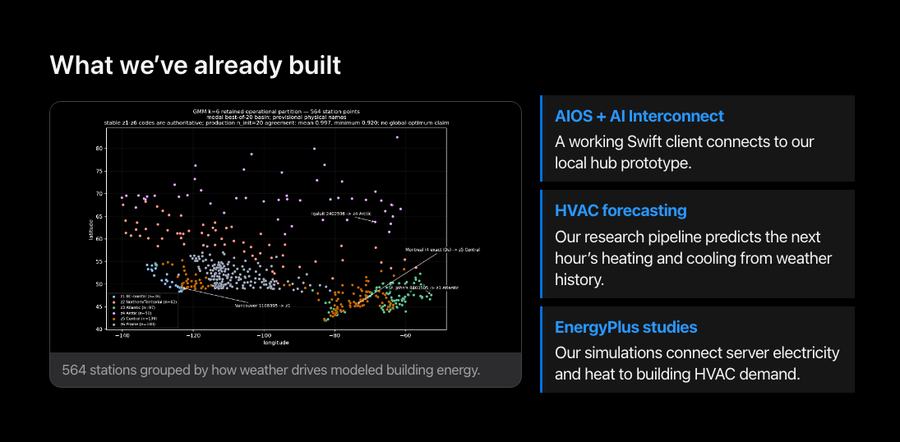
Buildings research
A working Swift client connects to our local hub prototype.
Open on the website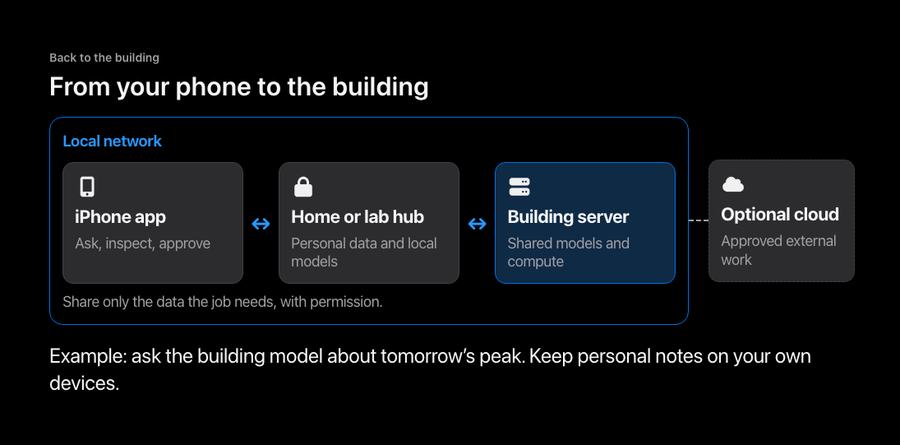
Buildings research
Share only the data the job needs, with permission.
Open on the website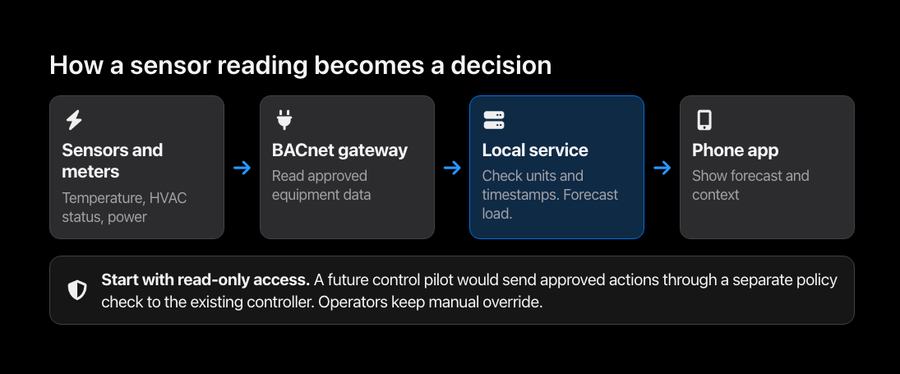
Buildings research
Start with read-only access. A future control pilot would send approved actions through a separate policy check to the existing controller. Operators
Open on the websiteBuildings research
Run suitable tasks on your phone or home computer.
Open on the website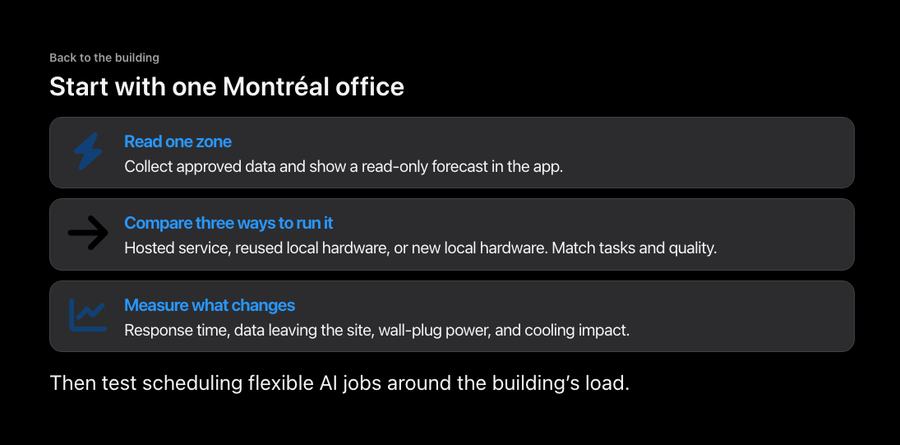
Buildings research
Collect approved data and show a read-only forecast in the app.
Open on the website



Other
An optional field lets the new build read older profiles. Test both builds against profiles with and without the field. If a shipped build replaces th
Open on the websiteScan once: your phone follows the talk.
Connecting…
CommitWhy a native app, then Swift and Xcode.
Device features, reminders, and Apple services.
Where Commit’s data lives, when a feature changes the database, and how to protect existing records.
Use a pretrained model, train a small one, or bring a model you already have.
Compare three builds, test the update, and release the build you verified.
Opening
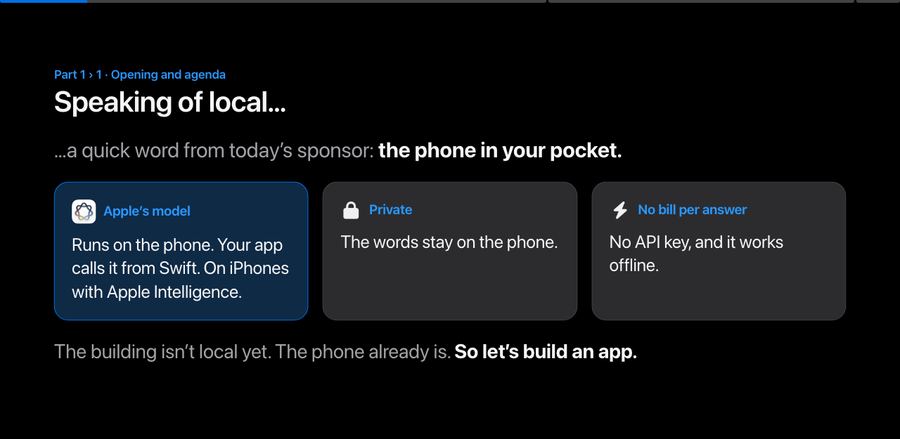
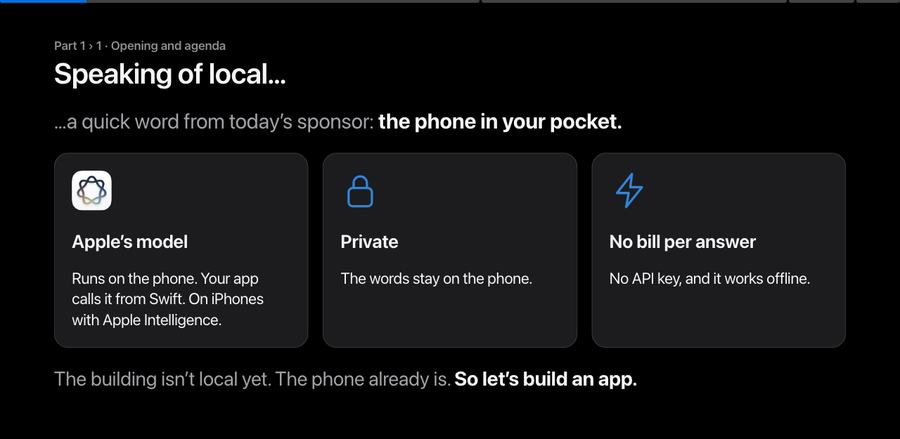
…a quick word from today’s sponsor: the phone in your pocket.
The building isn’t local yet. The phone already is. So let’s build an app.
Ship it, then look after it

 VoiceOver
Listen for direction, transfers, and the Save button.
 Largest text size
Save station
Check that the label fits and the route stays readable.
Choose the Simulator window running Passage.
Ship it, then look after it
Listen to the check-in fields and the selected state with VoiceOver.
Use the largest text size and check that each answer stays readable.
ButtonRun a known action.
 Search
Find an existing answer.
AI inputInterpret the sentence. Check the route in code.
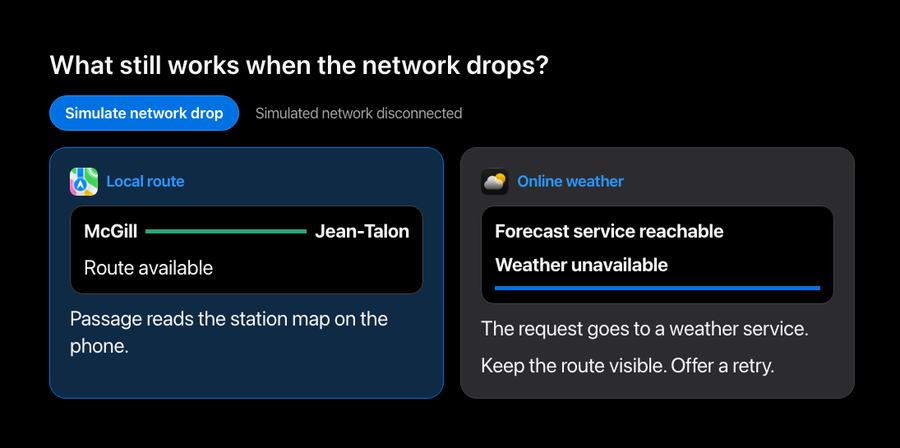
Local routeRoute available
Passage reads the station map on the phone.
Online weatherThe request goes to a weather service.
Keep the route visible. Offer a retry.
Morning demand could riseEstimate hourly heating and cooling demand.
Show the weather and building readings behind the estimate.
Give the operator a forecast they can use to plan the day.
A working Swift client connects to our local hub prototype.
Our research pipeline predicts the next hour’s heating and cooling from weather history.
Our simulations connect server electricity and heat to building HVAC demand.
Back to the building
iPhone appAsk, inspect, approveHome or lab hubPersonal data and local modelsBuilding serverShared models and computeShare only the data the job needs, with permission.
Optional cloudApproved external workExample: ask the building model about tomorrow’s peak. Keep personal notes on your own devices.
Sensors and metersTemperature, HVAC status, powerBACnet gatewayRead approved equipment dataLocal serviceCheck units and timestamps. Forecast load.Phone appShow forecast and contextStart with read-only access. A future control pilot would send approved actions through a separate policy check to the existing controller. Operators keep manual override.
Back to the building
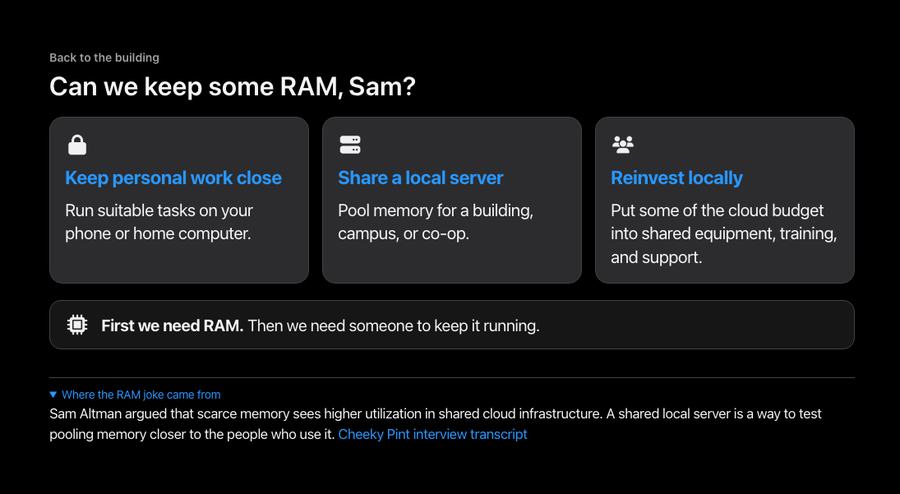
Run suitable tasks on your phone or home computer.
Pool memory for a building, campus, or co-op.

Put some of the cloud budget into shared equipment, training, and support.
First we need RAM. Then we need someone to keep it running.
Sam Altman argued that scarce memory sees higher utilization in shared cloud infrastructure. A shared local server is a way to test pooling memory closer to the people who use it. Cheeky Pint interview transcript
Back to the building
Collect approved data and show a read-only forecast in the app.

Hosted service, reused local hardware, or new local hardware. Match tasks and quality.
Response time, data leaving the site, wall-plug power, and cooling impact.
Then test scheduling flexible AI jobs around the building’s load.
Where the data lives
Only this person, on this phoneNo serverSwiftData on the phone. Commit: drafts and settings.Same person, iPhone + iPad + Mac Sync with iCloudCloudKit. Still no server to run.Shared between people, or you need to see it

 A backend databaseFirebase, Supabase. Commit: plan and check-ins.
Add a server only when the data has to leave the phone.
Databases
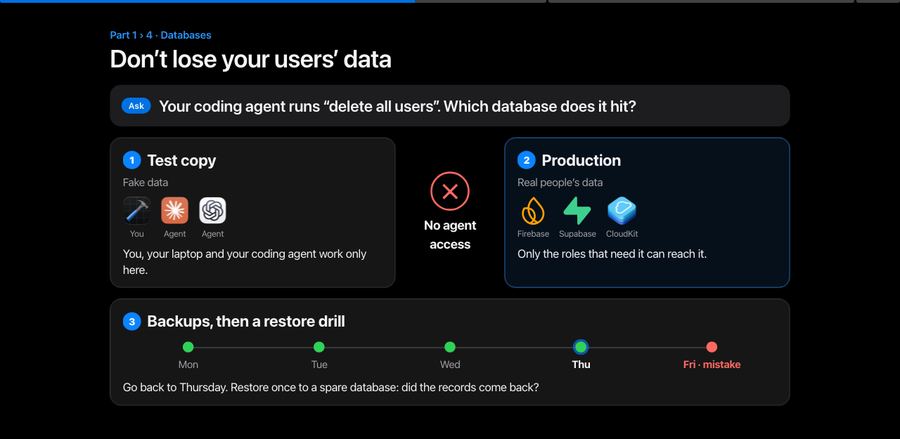
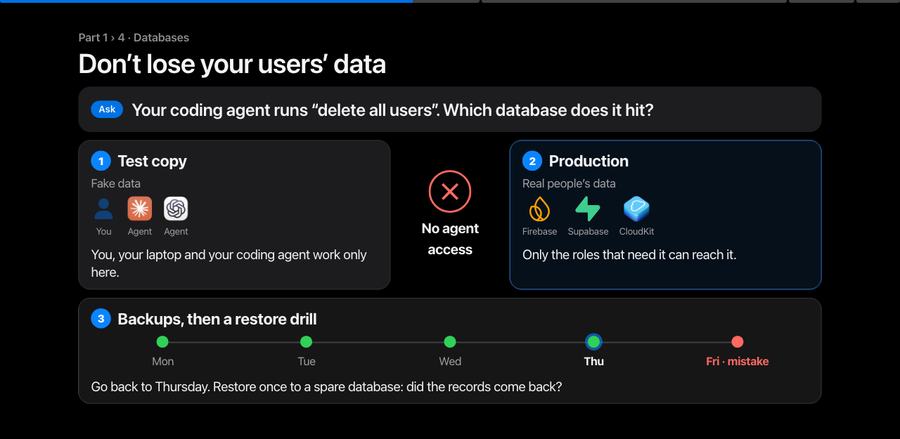
Your coding agent runs “delete all users”. Which database does it hit?
Fake data

You, your laptop and your coding agent work only here.
Real people’s data
Only the roles that need it can reach it.
Go back to Thursday. Restore once to a spare database: did the records come back?
Databases
Alex · saved before the update
Name: Alex
no Cycle
Sam · saved after the update
Name: Sam
Cycle: tracks
Then the old app edits Sam’s name
An optional field lets the new build read older profiles. Test both builds against profiles with and without the field. If a shipped build replaces the entire profile, a separate document can keep the new value out of its write path.
Firestore field updates · Firestore rules for optional fields
Databases
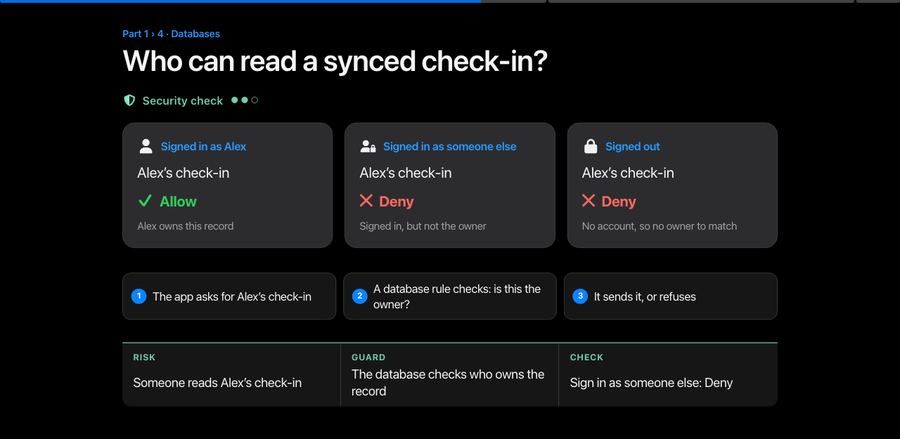
Security check
The app asks: save Alex’s gender
Only the owner
gender: "woman"Allowcycle: "day 12"Denygender: 1AllowOnly the app’s own fields. 0/1 is the same choice, as a smaller code.
Only what another device needs
The rules live in the database, not in the app, so a changed or copied app can’t skip them. Firebase keys in an app are not secrets: the rules do the protecting.
gender: 1 is the same answer as “woman”, stored as a code: the app turns 0 or 1 back into the word it shows. A number is smaller and easier for the rules to check (only 0 or 1 passes), as long as the app and the rules use the same list.Firestore rules for access by account · Firestore rules for specific fields · App Review 5.1.3
Databases
Each role has its own permissions. The overlap is what both can do.
Role-based access control (RBAC). The server checks whether your role allows the action.
Privacy · All three checks
Security check
Alex’s cycle answer: where could it leak?
Deny every permission once
Try each wrong case
Trace what leaves
Privacy
Ask for permissionExplain why you need access before you ask.
Send only what the task needsA model summarizing a workout needs the workout details.
Explain collectionTell people what the app and its providers collect.
Your own models
McGill · Live answers
Connecting…
NowLive demo
One idea per phone. It shows on the big screen without your name.
The screen shows totals and the ideas you send, never names. Nothing is saved.